The Web Client is full of features to make it easier to work with assets without installing the client-side desktop applications. This powerful tool can let external users connect to a Zoom Preview Server and view a shared collection of assets from anywhere with only as much as a shared link. The internal Zoom users can do much more. They can upload, edit, clip, share, comment on, or review assets. They can group assets into collections. These collections of assets can easily be shared with Zoom users, external users using email IDs or anyone anonymously through a public weblink.
All Zoom users that are assigned to a project can log into the Web Client. The assets displayed are as per the roles and projects assigned to the logged-in Zoom user. All asset operations like uploading, editing, cropping, adding text, clipping, commenting on or approving are also permission-based.
The permissions for collections are managed separately. These are not based on Zoom permissions. Check the Collection types and permissions section for more details.
To open the Web Client, open the URL http://[YourZoomPreviewServer]:8873/webclient in a web browser. Here, [YourZoomPreviewServer] is the hostname or IP address of your Zoom Preview Server. 8873 is the usual port for non-SSL setups, but check the port in use for your Zoom setup. The protocol HTTPS may be used instead of HTTP if SSL is implemented for your Zoom setup. Again, the port for SSL setups is usually 8973, but you should check with your Zoom administrator. On launching the Web Client, a login screen is shown to log into Zoom, or it may auto-login based on an existing user session.
After logging in, let us see which sections are available for use in the Web Client. The major components are Home, Assets, Collections, Sharing collections and Searching for assets. These are explained in detail below:
Home
The Homepage is shown after login. Alternatively, click the logo ![]() on the top left of any page to go to the Homepage.
on the top left of any page to go to the Homepage.
The logged-in user’s profile picture is shown in the top right corner of the window (next to the notification icon if it is available). Click the profile picture to open the User menu. The user may update their password or profile picture by clicking Edit User Profile. The right side panel on the Homepage shows activity and comments in the projects accessible to the logged-in user.
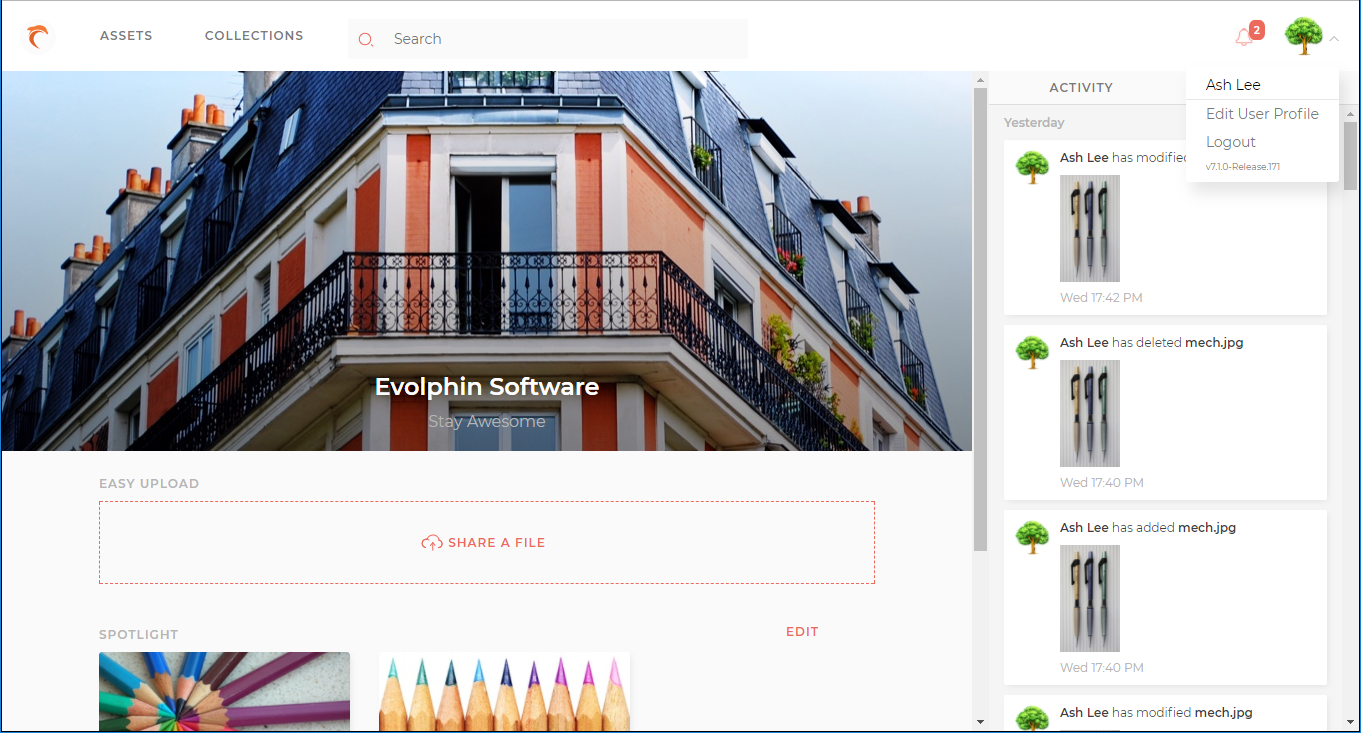
If we scroll down, the logged-in user’s favorite assets are displayed (if the user has favorite assets). To add or remove an asset as a favorite, click the star  in the bottom right of the asset’s thumbnail. Asset thumbnails are visible on the Asset list and Collection details pages in the Web Client. Check the Assets and Collection details sections for details.
Spotlight assets are also displayed if these are configured by the admin. Only admin users can add or remove spotlight assets. Click Edit in the Spotlight section. Click the  button to add assets to the spotlight. Click
 button on any asset in the spotlight to remove it. Alternatively, add an asset to the Spotlight using the menu on the asset’s thumbnail (visible on the Asset list and Collection details pages). Check the Assets and Collection details sections for details.

Uploading Assets
You can upload files conveniently through the home page by dropping them in the Easy Upload box. Alternatively, to browse for assets to upload, click the  link. In the Open window, select one or more assets to upload and click Open to begin uploading.
The upload status window shows  when uploading is complete. Click Done.
From Zoom 7.1, users may also upload assets by dropping on the Assets list or Collection detail page. Check the Assets and Collection details sections for more information.
Notifications
If the logged-in user has any unread notifications, then the bell  icon is shown on the top right corner of all pages. The notification icon also shows the unread notification counts for the user. Click the bell to open the notifications panel on the left side of the page.
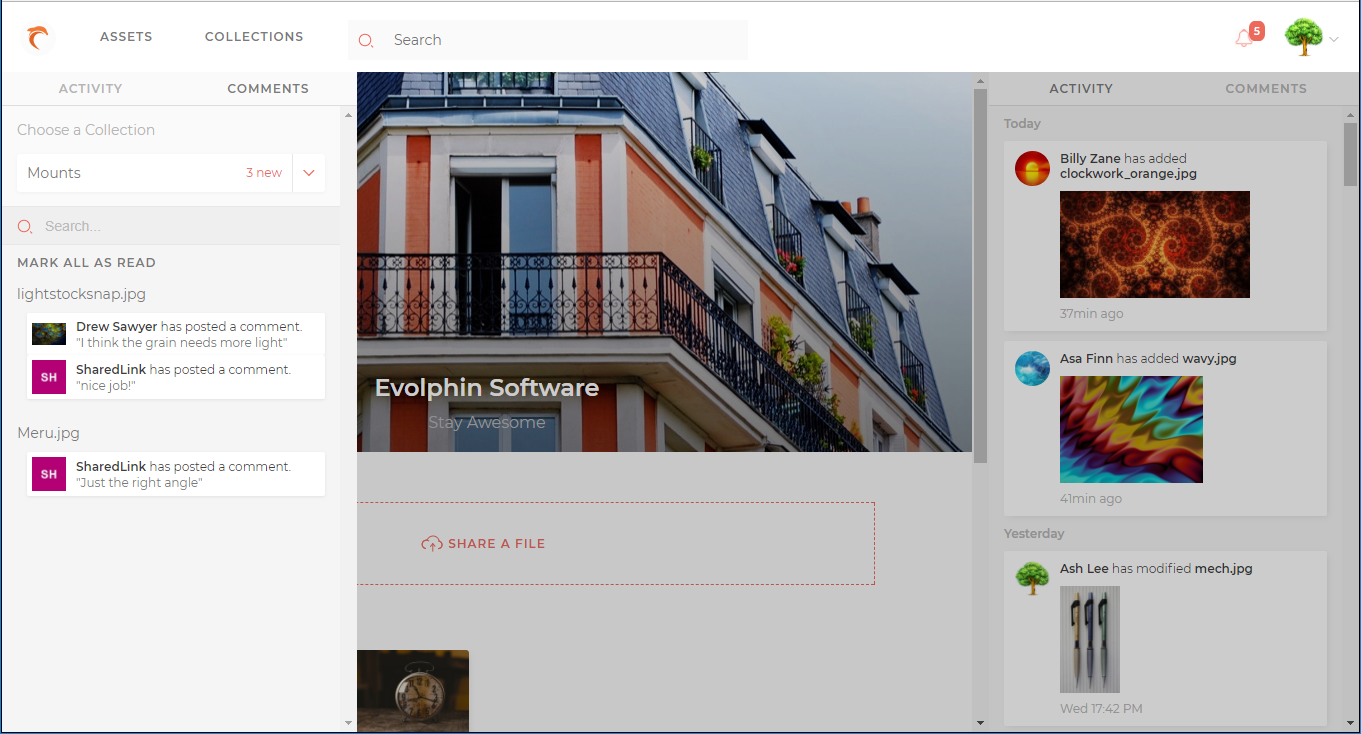
In the Notifications panel, view comments for a collection by selecting the collection in the Comments tab. Click any comment to go to the Asset in collection page showing all comments on the asset. The Asset in Collection page is shown here.
Click on the bell icon again to hide the Notifications panel.
Assets tab – Assets listing
The assets page shows assets available to the logged-in Zoom user as asset thumbnails under projects and collections visible to the logged-in Zoom user. Only those assets are shown which are accessible to the user for their role and assigned projects. This is the same set of assets that are visible to this user inside the Asset Browser. The user is also allowed those operations on the assets that they can perform in the Asset Browser.
From Zoom 7.3 onwards, by default, assets are displayed hierarchically under their respective projects. Alternatively, a comprehensive list of all assets available for the logged-in user is also available by toggling the Folder Navigation mode as explained below. This view is similar to the way assets were shown on the Assets page before Zoom 7.3.

By default, the Folder Navigation Mode is enabled. In this viewing mode, the user can also choose whether to view the folder tree or not. By default, the Folder Tree is enabled so the folder tree structure is displayed on the left side of the page. Choose to disable only the Folder Tree or the Folder Navigation Mode altogether by clicking the sliders for each of these in the Configure View menu. Click the Configure View  button to access the Configure View menu.
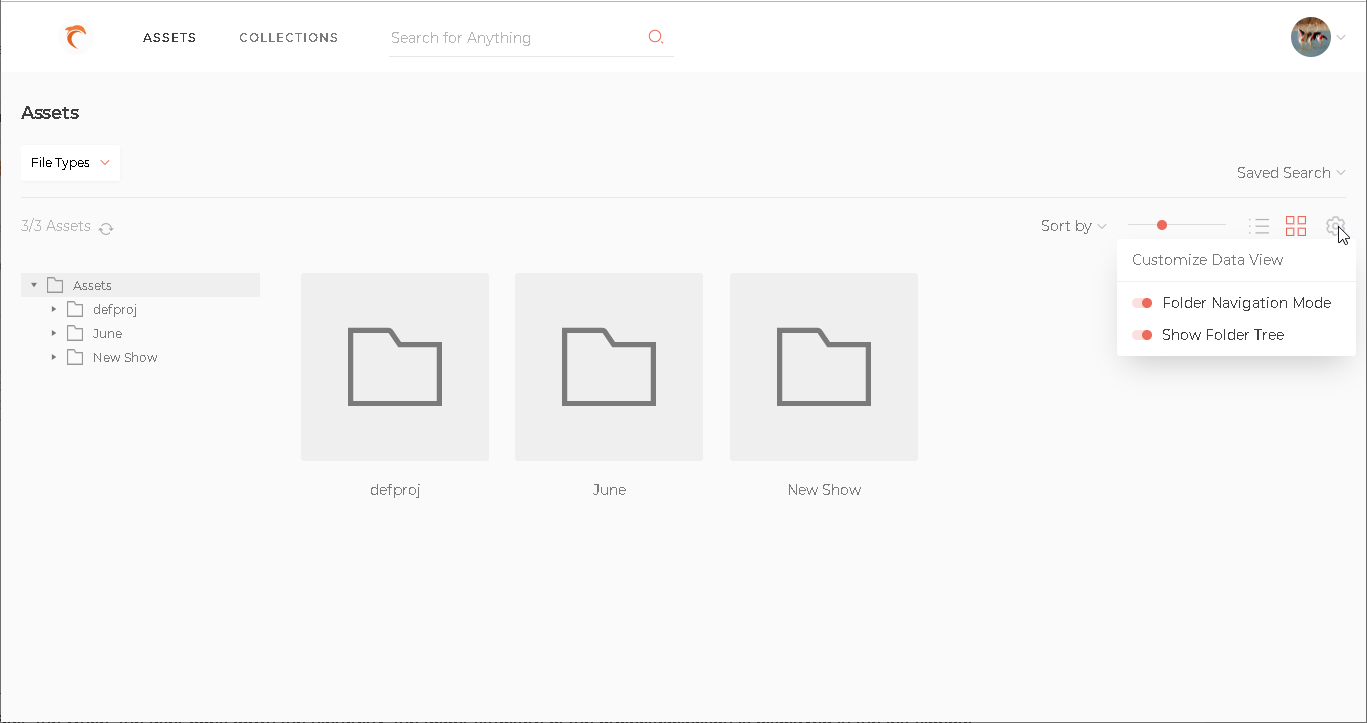
When only Folder Tree is disabled then the assets are displayed in their respective folders as per the Zoom repository but the folder tree is not visible on the left side.

The number of assets visible against the number of assets filtered is shown above the assets display panel. The filters applied are also shown above the assets display. See more about filtering here. Right after the asset numbers is a reload button  . It refreshes the assets display so any changes to the assets like additions, deletions, or metadata changes since the last refresh are also reflected.

The + New Folder button allows users to create sub-folders within a folder viewed in the Assets page. If the Folder Navigation mode is disabled then the + New Folder button also disappears.
In the far right, the Sort By drop-down shows the sort parameters along with sort orders. The selected sort parameter and order are prefixed with a ![]() . The thumb size slider next to sort options changes the thumbnail size of the assets. (Reset) restores the assets display to the default thumb size. The view buttons,
. The thumb size slider next to sort options changes the thumbnail size of the assets. (Reset) restores the assets display to the default thumb size. The view buttons, 
 are for choosing the way assets are displayed, list, grid, or mosaic.
 view is not available from Zoom 7.3 onwards.
The Configure View button on the right corner also lets you configure metadata that is displayed with the asset thumbs. Zoom remembers these view configurations between successive logins of a user. Click on the Configure View button to access the Configure View menu and select Customize Data View option.
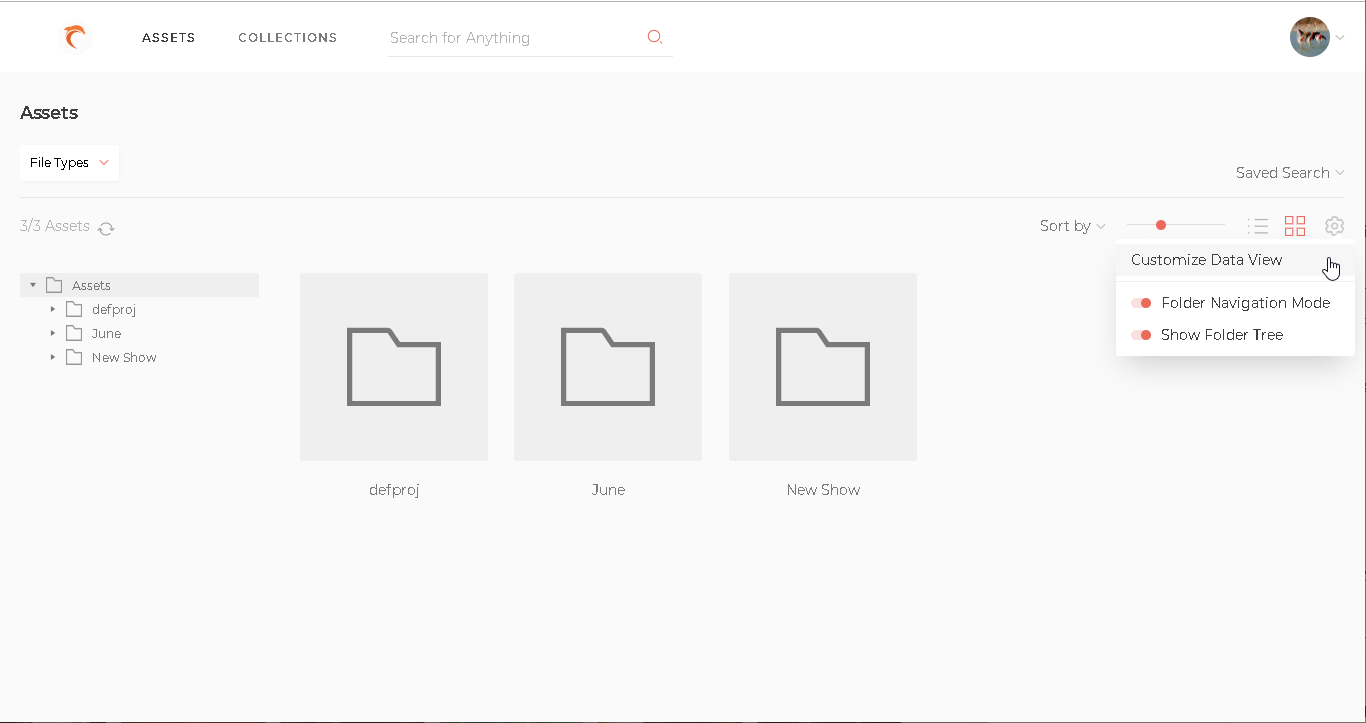
The Customize View window is displayed. The user can select or remove additional information to be shown about the assets on the asset thumbs in the Assets page. The user can also search within the metadata fields using the Search box on top.
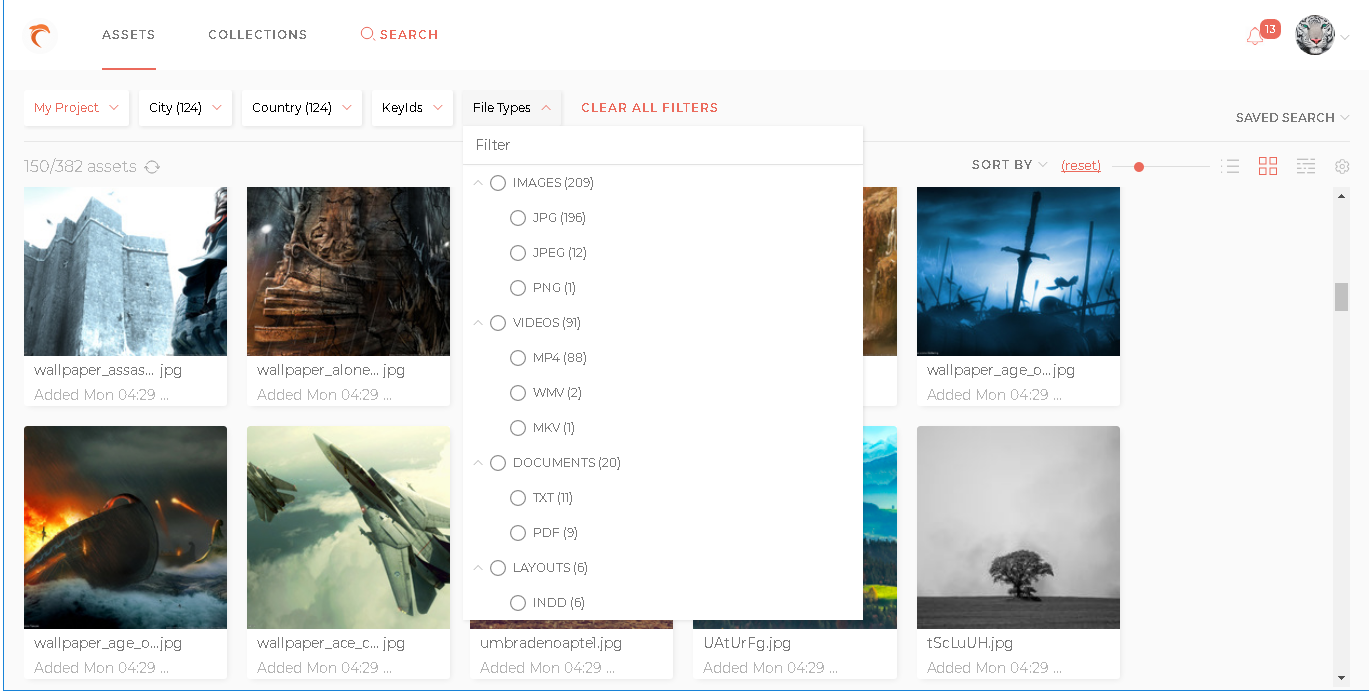
Filtering Assets
The assets displayed can also be narrowed down using filters above the assets display. The filters work when the Folder Navigation mode is enabled or disabled. Select one or more filtering criteria to filter assets that meet all selected criteria. Click Clear All Filters to remove all filters and see all available assets for the user again.
These filtered searches may be saved from the Saved Search menu in the right corner. You can also load previously saved searches from the list.

Actions on Asset thumbnails
Some actions may be performed on the asset thumbnails displayed on the Assets page. Favorite or unfavorite an asset by hovering over the asset thumb and then clicking the star that appears in the lower left corner of the asset thumbnail as shown in the image below.

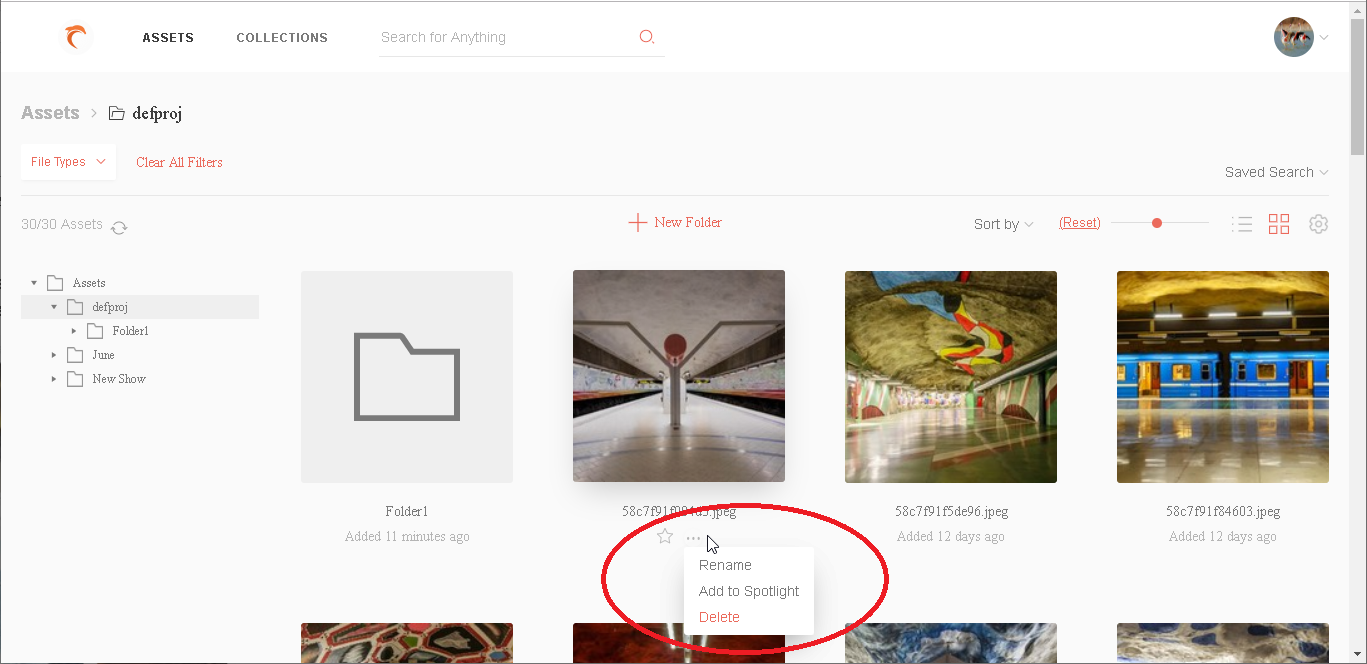
To rename or delete an asset, hover over the asset thumb and click … for a popup menu of options as shown below. A user with admin rights on a project also gets the option to add an asset to the spotlight from this popup menu. For other users, Add to Spotlight is not available.
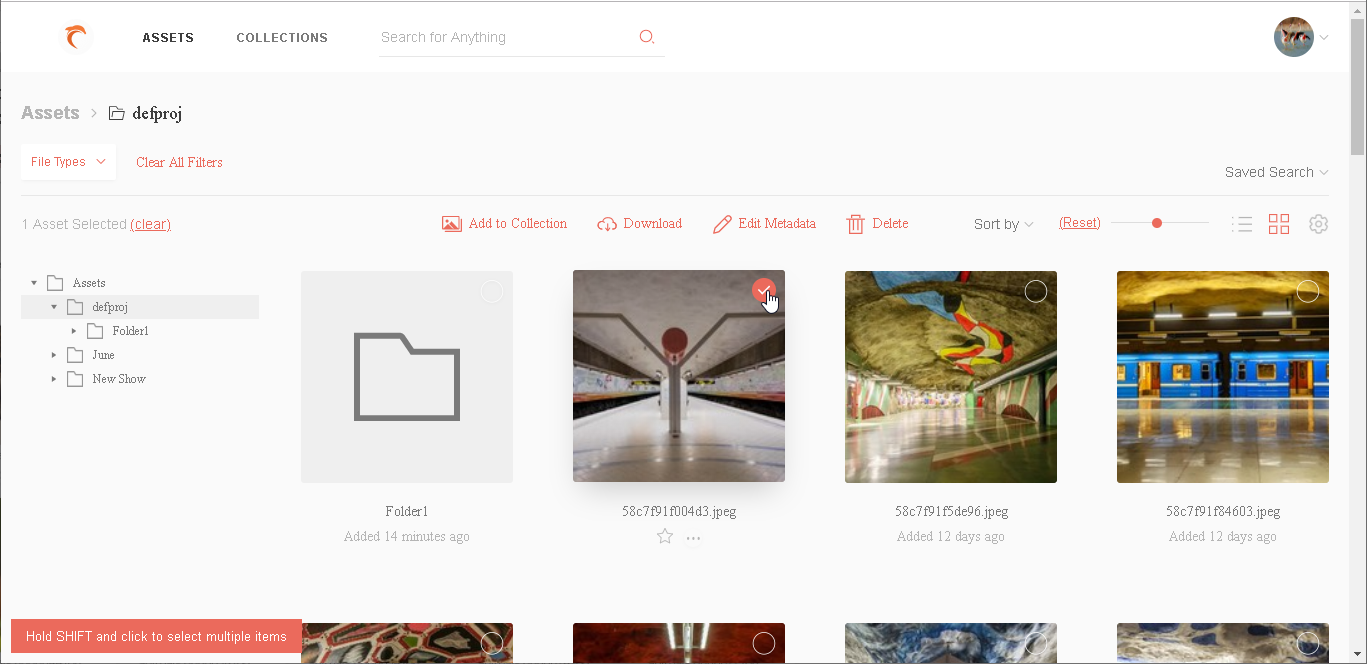
When you hover over an asset thumb, another option is to select the asset by clicking the select circle in the top right corner of the asset thumbnail. With at least one asset selected, click anywhere on another asset thumbnail to alternately select or deselect it. After selecting an asset, you can also hold the Shift key and click on another asset thumb to select all assets between the two.
A selection menu bar appears above the assets display panel when at least one asset is selected. The selection menu has actions to perform on the selection. From the selection menu, you can choose to add assets to a collection , download assets
 , edit asset metadata
 , or delete assets
 .
.
Click (clear) to deselect assets and stop working with the selection. The selection menu bar also disappears.
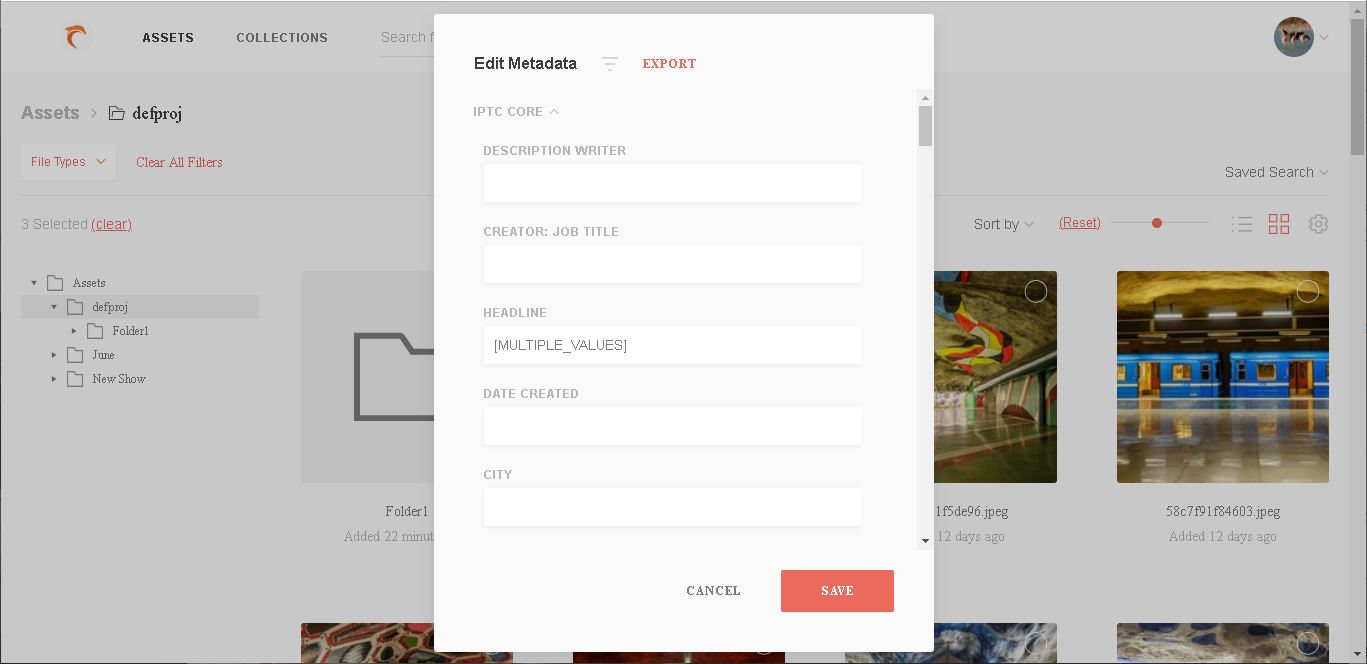
If you click the Edit Metadata button after making a selection, the Edit Metadata window is displayed. From this window, you can view and edit metadata values for all selected assets in one go. You can also export metadata for the selected assets to a text file. Click EXPORT to download metadata information about the selected assets to a text file.
If you click the Add to collection button after making a selection, the Add to Collection window is displayed. Enter the name of a new collection or select an existing collection from the drop-down. Click Done to add the selected assets to the chosen collection.

Assets tab – Asset details
When you click an asset thumb, the asset details are shown on the asset details page. Metadata details for the asset are also displayed.
You can crop the asset or add text by clicking the respective buttons. After these changes, you can download the asset by clicking the Download button. You can also download a sample of the asset after applying some modifications. For the sample, you can crop, add text in various font styles, or apply a preset. Presets are selected from the Presets drop-down list. When applying a preset, specify other properties associated with the preset, like width, height, or format. Various options are available depending on the preset chosen.
For some file formats, you can also create new assets containing these modifications over the original asset.

For video files, you can see a 360 view. You can also choose to download the original video or a modified sample of the video. You can clip a sample of the video to download or create a new video asset. You can also apply a preset to modify the sample video. Choose a preset and its associated options, then click Download to download a modified sample of the video after applying that preset. You can also download the video at various preset resolutions, like 2160 or 1080 pixels. Again, the original asset is not modified in the Zoom repository due to these modifications. The newly created clipped asset is saved in the default Upload location set on the Preview Server.
Assets with AI data
If an asset has AI data, then that is also shown along with the asset while viewing its details.
For a video
The most common forms of analysis used on videos include transcription (speech to text), object detection, logo detection, and celebrity detection. Zoom displays the AI-generated tags as data timelines in the Web Client’s data timeline view. Each AI engine creates its own data timeline.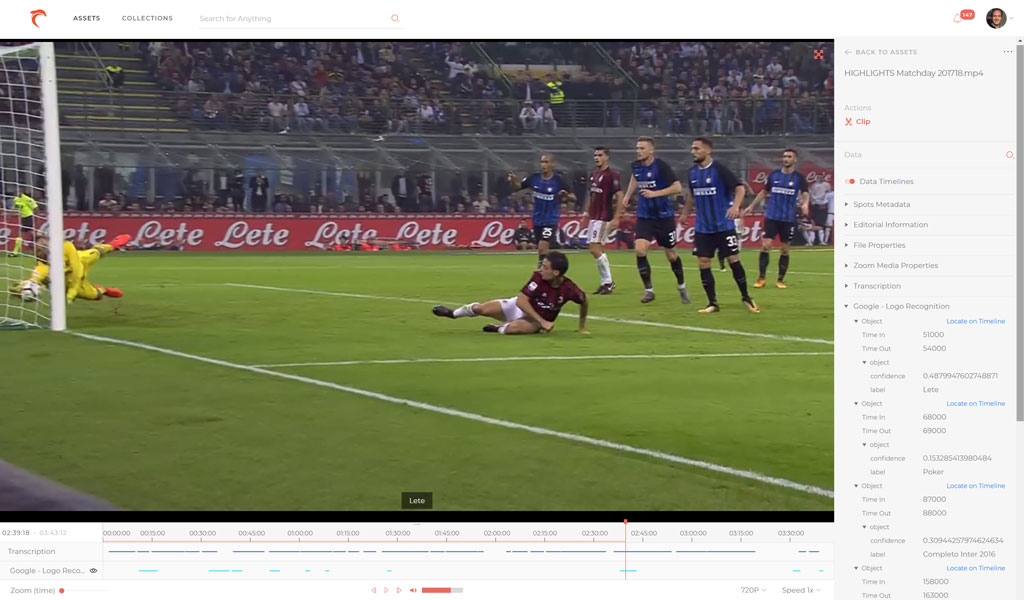
 icon next to each layer in the timeline.
Additionally, expanding the metadata in the right panel will display Locate links that you can click to be brought to that frame in the video.
icon next to each layer in the timeline.
Additionally, expanding the metadata in the right panel will display Locate links that you can click to be brought to that frame in the video.
For an image
Text (OCR) and object recognition are most commonly employed for images as shown in the screen below.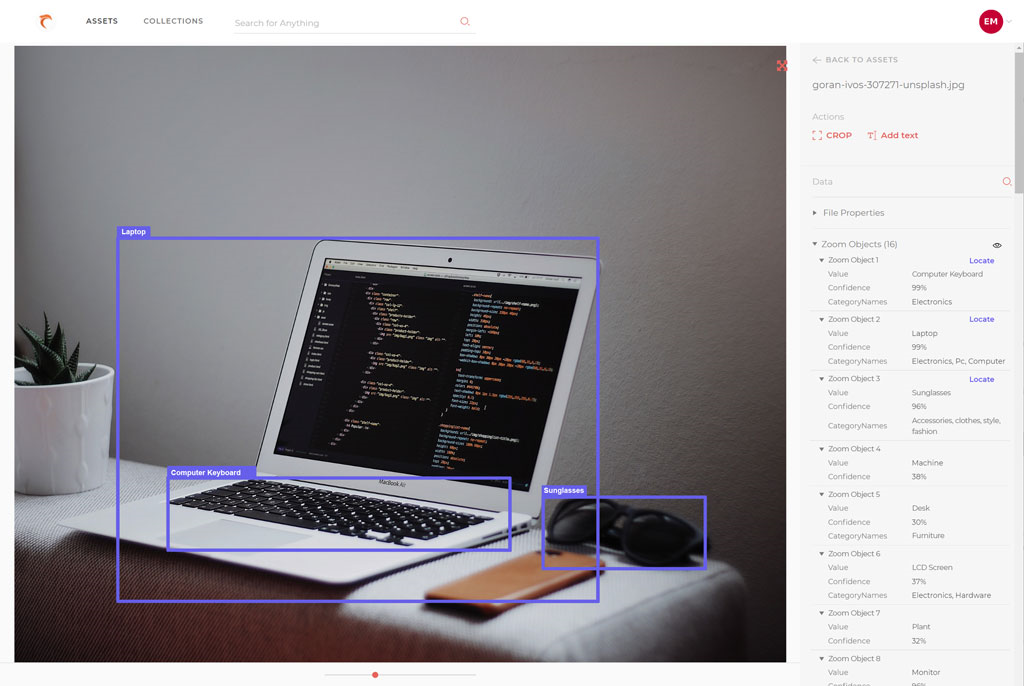
button next to the data layer name in the right-side panel. If locator boxes were returned by the AI engine, they will be displayed over the image so you can see which tag corresponds to which area in the image.
You can also expand the metadata on the right panel to show Locate links for toggling the data point marked on the asset.
Collections tab – Collections listing
All collections accessible to the logged-in user are displayed on the Collections page as collection thumbnails. Unlike the Assets page, the Collections page may also be configured to be accessible to external guest users. To know more about access rights on a collection, go to Collection types and permissions.
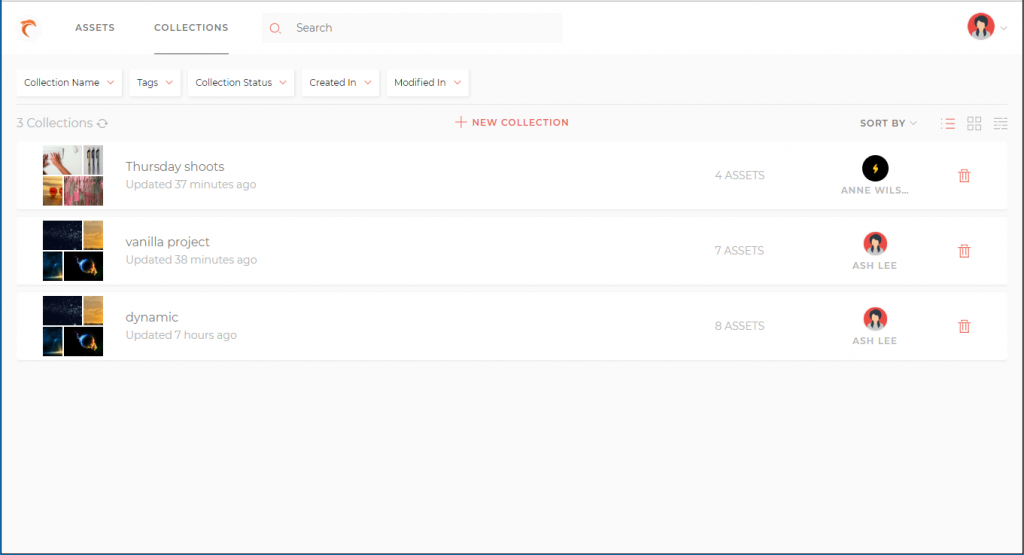
For each collection, its name, duration since last updated, and the number of assets in it are shown. You can also filter and sort collections. You can change between list and grid views (Mosaic view is not available from Zoom 7.3 onwards). The number of collections displayed is shown above the collections display. The reload button refreshes the display so any changes to the collections since the last refresh are also reflected.

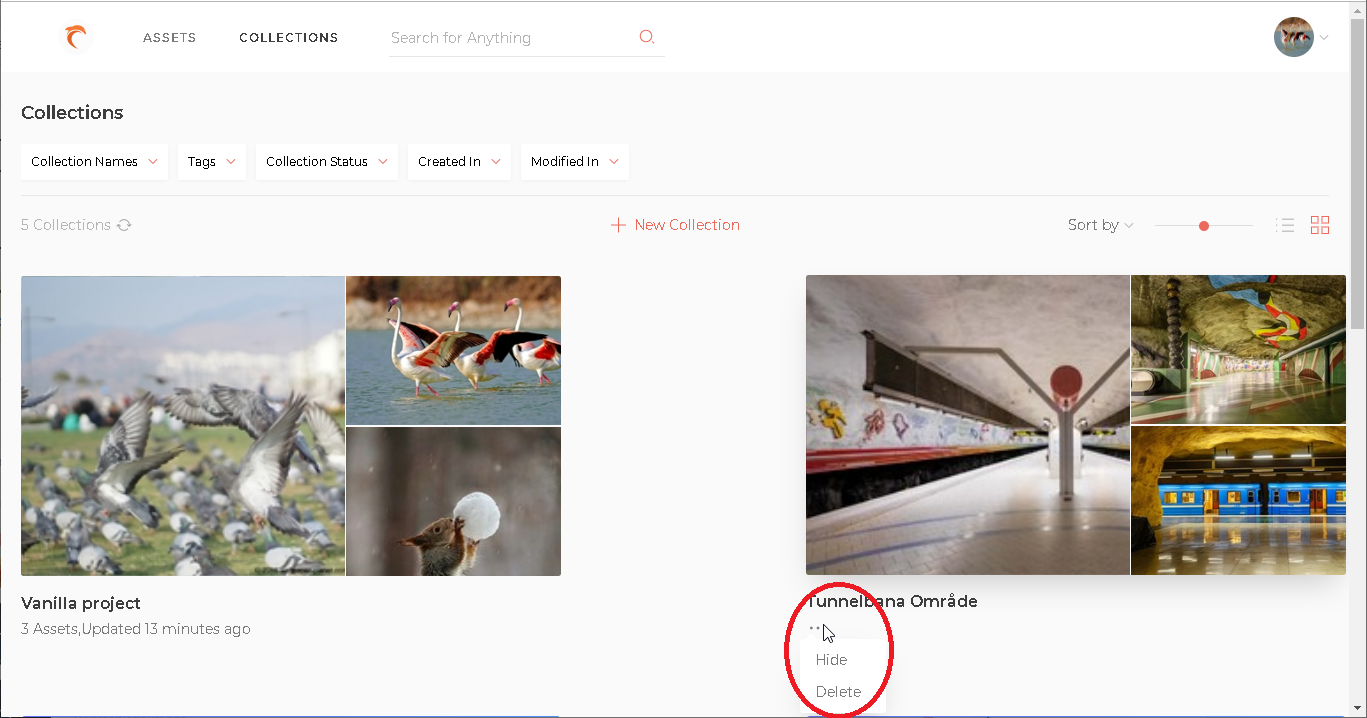
In list view, the owner of the collection is also displayed to the right. To delete a collection, click the Delete button in the list view. To delete a collection in other views, select Delete from the … popup menu below the collection thumb.
Click the + NEW COLLECTION button on the top of the collections list to add a new collection.
Filtering Collections
The collections displayed can also be narrowed down using filters above the collections display. Select one or more filtering criteria to filter collections that meet the chosen criteria. Click Clear All Filters to remove all filters and see all of the user’s available collections again.

Actions on Collection thumbnails
Some actions may be performed on the collection thumbnails displayed on the Collections page. For a user that has admin rights to the collection, a collection context menu is also available. Click … on a collection thumb for a popup menu of options as shown below. Only a super admin user or the owner of the collection get the option to delete the collection.

When you hover over a collection thumb, you can also select that collection by clicking inside the select circle in the top right corner of the thumbnail. With at least one collection selected, click anywhere on another collection thumbnail to select or deselect it in alternation. You can also hold the Shift key after selecting a collection and then click on any other collection thumb to select all collections between the two.
As soon as a collection is selected, a selection menu bar appears above the collections display panel. The selection menu has actions to perform on the selection. From the selection menu, you can choose to delete selected collections. You can also select all collections loaded in the display by clicking Select All.
Click (clear) to deselect collections and stop working with the selection. The selection menu bar also disappears.

Collections tab – Collection details
When you click any collection thumb, the details about that collection are shown on the Collection details page. It shows all assets in the collection as well as other details like its status and tags assigned.
The actions that the user can perform with the collection are also visible. These are governed by the collection’s own permissions management. To know more about access rights on a collection, go to the section Collection types and permissions.
A collection’s admin users can add or remove assets from the collection. They can also rename and download assets, rename the collection, update the collection status, add or remove tags, and update collection settings. They can update sharing parameters for the collection, add and remove users to the collection, and change the permissions assigned to existing users of the collection.
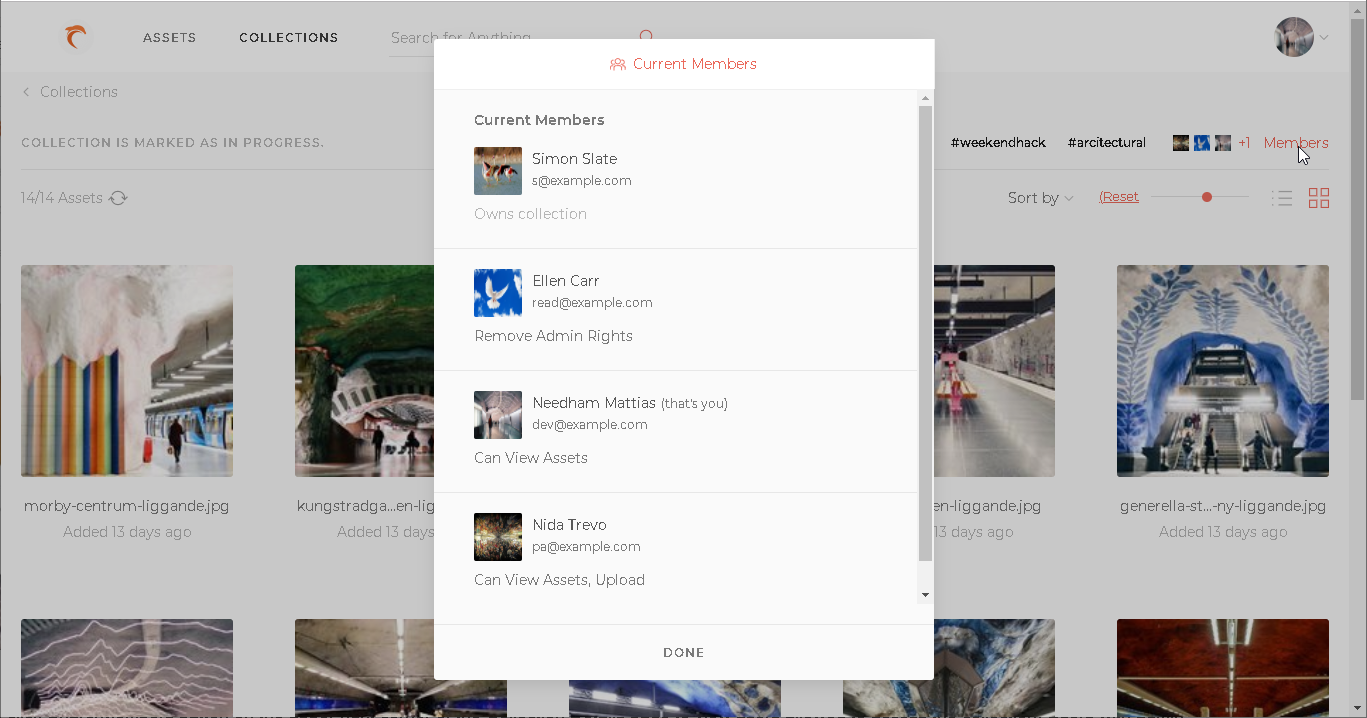
All users of a collection can view the collection’s thumb on the Collections page. They can also select and sort assets in the collection and change display views between list and grid. Each user of a collection can see the list of all users of the collection, along with each of their email IDs and permissions assigned.

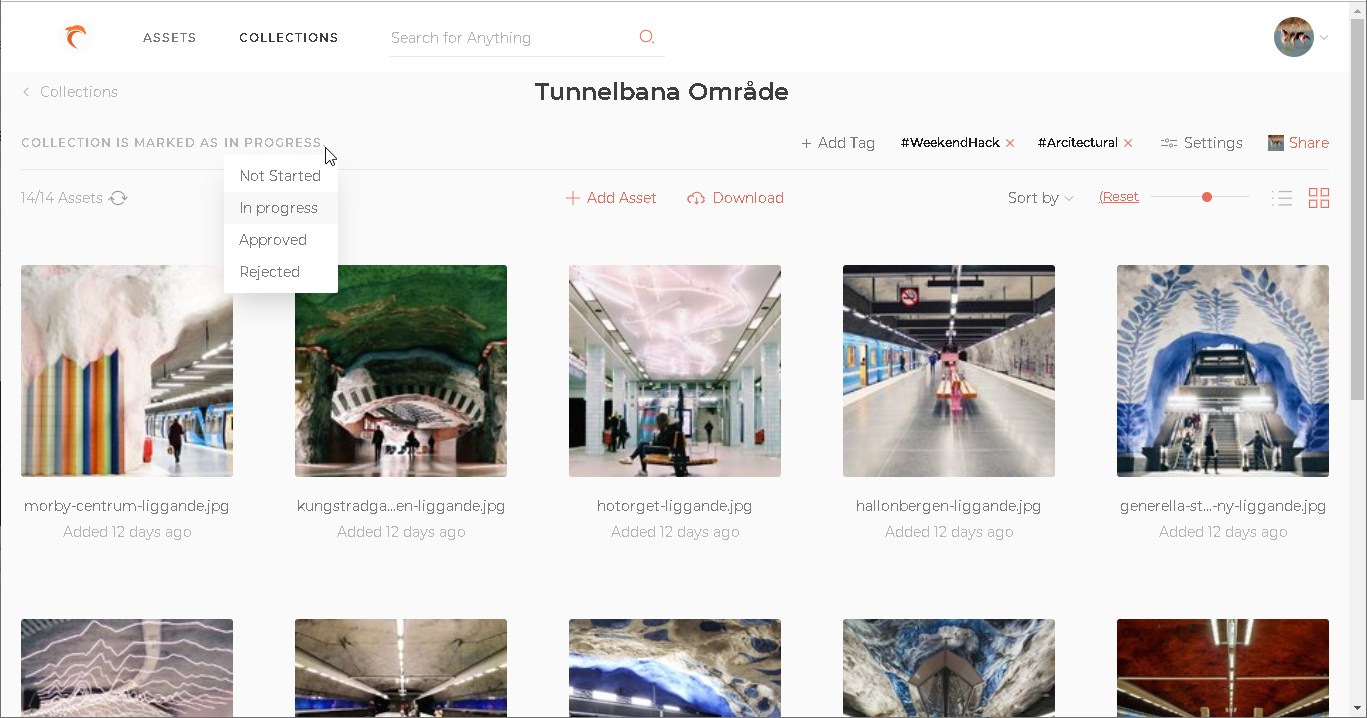
In the Collection details page, the collection’s status is displayed right below the name of the collection. Collections can have one of the following statuses:
- Not Started – no activity has been performed on any asset of the collection since it was created or unhidden.
- In progress – as soon as an asset is edited, approved, rejected, or commented on, the status of the collection changes to In progress.
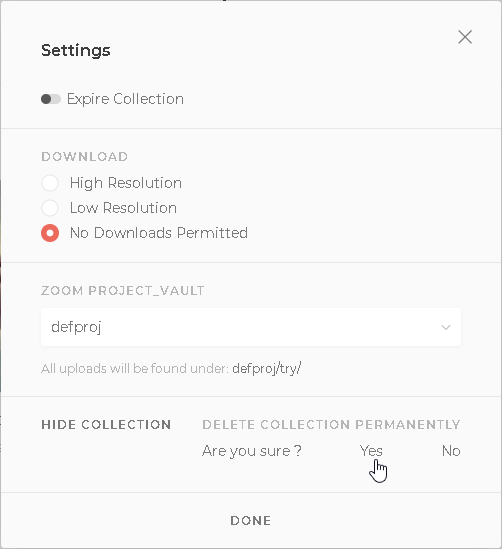
- Hidden – a collection may be marked Hidden by any user who has Admin rights on the collection. A hidden collection’s thumb will not be displayed in the Collections page by default. It is only shown if it is filtered in through any of the collection filters.
- Approved – a collection may be marked Approved by any user who has Admin rights on the collection. Approved status means that the work has been completed and the collection is ready to use.
- Rejected – a collection may be marked Rejected by any user who has Admin rights on the collection. Rejected status means that the changes made to the collection have been rejected by an admin user.
Admin users can update a collection’s status by selecting it from the status drop-down menu. Hover over and then click the collection status to see the list of options in the Status drop-down menu. Select a new status from the list of options.
Click  Download to download all assets as a PDF or a ZIP file.

Click on + Add Asset button to add a new or existing Zoom asset to this collection. Drop files or Browse to choose new files or type in the Find Existing Asset box to choose assets to add. Click Add Assets to Collection to add the selected assets to the collection in the background. The window closes and the user is free to resume working with the Web Client.
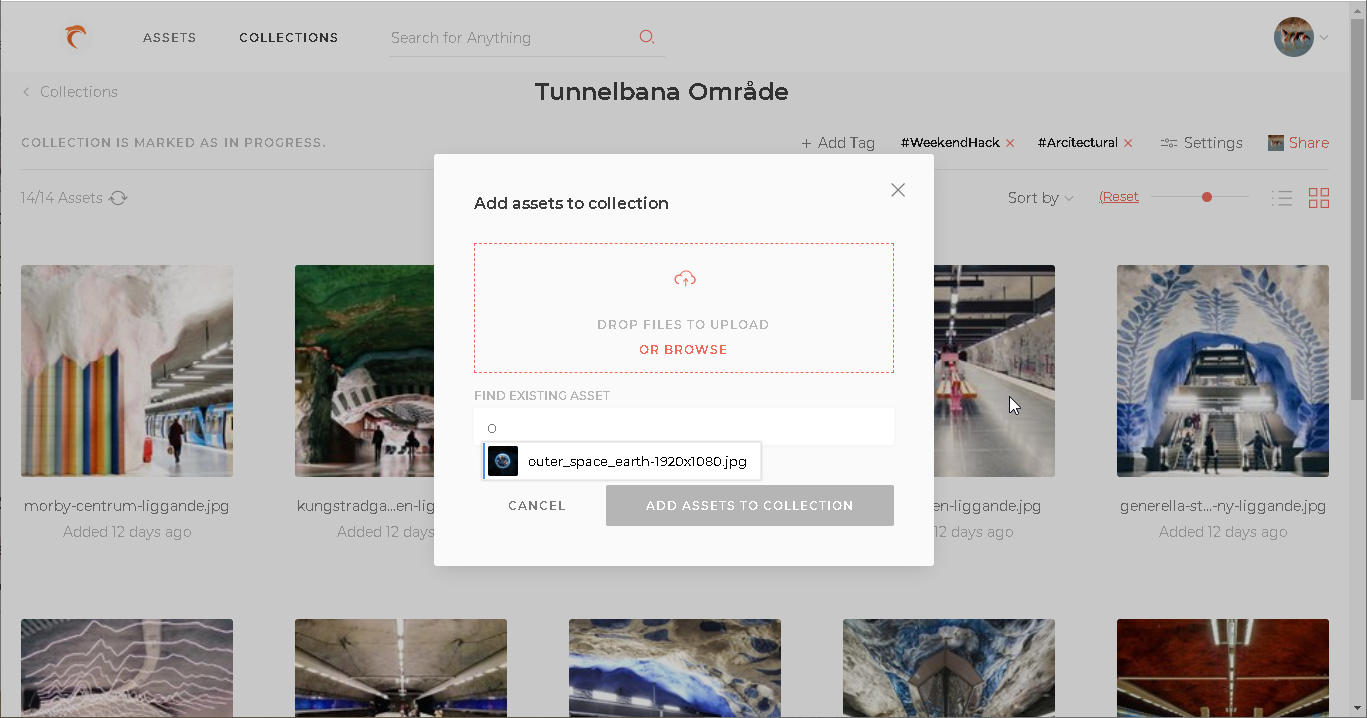
The progress of the asset upload is shown in the top right corner of the window. Hover over the upload progress bar to see a list of all pending uploads running concurrently.

Click any upload progress entry from the list to view the upload status details.

Before the uploads are complete, you can click Cancel All Uploads to cancel that whole upload batch.
Click + Add Tag to add a new tag to the collection. You can also click the x next to existing tags listed after the + Add Tag button to remove that tag from the collection.
Click  Settings to view the configuration settings for the collection.

The options available on the Settings window are:
- Expire Collection – this toggle button allows users to expire a collection at a selected time now or in future.
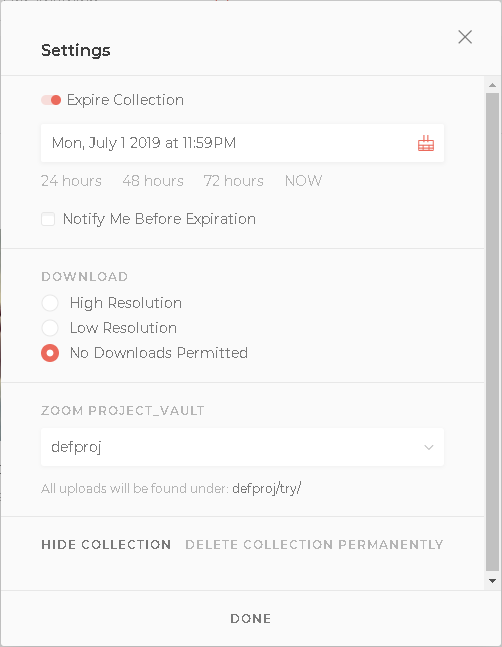
No one can work with an expired collection. If a user opens an expired collection then a prompt on the top of the page informs about the status of the collection. If you want to bring back an expired collection, click Change settings in the message to go to the Settings window to switch off the Expire Collection toggle.

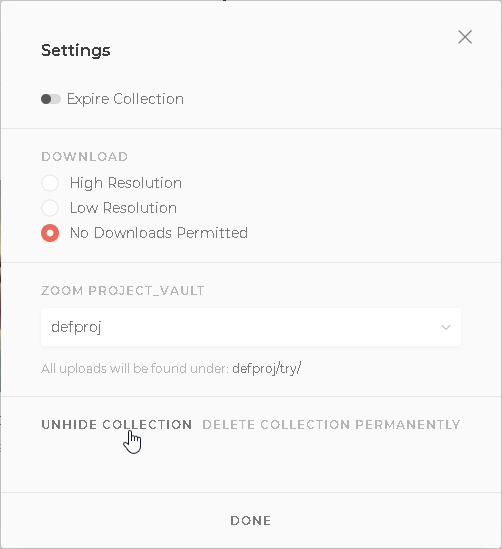
After the Settings button, a few members of the collection are listed by showing their profile icons. If you hover over the icons, the list of members is shown below it.

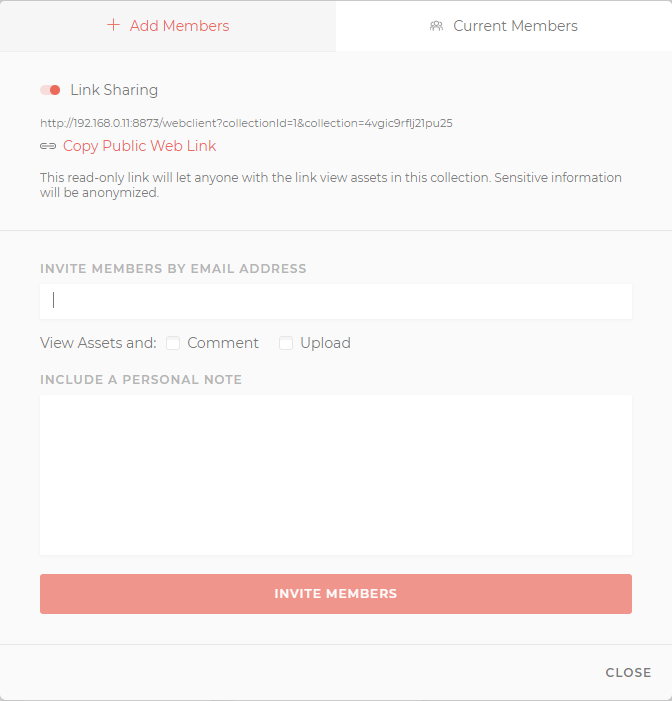
Finally, click Share/Members button on the upper right corner of the Collection Details page to view users allowed to access the collection. Users with admin rights on the collection see the Share button while those without admin access see the Members button. Click the Members button to view the list of members of the collection along with their assigned rights.
For admin users of the collection, click Share button to view the Share window showing the Add Members tab. These admin users can share the collection publicly using the Link Sharing toggle switch (only available for External Collections).

The link may be copied for sharing by clicking Copy Public Web Link. Click the Link Sharing toggle switch again to turn off public link sharing of the collection.
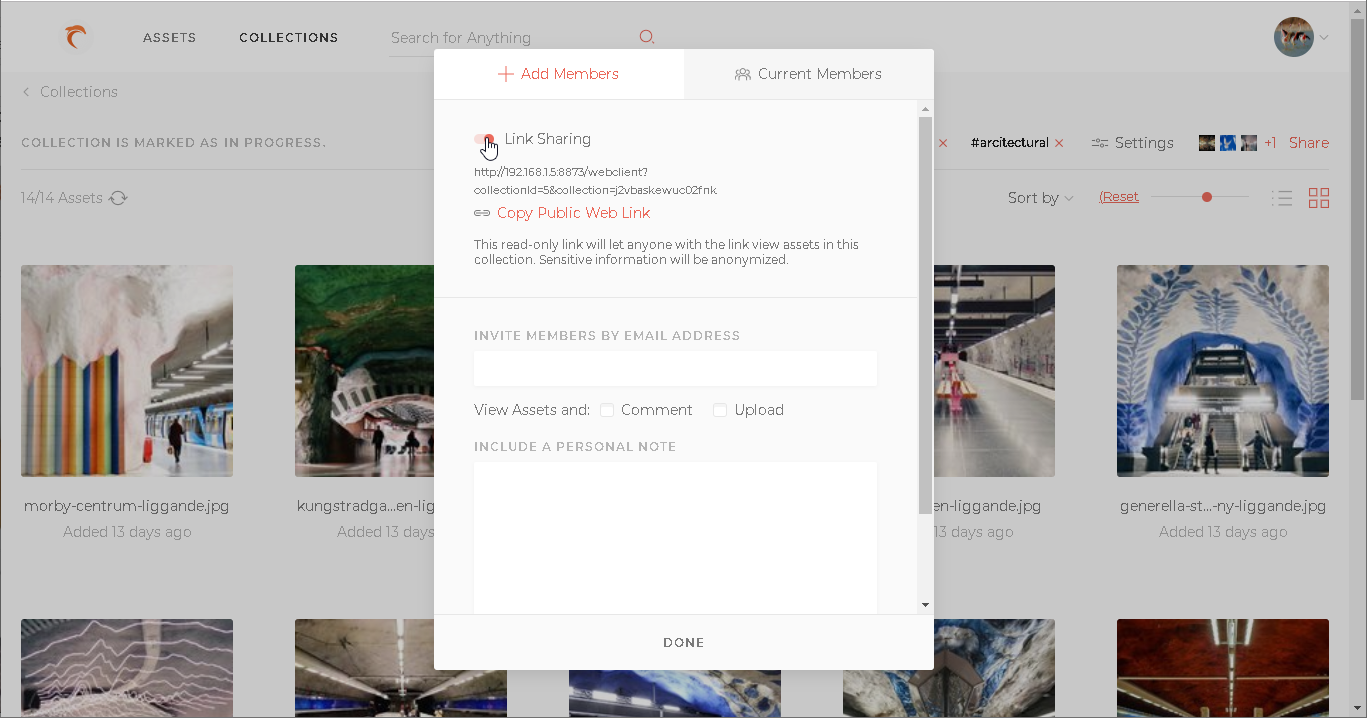
To invite new members to the collection, specify their (comma separated) email IDs in the Invite Members by Email Address text box and click the Invite Members button.
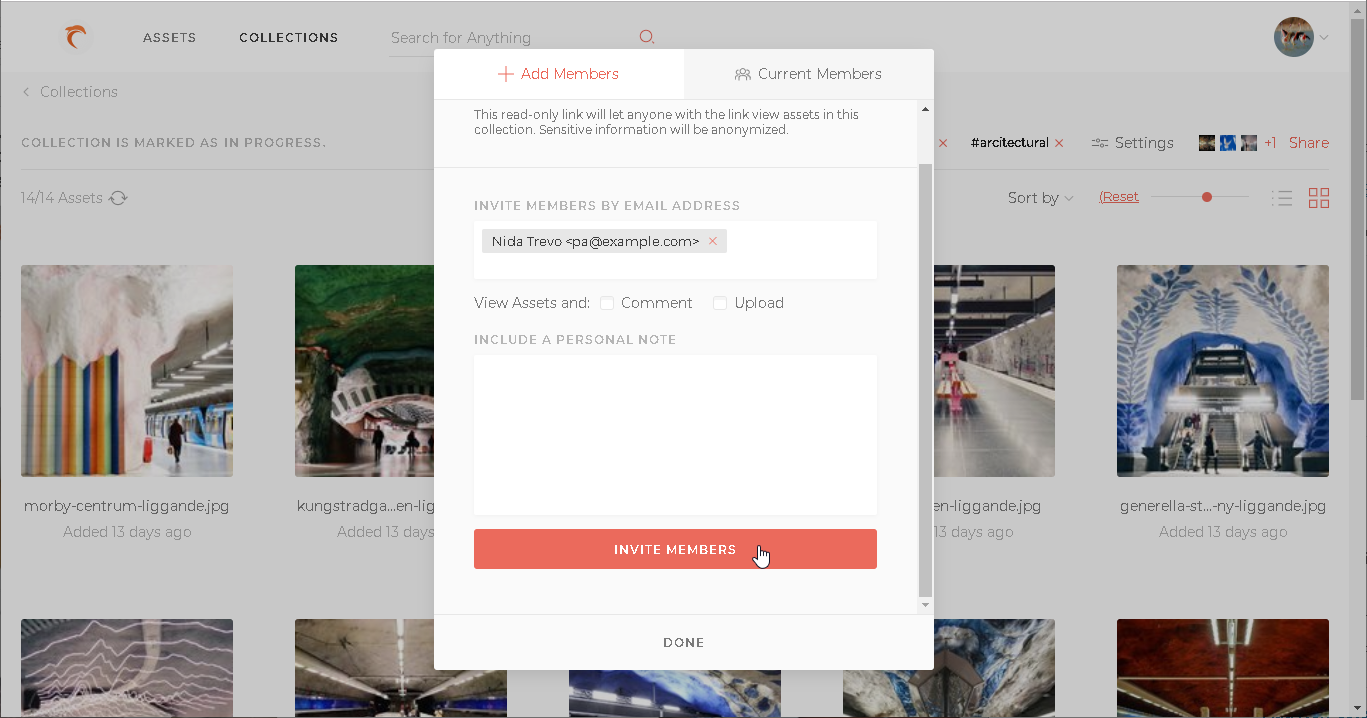
A confirmation message informs that the emails have been sent.

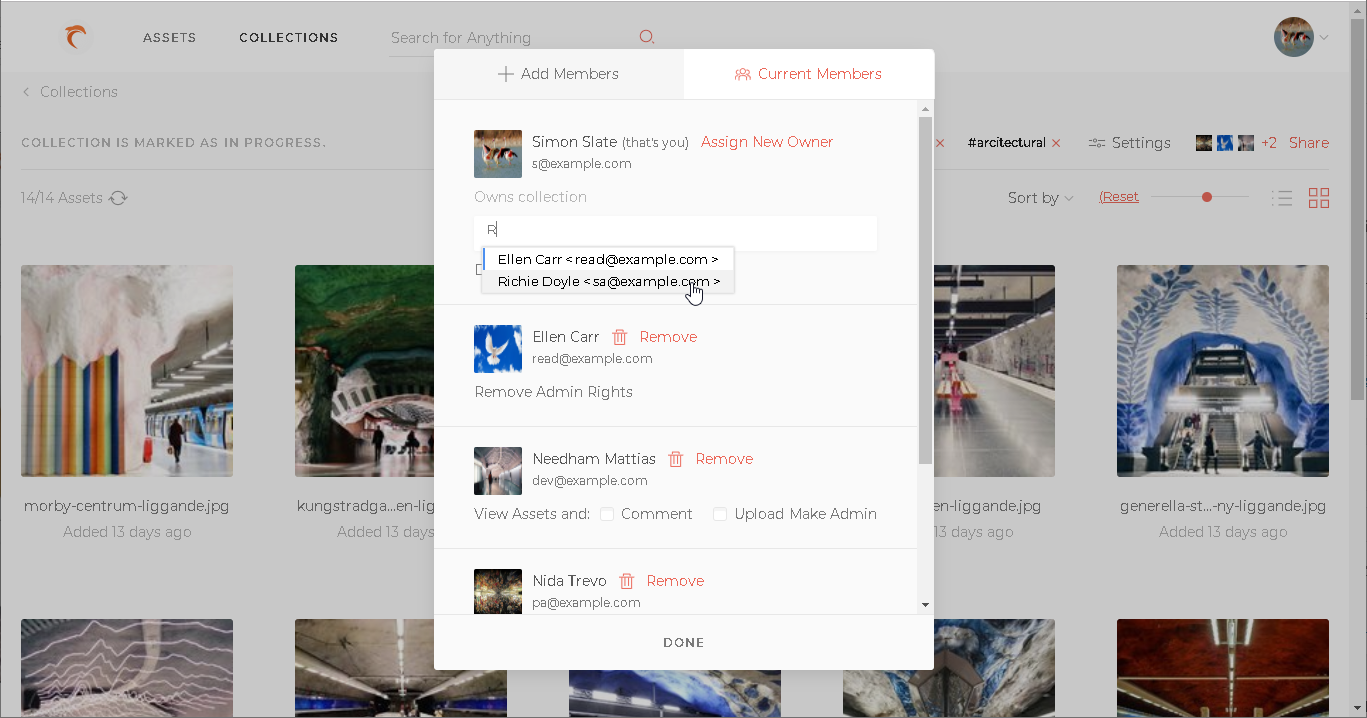
Admin users can also access the Members tab to view and edit access rights of the existing members of the collection.

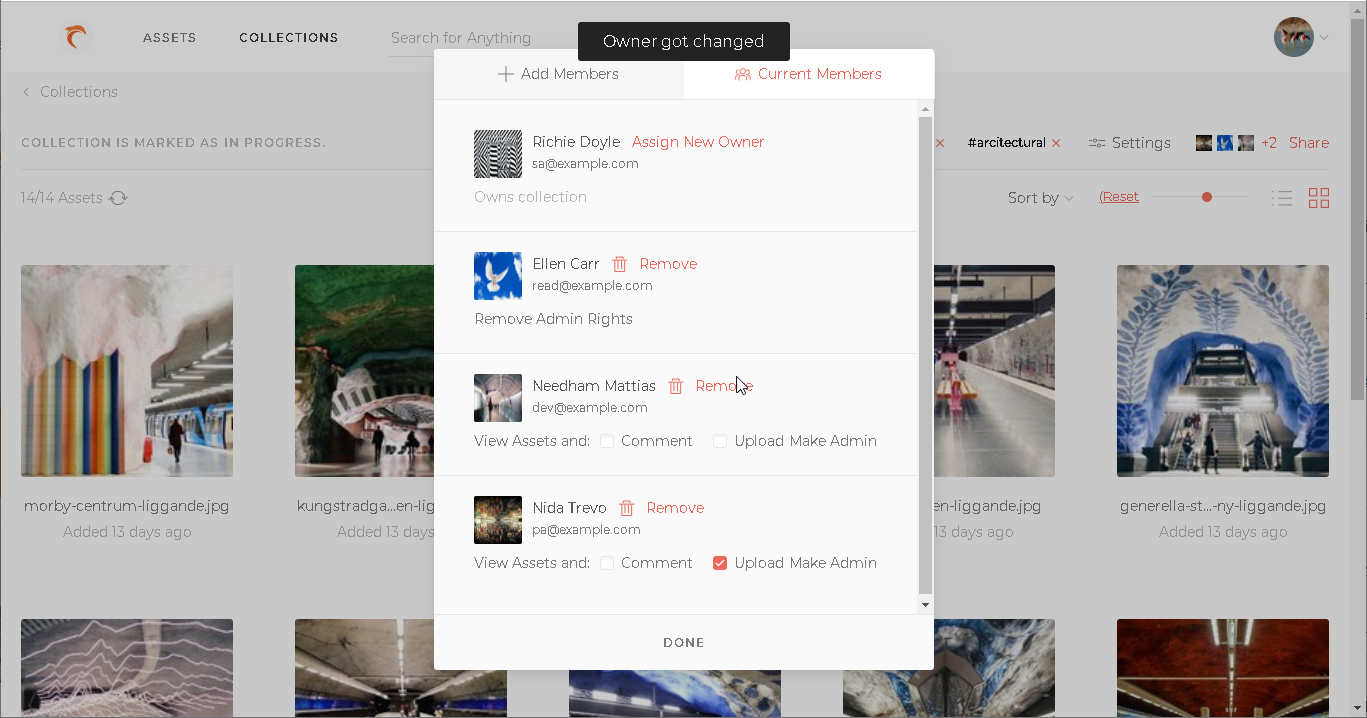
Zoom super admin users can also change the owner of a collection from the Current Members tab.

Click on the Assign New Owner link next to the current owner of the collection. Specify a new name in the owner name text box and click Done.
A confirmation message informs that the owner is successfully changed.
An Asset in a Collection
When you click an asset thumb in the Collection view page, the asset is shown as part of the collection, with its comments, feedback, and approval/rejection status. You can add new or reply to existing comments. Comments can also be spatially added and seen on top of the asset preview. Alternately click Show Comments below the asset preview to view or hide markers for spatial comments on the asset. Only comments from the latest revision of the asset are shown. Any comments existing in earlier revisions of the asset are not shown.
The collection’s admin users can edit or delete any comment. Admin users can also approve or reject an asset within the collection.
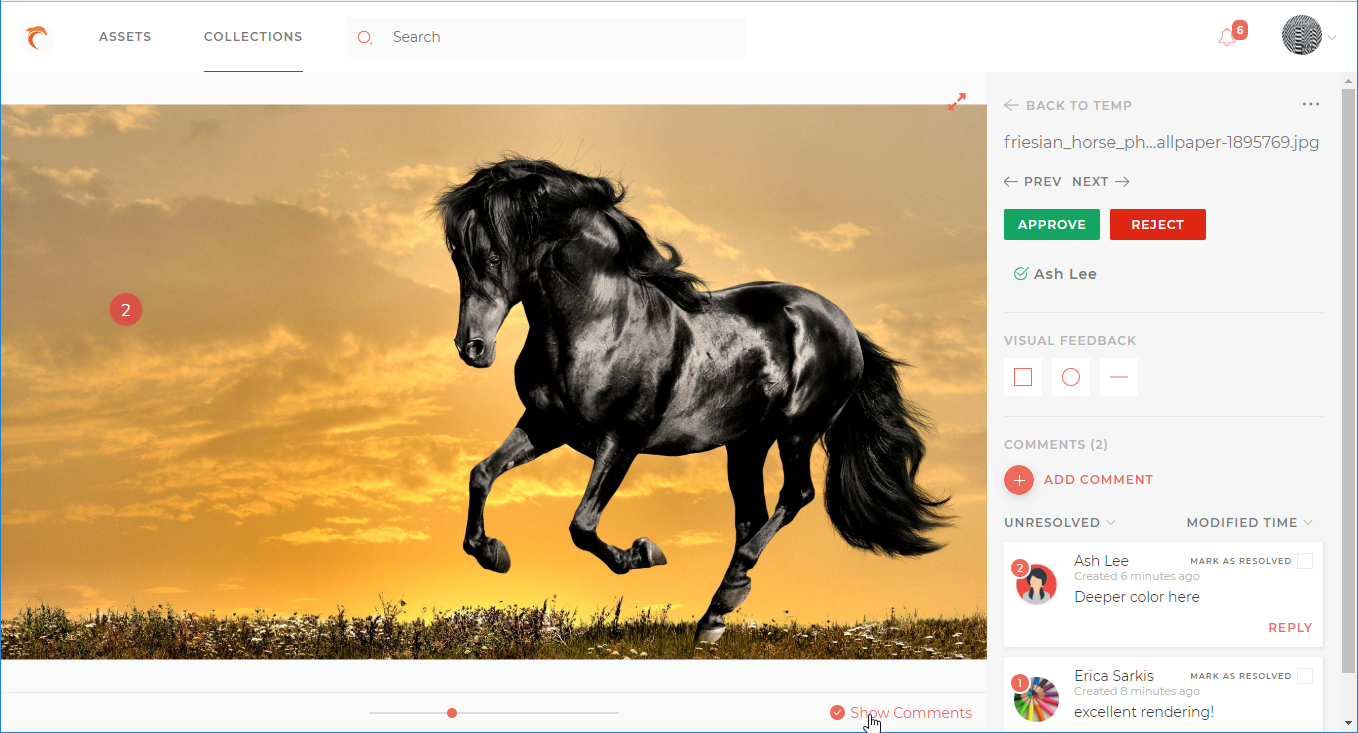
Move the slider below the asset preview to zoom in or out on the preview.
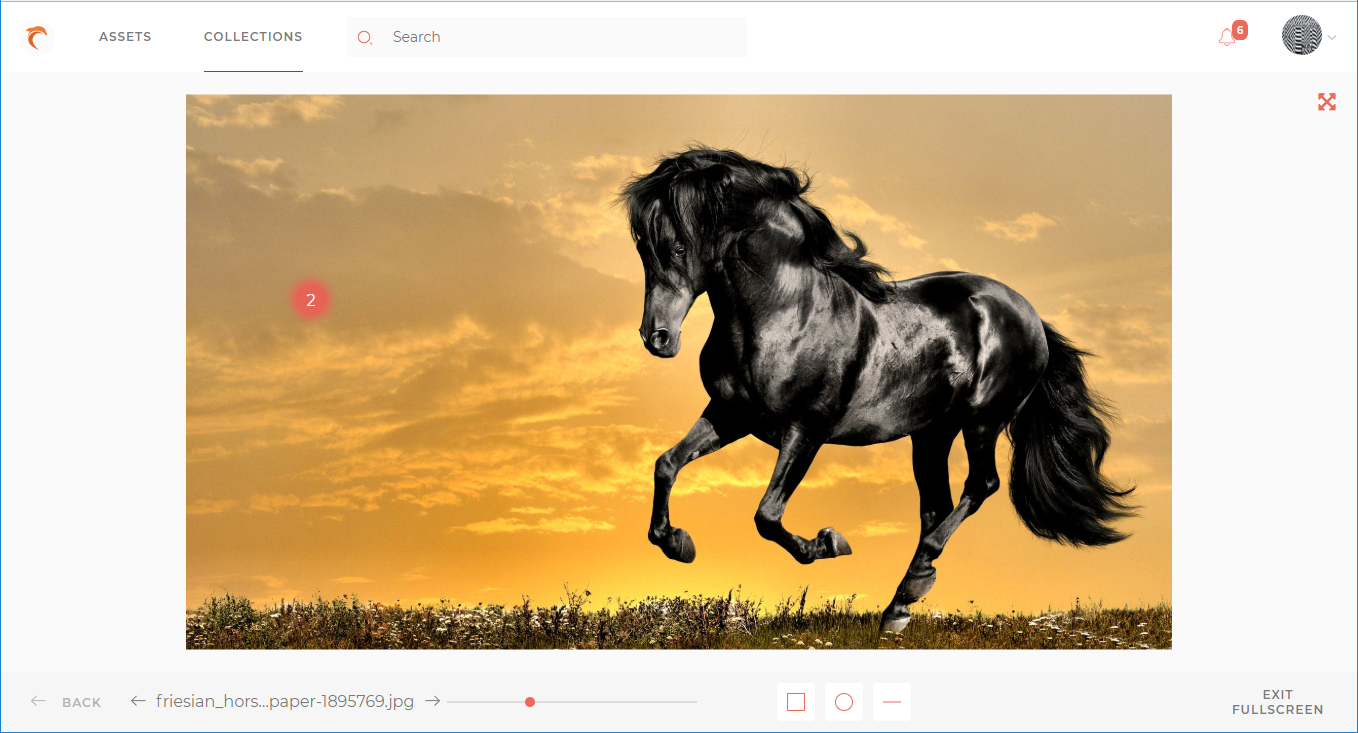
Alternatively, click the resize arrows  on the top right of the asset preview to hide the asset details and comments in the right pane and view the asset in the whole width of the window. Click the fullscreen arrows
  to view the asset preview in full screen. Click EXIT FULLSCREEN to exit the fullscreen mode.
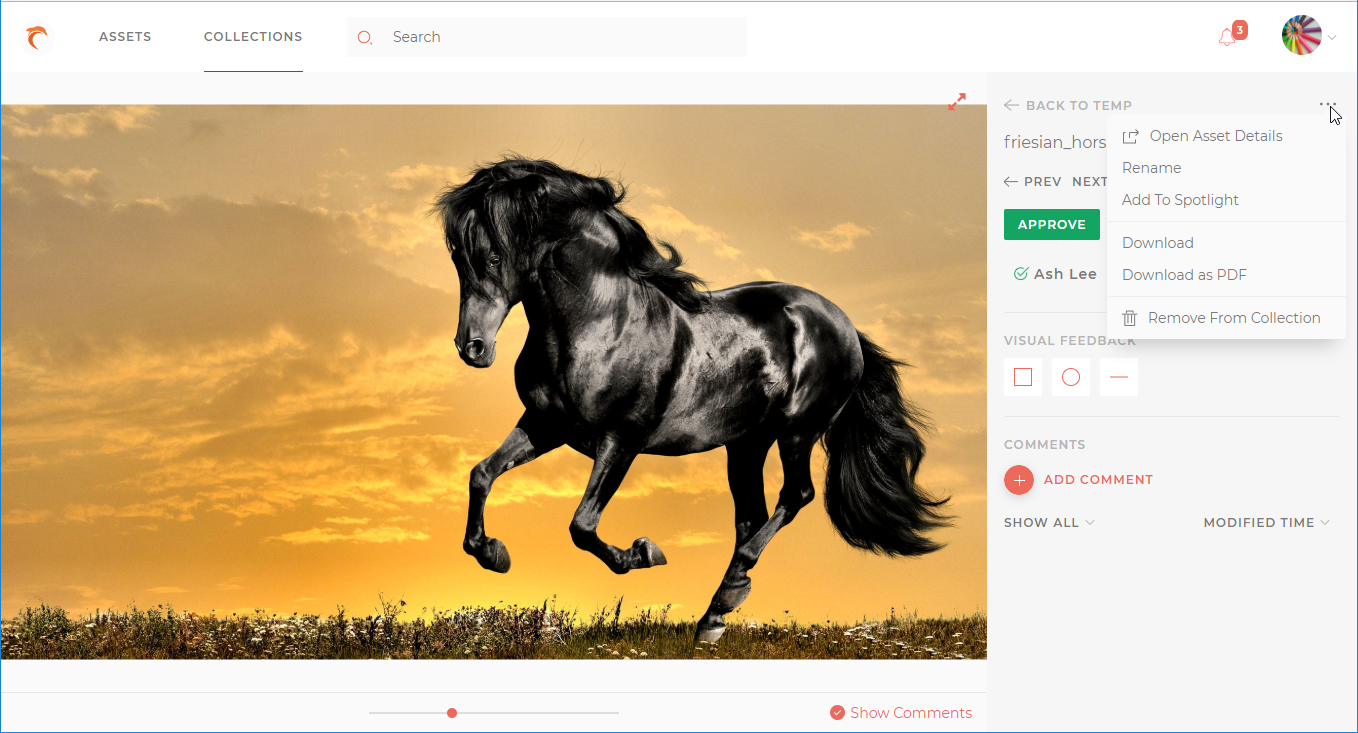
Click the … button on the top right of the details to open its context menu. It shows options to view more details about the asset on the Asset Details page, rename or download the asset, add it to the spotlight, or remove it from the collection (options depend on user’s rights in the collection).
Video in a Collection
Video assets in a collection can have comments added spatially on different frames of the video. Click any comment on a video to move the slider to the frame where the comment was added. You can also browse spatial comments on frames of the video by clicking previous  and next comment
  sliders near the play button.

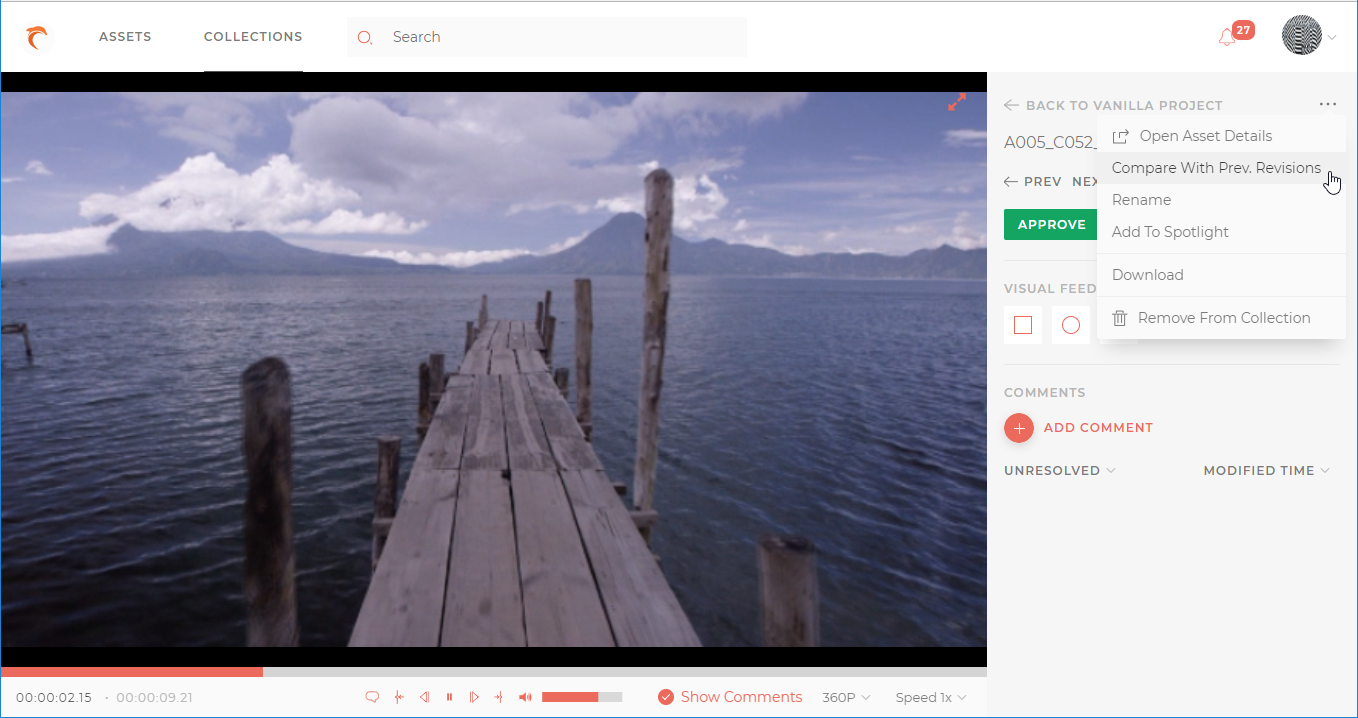
If a video asset has multiple revisions, compare any two revisions by clicking the Compare with Prev. Revisions option from the … menu on the top right of the asset details.
Latest two revisions are selected in the Choose Version window. Select any two revisions and click Compare.
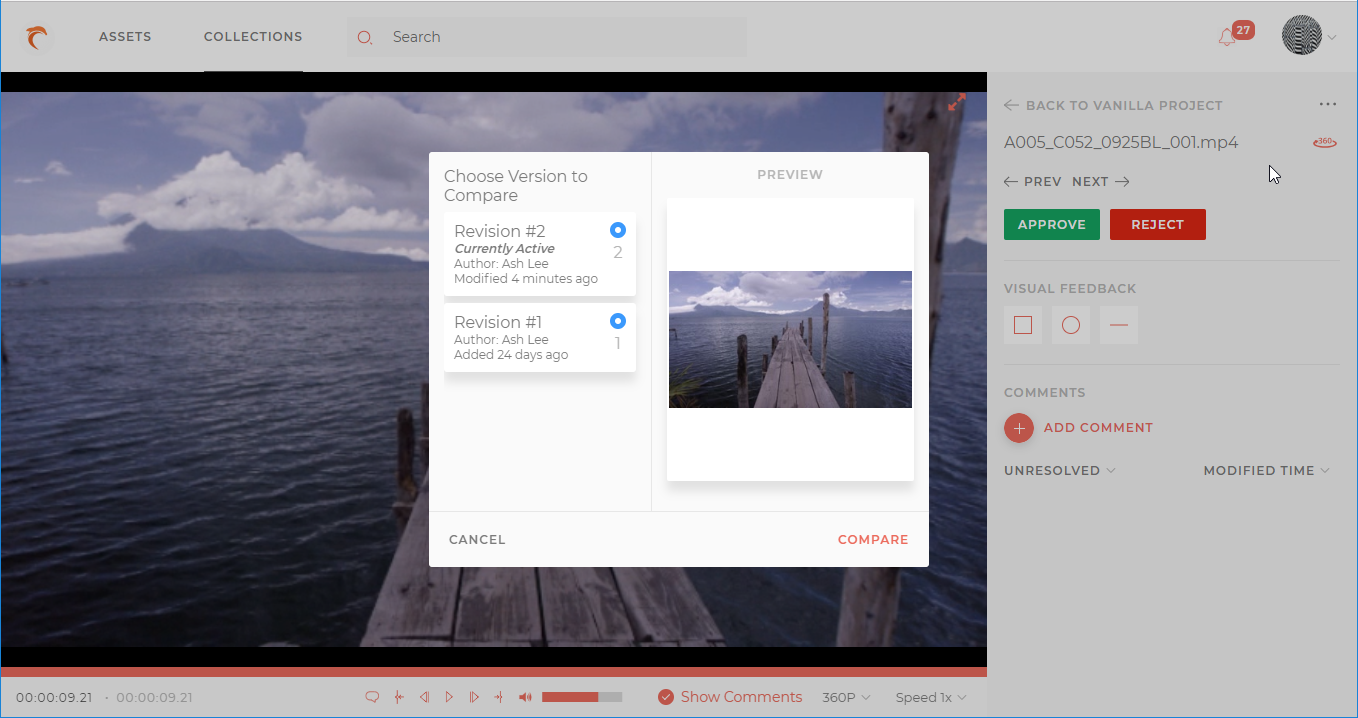
The chosen revisions are shown side-by-side for comparison.
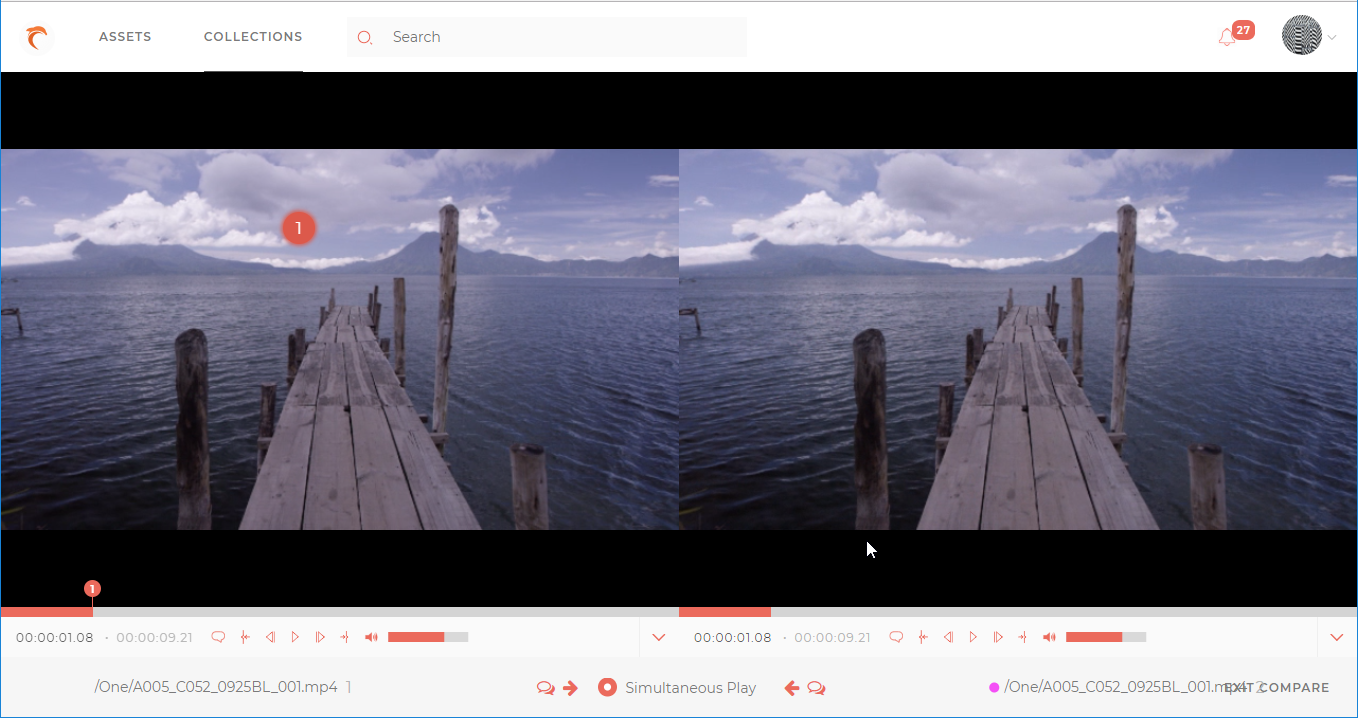
Click Simultaneous Play alternately to play the two revisions simultaneously or separately. Click Copy unresolved comments to Right  or Copy unresolved comments to Left
  buttons to copy unresolved comments from one revision to another.

Click EXIT COMPARE to exit the revision comparison mode.
Document in a Collection
Documents in a collection can also have comments added spatially on any page. To add a comment spatially, browse to the desired page and click where you want to add the comment on the page preview. Alternatively, you can also click any of the Visual Feedback buttons 

 to graphically add a spatial comment anywhere on the page preview.
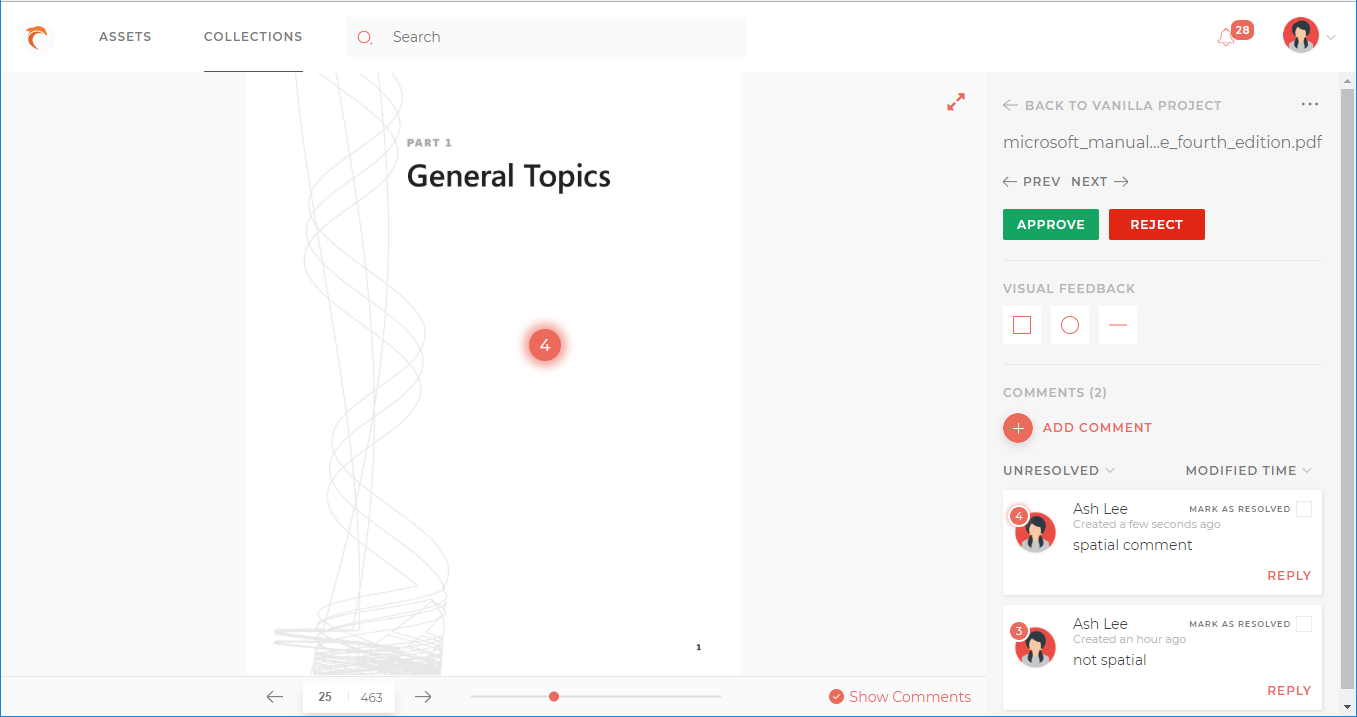
Click any spatial comment on a document to move to the page where the comment was added. You can also view spatial comments when browsing the document preview page-wise using previous  and next
  page arrows.
Web Client Users
These users can access the Web Client:
- Internal users: All Zoom users who have a role and project assigned to them can log in to the Web Client. This includes concurrent-only users created in Zoom, that do not consume any desktop license. These internal users get to access all areas of Web Client as per their role and project assignment, except the Collections tab. Access to the Collections tab is governed by the collections’ own permissions as detailed in the next section.
Zoom’s internal role and project assignment for the logged-in user, or for other users in the collection, is never shown inside Web Client.
- External users: These are non-Zoom users that have been invited (over email) to access one or more collections by the collections’ admins/owners. After getting their invitations, these users need to first register on the Web Client. After registration, they can access only the collection tab of Web Client, with access to actions as per their permissions in the collection. These permissions are assigned and managed by the collection admin/owner.
- Guest/anonymous users: Collections may also be shared publicly where anyone can view the collection anonymously without logging in. Only admins/owners of the collection can create this shareable public link.
Collection types and permissions
Collections could be either Dynamic or Static. Static collections contain manually selected assets in them while dynamic collections have a filter that automatically picks assets that satisfy the filter criteria.
In the current Zoom release, dynamic collections may only be shared with internal Zoom users. While static collections may also be shared with external Web Client users.
Dynamic collections do not have an option to add assets to it like in static collections as their assets are populated automatically as per a filter.

If you try to publicly share a dynamic collection, an error is shown. Sharing with internal Zoom users is allowed.

Collections can also be set to be created as External or Internal. External collections are the default setting now, but collections in Zoom versions before 7.0 were all internal by default. External collections can be shared with external users as per the discretion of the collection admins, and sharing can be turned off for an external collection too. Internal collections cannot be shared with external users at all.
You cannot change an External collection to Internal or vice versa. Zoom admins set a toggle switch for all collections created henceforth to be External or Internal. By default, this is set to External Collections (Zoom 7.0 onwards). The Web Client users creating a collection cannot choose to create either external or internal collection. To summarize:
- External collection: can optionally be shared with external users. The default type from Zoom 7.0 onwards. Internal Zoom users can log in to the Web Client even if they do not have any project assigned if they have access to atleast one collection.
- Internal collection: cannot be shared with any external user. The only collection type until Zoom 7.0. No Zoom user can log in to the Web Client unless they have atleast one project assigned, except super admins.
No Zoom user can access (view) a collection that is not explicitly shared with them, except the super admin (or collection owner). So, on the Collections page, only those collections are shown that have been shared with the logged-in user.
Zoom super admin can access all features in all collections.
Collection sharing
Click the Share button  on the top right of the Collection View page to share a collection. The Share button is only available to users that are allowed to share that collection. This includes super admins, the collection owner, and collection admins.
In the popup window, enter the email IDs and an optional note. Then, scroll down and click the Invite Members button. The window disappears and a message is shown that the invitations have been sent.
To share the collection anonymously, click the Link Sharing toggle button to enable it. Now, click the  button to get a public link to the collection. Share this link as needed.
To change permissions for existing users of a shared asset, click the Current Members tab in the same Sharing window and choose the desired permissions for an existing user.

A super admin user will have rights over all collections, even when not listed in the Current Members tab. Adding or removing permissions for the super admin user in the Current Members tab will have no effect.
A user should either be the owner or admin for the collection and also at least have EDIT permission in Zoom to be able to share a collection.
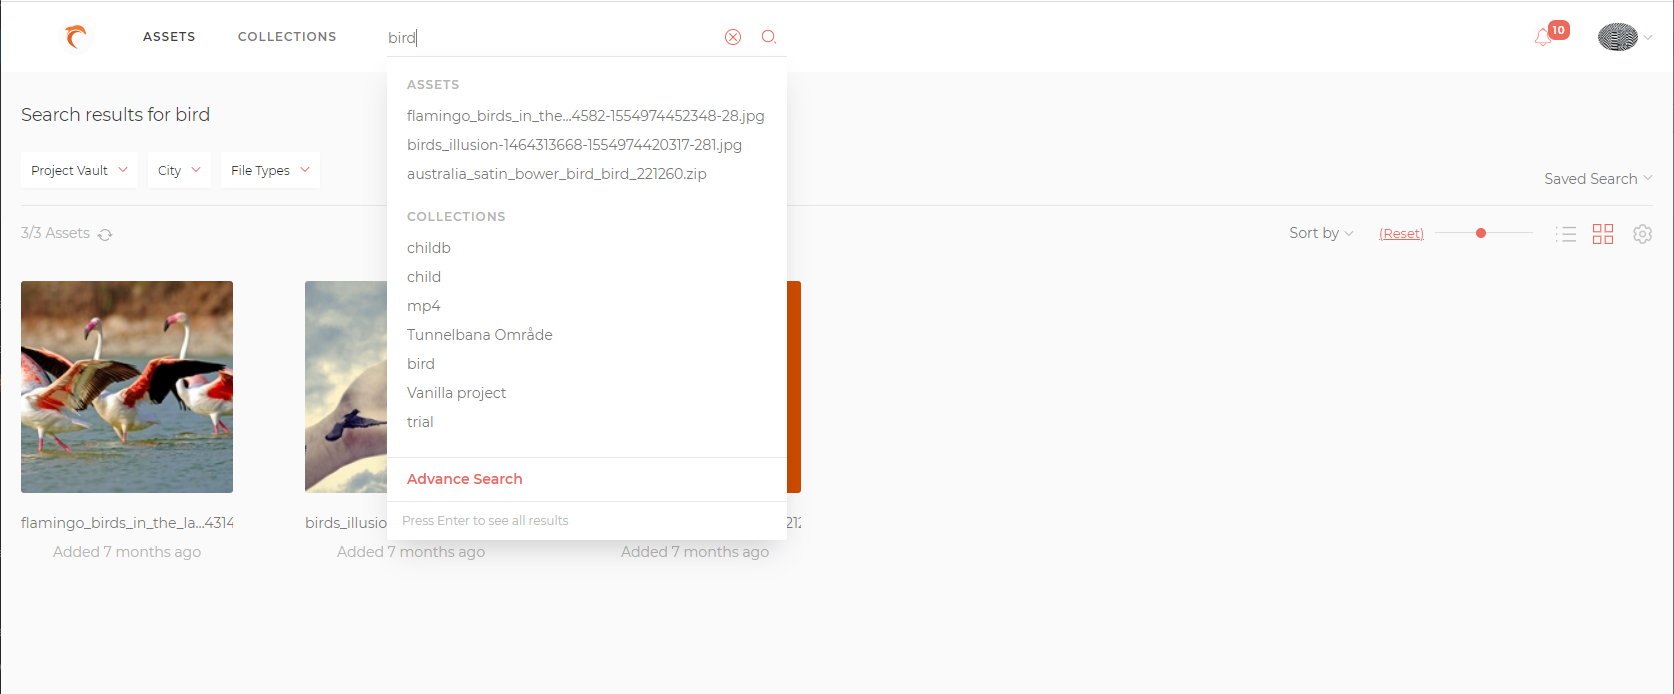
Search
Enter search criteria in the Search box on top to search within assets names and keywords assigned to assets. Press Enter to view all assets matching the search term. You can further filter the search results using the filter dropdowns as on the Assets page. For more details on filtering, go to Filtering Assets.
Advance Search
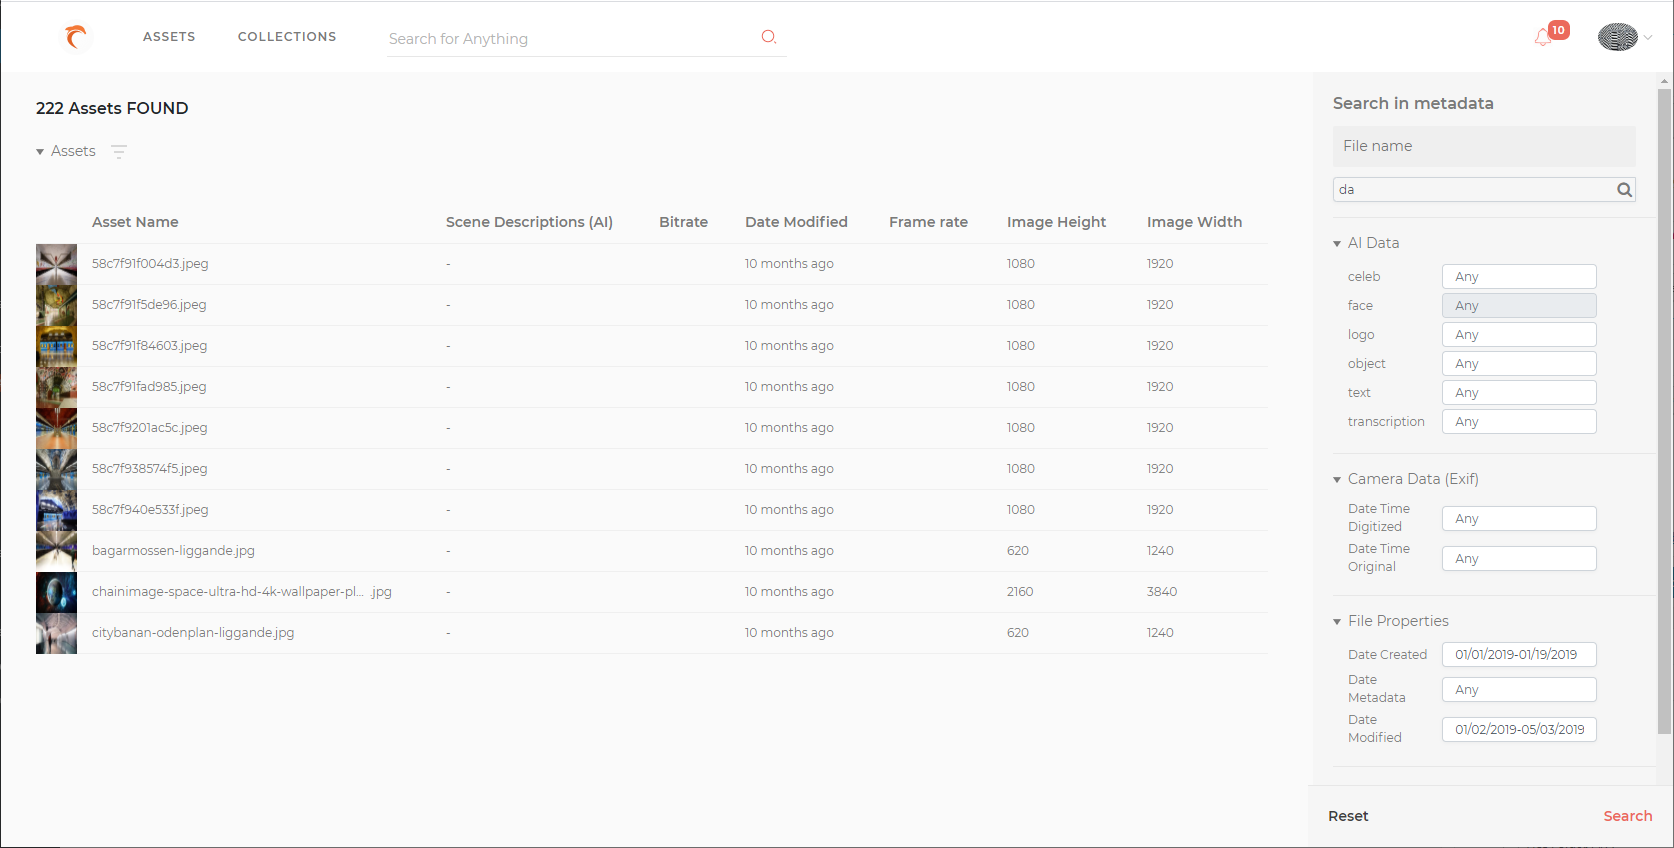
From Zoom 7.3 onwards, Advance Search is available to search for assets using more complex filters. Click in the Search box on top, and click Advance Search. The Advance Search page is displayed.

The metadata fields available in Zoom are shown on the right pane. You can open a metadata group to view the metadata fields and enter a value to search. You can also search for the desired metadata field using the Filter in metadata box.

Enter the search value in one or more metadata fields and click Search. Assets having the same values or values within the specified range will be listed.
You can also enter multiple values in a metadata field and apply either the AND or OR operator between them. For example, we are searching here for files that have either 24-it or 16-bit Color Depth.

For the search results listed, a few metadata fields are shown in columns. You can add remove columns to show with the search results by clicking on the  button at the top of the search results.

Click to select or deselect the columns to show or hide with the search results. Click Apply to save the changes.