Zoom Preview Server is an installation of Zoom Server that is running the Zoom Preview Service to provide previews and thumbnails and connect with and communicate with Zoom web apps. There can be multiple Zoom Preview Servers in a single installation of Zoom (not the Zoom NonStop setup), but only one Zoom MAM Server.
To install Zoom Preview Server, we run the Zoom Server installer, and after installation, we stop all Zoom services except the Zoom Preview Service.
Install and verify Zoom Preview Server
Copy the Zoom Server installer and install the Zoom Server for Linux or Windows by following the instructions in the installer. This will install the Zoom Preview Service.
After installation on a Windows Server, check that:
- You can connect to the TCP port of your Zoom Server from this machine. You can easily check that by opening the Windows PowerShell and typing the below command with your MAM server and port:

- Ensure the Zoom Preview service is running and has been set to start automatically at startup. (From Run box, open services.msc):

- Make sure the Zoom Service has been stopped or disabled to ensure only Zoom Preview service is running:

After installation on a Linux Server, check that:
- You can ping your Zoom Server from this machine.

- You can connect to the TCP port of your Zoom Server from this machine.
telnet 192.168.1.100 8880
- Zoom Preview service is running and is also set to start after server startup.

- All other Zoom services (zoom, curator-server, clientproxy) are set as disabled at startup.
systemctl disable zoom
Set up the SSL certificates
This step is only needed if you are using a self-signed SSL certificate for Zoom. If you are using a commercial SSL certificate then no other settings are needed on this machine.
If you are using a self-signed SSL certificate then this certificate needs to be configured on this machine as well. You will need the certificate file and its trust store password to complete this step.
Save the certificate file on this machine, and copy its path.
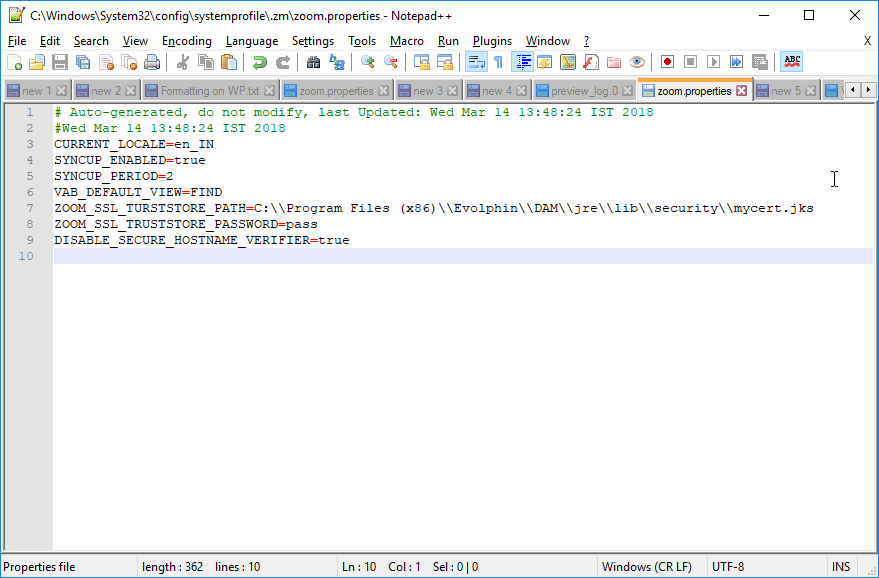
Go to the folder C:\Windows\System32\config\systemprofile\.zm and open the zoom.properties file for editing.
Check for the variables ZOOM_SSL_TRUSTSTORE_PATH, ZOOM_SSL_TRUSTSTORE_PASSWORD, and DISABLE_SECURE_HOSTNAME_VERIFIER. If these variables are already setup then the self-signed SSL certificate is also already set up on this machine.
If these variables are not present, then add them as shown below:
- Set ZOOM_SSL_TRUSTSTORE_PATH as the local path for the certificate file that we saved earlier (path should include the name of the certificate file).
- Set ZOOM_SSL_TRUSTSTORE_PASSWORD as the trust store password.
- Set DISABLE_SECURE_HOSTNAME_VERIFIER as true.
Save and close this file and restart the Zoom Preview Service on this machine. Check here to know more about how to restart the Zoom Preview Service on Windows.