VideoLX 2.0 is a lightweight proxy-based media asset management setup that lets Zoom users access high-resolution video files that are saved outside the Zoom repository. It is an upgrade to the previous VideoLX 1.0 with full support for the low-resolution H.264 proxy generation.

Prerequisites
- Ensure you have received a VideoLX license from Evolphin Sales.
- Ensure the Zoom MAM Server is already up and running. See instructions on how to set up your Zoom MAM Server.
- Check VideoLX module is enabled from Zoom’s Web Management Console.
- Designate at least one Windows Server machine on your network as a Transcoder machine (or more transcoders if needed).
- Setup an external shared storage like a SAN or NAS. Zoom desktop clients should have write access to the share.
- Create a small video file to be used as a placeholder for high-res files checked into the Zoom repository until their low-res version is generated.
- The Transcoder will temporarily store files being processed in %userprofile%\.zm. Consider relocating this folder to a path where storage isn’t an issue if planning to transcode a very large amount of files simultaneously. Information on relocating this data can be found here: Relocation of Client-side Data (.zm)
- Ensure data-exchange metadata groups such as ZPIG (Zoom Proxy Info), LRVD (Low res video properties), NVPR (Native Video Properties) or VDEO (Media properties) are defined in the metadata schema and fields required to share common paths and status information between servers, transcoders, and optional archive modules are not deleted. If you wish to modify these groups please consult with Evolphin support.
- Plan on having an exclusive Zoom user account for the Transcoder. One Zoom user account per Transcoder will be needed.
The video below goes over the key steps. It is recommended you watch the video and then follow along with the steps listed below to complete the setup:
Settings on your Zoom Server
Firstly, VideoLX needs to be configured on your Zoom Server. You need to log in to your Zoom Server’s Web Management Console as an admin.
- If you need to set up an on-premise Zoom solution, then you will need to install the Zoom Server (for Windows or for Linux) and also set up a Preview Server. Once the Zoom Server and Preview Server are set up and configured, open the Web Management Console for the Zoom Server.
- If you already have the Zoom Server and Preview Server configured then open the Web Management Console for your Zoom Server.
- If you have a cloud-based Evolphin Zoom service then you need to open your Web Management Console link as provided by Evolphin.
If you want SSL with your VideoLX setup, then make sure that it is enabled on your Zoom Server. To enable SSL or to check if it is enabled, see this section about Zoom Server here.
While accessing the Web Management Console as an Admin, we will configure these options:
- Enable VideoLX
- Set Ingest Rules
- Set Transcoder Settings
- Set up a low-res converter
- Check SSL
- Supply default metadata
- Point to a SQL database
For more details, watch a video tutorial about setting up VideoLX 2.0.
VideoLX also needs to be set up and configured here:
Enable VideoLX
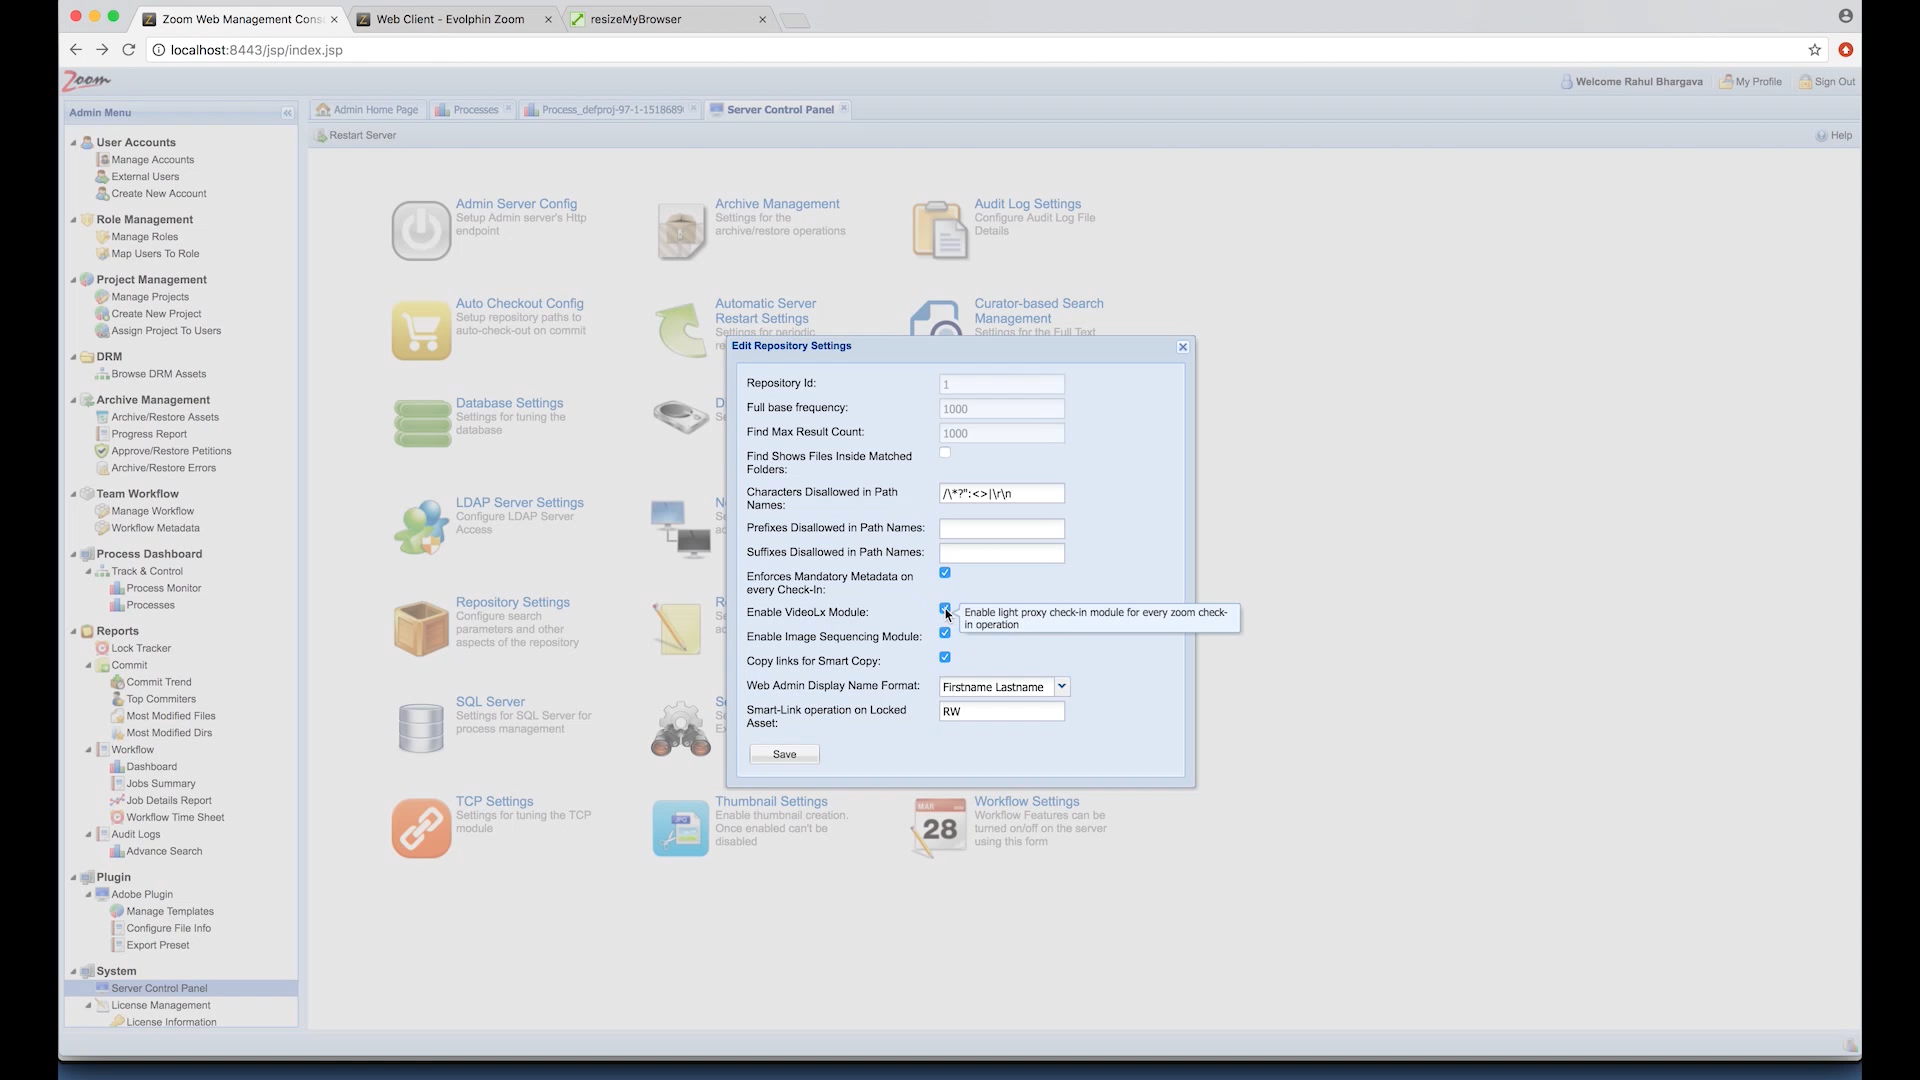
In the Web Management Console, open the Server Control Panel from the System node in the Admin Menu sidebar.
Click on Repository Settings. On the Repository Settings window, enable the VideoLX checkbox. Click Save. Restart your Zoom Server when prompted.
You need to have a VideoLX license from Evolphin to see the VideoLX checkbox as described above. Talk to Evolphin support if you do not have one.
Set Ingest Rules
After the Zoom Server restarts, again login to the Web Management Console as an admin. Open Ingest Settings from the VideoLX node in the Admin Menu sidebar.
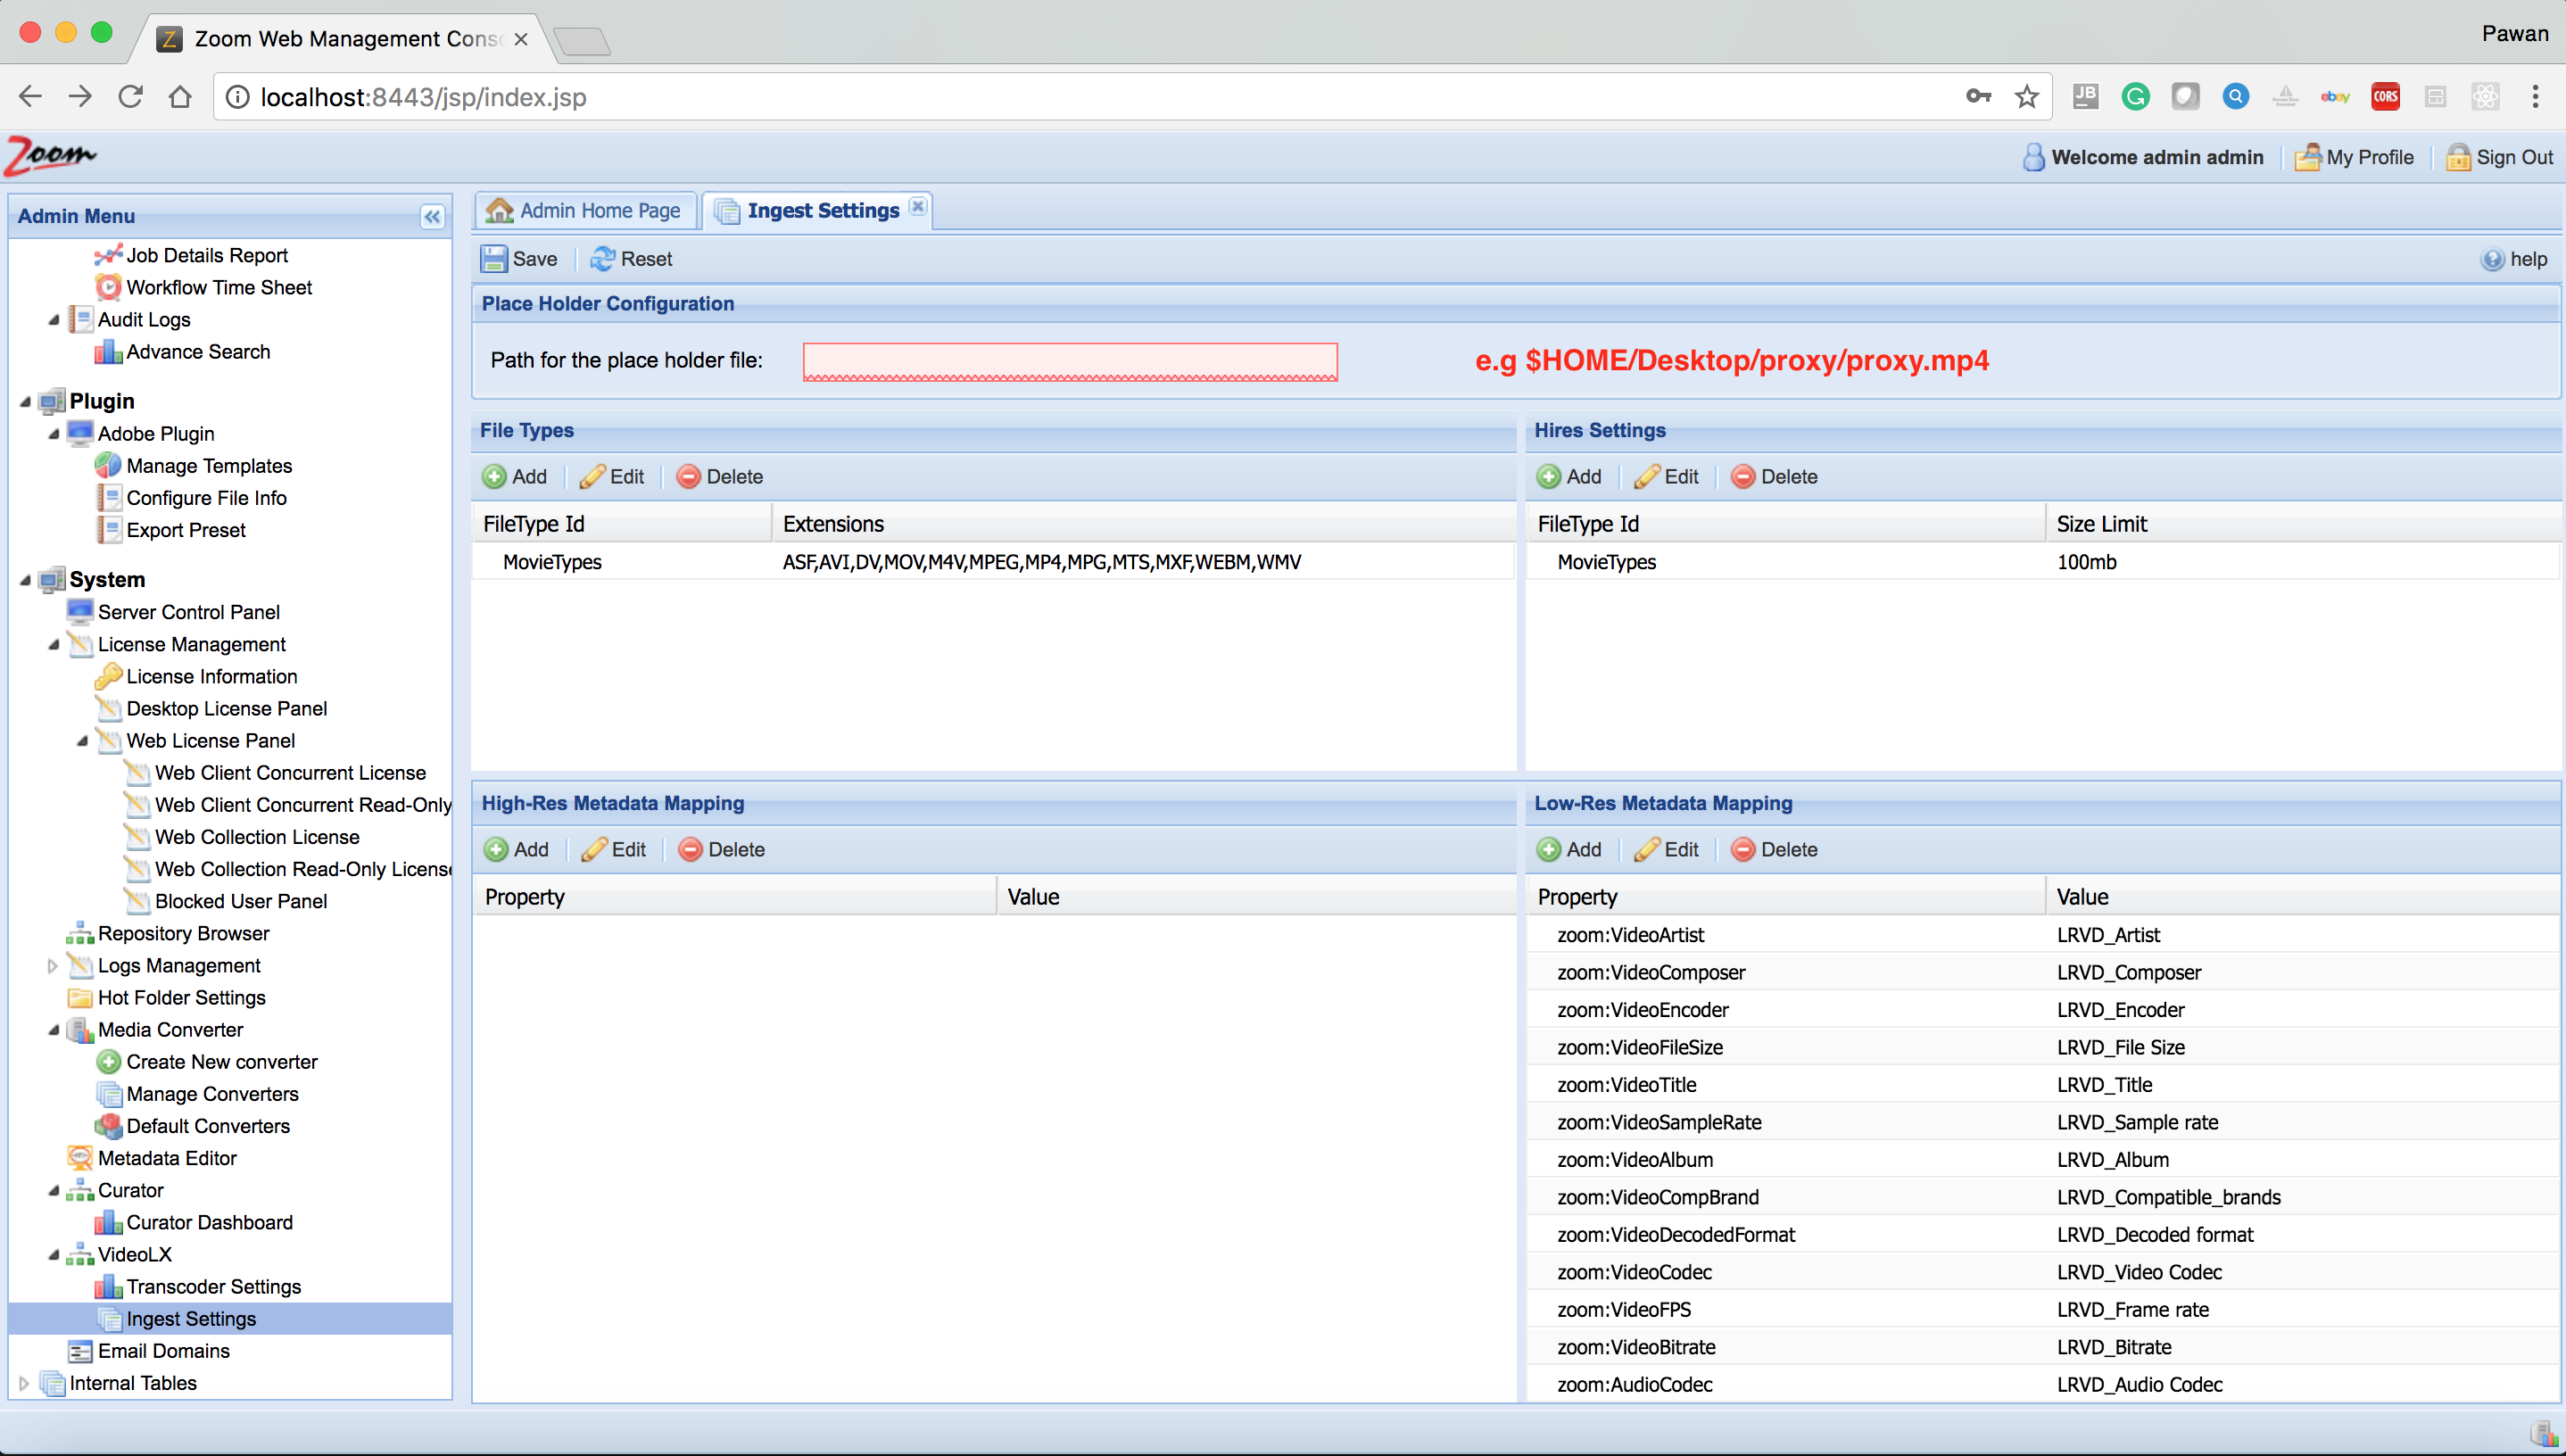
Placeholder file: Specify a path to a valid MP4 video file as a placeholder that will be used as the first revision for all high-res assets when these are checked-in to the Zoom Server. When the low-res version is transcoded, it will be saved as the second revision. The placeholder file can be unique to each user by using the “$HOME” in the path or you can point to a video clip on a shared drive. If using “$HOME” the VideoLX ingest module will look for the MP4 file on the user’s workstation.
Make sure the placeholder path is accessible from each Zoom Client workstation.
High-res video File Types: The file extensions to be treated as high-res need to be specified here. For example, if you don’t wish for any .mp4 to be treated as high-res you can remove it from the extensions list.
High-res file size threshold: The Size Limit for high-res files is mentioned under Hires Settings. All files that have extensions listed here and which are larger than the size limit specified will be treated as high-res. All the other files will be treated as direct ingest and will be stored in the Zoom MAM database. The high-res files will go through a low-res proxy transcoding workflow.
This page also has options to define the High-res and Low-res technical video metadata mapping used to copy the technical video metadata such as duration, bit-rate extracted by the Evolphin transcoder to appropriate metadata fields in Zoom. The default settings rarely need to be modified.
After making the changes, click Save.
Evolphin Transcoder Settings
In the Web Management Console, open Transcoder Settings from the VideoLX node in the Admin Menu sidebar.

This page will list all Evolphin transcoders available. Transcoders are listed after being registered with the Zoom MAM Server using the form on the transcoder server. For more information on registering transcoder servers, watch the tutorial video above or read the information further down this page.
Global Configuration
We will set some global settings here that all transcoding machines will use. Later on, the settings for any transcoder may be changed from the global values. Particularly, when multiple transcoders are set up, you may use specific transcoders for only specific projects by editing here.
Set these global values:
Third Party Mount Path: Specify the network location where all high-res files will be saved. Make sure it is accessible by the Zoom Client workstations.
Copy Low Res to TPM: Check this box if you want low-res files to be saved on the Third Party Mount also (along with the low-res proxy checked into the Zoom Server). All high-res files are being saved on the Third Party Mount only. But, when this box is unchecked, the low-res files are only saved on the Zoom Server.
Auto Connect Time: Specify the time in minutes after which a Transcoder will auto connect to the MAM server to check for new transcode jobs. If it is not specified then 5 mins is used as the default value. This value impacts how long the Zoom server waits before triggering low-res proxy transcoding after a VideoLX high-res ingest.
Notify Users: Choose one of more admin users that need to be notified about events in the VideoLX setup from the drop-down list box.
Transcoding Machines
After a transcoder is registered, it will be listed here in the Transcoding Machines page. You can edit any transcoder configuration by selecting it and clicking the Edit button.

Third Party Mount Path, Copy Low Res to TPM, Auto Connect Time can be overridden for each registered transcoder. Otherwise, the settings in Global Configurations are used.
Select Projects: If you have multiple transcoders please make sure you point each transcoder to a unique set of Evolphin Zoom Project vaults. For instance, Evolphin Inc and NewsNet Global brands above may be registered with different transcoders. In the above example, the transcoding server in San Ramon, CA processes high-res videos for the Evolphin, Inc brand and the Boston, MA transcoding server processes high-res videos for the NewsNet Global brand. This is a great way to scale out when ingesting a larger number of videos. Please note each transcode server will require a separate license.
Click Save.
Setup a low-res converter for VideoLX
Select which converter on the Zoom Server to use as the low-res converter for generating proxies. VideoLX 2.0 ships with the “System – Low Res Converter” you can use, or you can use the settings page below to create your own.
In the Web Management Console for your Zoom Server, open Manage Converters page from the Media Converter node in the Admin Menu sidebar.

Select the converter from the list called “System – Low Res Converter” which has MP4 as its output, and click Edit. In the Edit window, make sure the Use as LowRes Converter checkbox is checked. Click Save.
To tune the ffmpeg-based Transcoder for your specific low-res proxy needs, please make sure you are familiar with how ffmpeg parameters work. In the list of converters, you can duplicate one as a starting point and change the settings to suit your needs.
ffmpeg commands, please refer to ffmpeg.org’s documentation.Evolphin’s built-in low-res converter maintains the frame size (dimensions) of the video so that when switching between low-res and high-res versions, the frame size does not jump in Adobe Premiere. If you would like to adjust the file size (data size) of the low-res versions, you can modify the -maxrate setting to keep the bitrate of the low-res version under a certain amount. -maxrate is essentially a bandwidth cap, and when combined with the -crf setting, you can control the quality of the outputted videos.
Non-FFmpeg based transcoders can also be supported via the Zoom Converter framework. For instance, the REDLine SDK can be used to support the RED camera format as explained here.
SSL check
If you wish to use SSL/TLS between an Evolphin Transcode server and the Zoom MAM server, please ensure that SSL is enabled on the Zoom Server. If you are using a cloud-based Zoom service then check with Evolphin support. If SSL is required, you can learn how to set up an SSL certificate for the Zoom Server here.
Mandatory metadata check
If mandatory metadata is enabled in Zoom, then all mandatory metadata fields should have a default value set for each of them. This is important or else check-in would fail for high-res ingest files.
To determine how to check if mandatory metadata is enabled or not, click here.
To set default values for mandatory metadata, follow these steps:
Open the Metadata Editor page under the System node in the Admin Menu sidebar.

Ensure that all mandatory fields under all metadata groups have default values. To add a default value, select the metadata row and click Edit. Specify the default value and click Submit. After all the defaults are saved, click Save Metadata at the top menu bar.
Set up a SQL database for process monitoring
- To log and view the progress of the transcoding processes on various Transcoder machines, you need to configure a SQL database in the server control panel. If you do not have a Zoom script database set up already, then install and configure an SQL server like MySQL, and set up the schema for process reporting as described here first.
- Go to the Web Management Console for your Zoom Server and open the Server Control Panel page from the System node in the Admin menu sidebar. Click on SQL Server. In the Edit SQL Server window, specify the details about your SQL Server like username, password, and location. Click Save.
If the Zoom Server is able to connect to the SQL Server using these settings, then a confirmation about successfully saving the settings is displayed.
Settings on the Transcoder machine
Select a Windows Server machine as the Transcoder. It should be set up with a mount point to the SAN/NAS that will store the high-res assets and be able to access your Zoom Server.
We need to install a Zoom Preview Server on this machine and ensure it can communicate with the Zoom Server.
Install the Zoom Preview Server
On this machine, copy the Zoom Server installer for Windows. Install the Zoom Server and follow the instructions in the installer. This will install the Preview service needed by the Transcoder.
After installation, check that:
- You can connect to the TCP port of your Zoom Server from this Transcoder machine. You can easily check that by opening the Windows PowerShell and typing the below command with your MAM server and port:

If you do not know how to use the Windows PowerShell, keep going as the transcoder web registration form will also validate the connection.
- Ensure the Zoom Preview service is running and has been set to start automatically at startup. (From Run box, open services.msc):

- Make sure the Zoom Service has been stopped or disabled to ensure only Zoom Preview service is running:

Set up an SSL certificate
This step is only needed if you are using a self-signed SSL certificate for Zoom. If you are using a commercial SSL certificate then no other settings are needed on the Transcoder machine.
If you are using a self-signed SSL certificate then this certificate needs to be configured on the Transcoder machine as well. You will need the certificate file and its trust store password to complete this step.
Save the certificate file on the Transcoder machine, and copy its path.
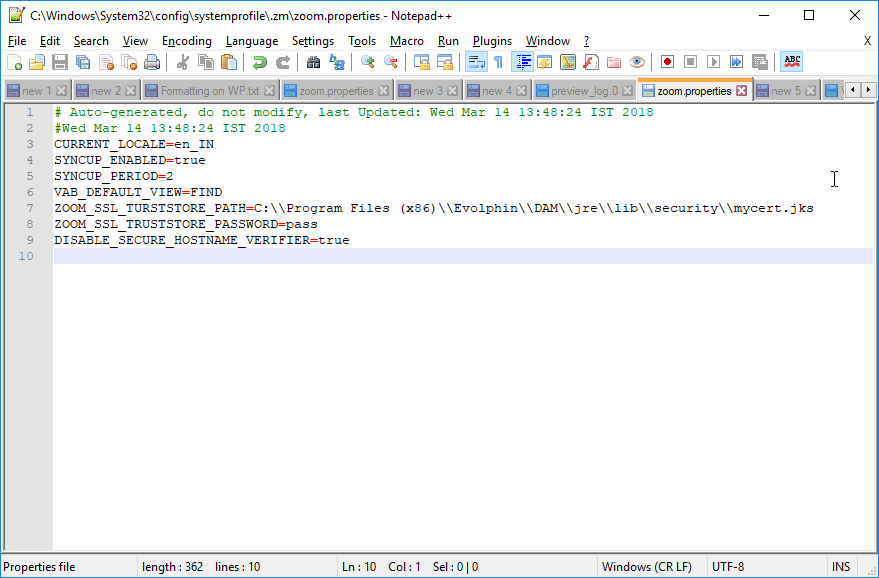
Go to the folder C:\Windows\System32\config\systemprofile\.zm and open the zoom.properties file for editing.
Check for the variables ZOOM_SSL_TRUSTSTORE_PATH, ZOOM_SSL_TRUSTSTORE_PASSWORD, and DISABLE_SECURE_HOSTNAME_VERIFIER. If these variables are already setup then the self-signed SSL certificate is also already set up on the Transcoding machine.
If these variables are not present, then add them as shown below:
- Set ZOOM_SSL_TRUSTSTORE_PATH as the local path for the certificate file that we saved earlier (path should include the name of the certificate file).
- Set ZOOM_SSL_TRUSTSTORE_PASSWORD as the trust store password.
- Set DISABLE_SECURE_HOSTNAME_VERIFIER as true.
Save and close this file and restart the Zoom Preview Service on the Transcoder machine. Check here to know more about how to restart the Zoom Preview Service.
Register Transcoder machine with your Zoom Server
On the Transcoder machine, open the Transcoder configuration page: http://[TranscoderIP]:8873/review/transcoding/index.html
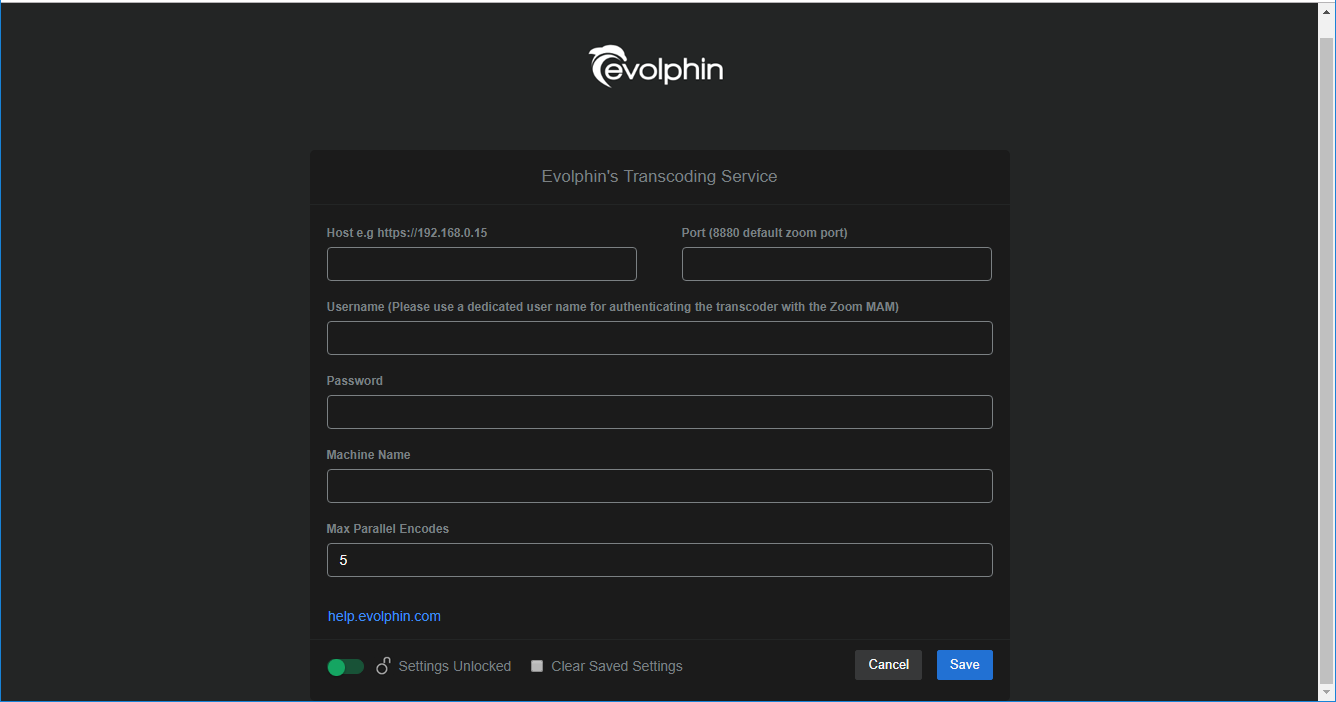
Host and Port: Specify your Zoom Server hostname and the port on which the Zoom Server connects. Enter port 9880 if using SSL, otherwise, enter port 8880. If you use another port for the SSL connection on the Zoom Server, then specify that port value (the SSL port for your Zoom Server may be checked on the Zoom Server. Click here for more details)
Username and Password: Specify Zoom user credentials that the transcoder will use to connect to the Zoom Server. This user should be used exclusively by this Transcoder Machine. It will consume a Zoom user license. Do not use your admin or personal user account as that will cause the authenticated session between the servers to be invalidated.
Machine Name: Give a name for the Transcoder machine without using any spaces or special characters (!, @, #, %, $, & ,*, (, ), _, +).
Max Parallel Encodes: Specify the maximum number of encoding jobs allowed parallelly. The default value is 5.
Click Save.
This transcoder is now registered with your Zoom Server and ready to use. It will use the Global Settings that were set earlier. You can set up multiple Transcoder machines similarly. You can also modify the settings for any Transcoder from the Transcoder Settings page in the Web Management Console for your Zoom Server.
Client Configuration
Third-party mount points (TPM) are paths to the root folder where the high-res media is copied to after an ingest. For example, if the TPM folder as mounted on a MAC workstation is:
/Volumes/data/SAN/High-ResMedia/
Underneath this root folder, Zoom VideoLX might have copied a high-res video file and appended “_original” to the name, such as:
/Volumes/data/SAN/High-ResMedia/Library/Video/airplane_original.mov
The TPM might have been mounted on the Windows Server Transcoding machines as:
\hvidserver1\data\SAN\High-ResMedia\
In order for the Zoom Client apps to locate the high-res assets, the above TPM path must be specified in the zoom.properties file:
3-SR-MBP-2018: evolphin$ grep -i Third ~/.zm/zoom.properties THIRD_PARTY_MOUNT_POINT=/Volumes/data/SAN/High-ResMedia/
Clients will also need a reference to associate high-res files with their proxy assets. You will need to add the following line, adding or subtracting high-res formats as needed.
EXTENSIONS_PROXY_MAP=mp4->wmv,r3d,mpg,mts,m4v,webm,mp4,dv,asf,avi,mov,mpeg,mxf;
This can be configured in the global settings on the Zoom Server and automatically pushed to the Zoom Client workstations. Read more about TPM here.
To see how to verify the VideoLX ingest workflow, follow the article here.