After your VideoFX / VideoLX system is set up, you can also set up Aspera for automatic high-res file duplication based on pre-configured conditions. You will need to set up an Aspera High-speed Transfer Server and an Aspera Client / CLI as part of this setup.
Components
The interaction of the Aspera system with the existing transcoding flow is shown below for a file that meets the condition to be transferred by the Aspera Server:

In this diagram, the high-res version of the file ingested via the transcoding flow in Zoom is transferred by the Aspera Server to the configured destination path. The components are:
- File: this is a file being ingested via the transcoding flow in Zoom.
- Check-in Process: the back-end processes of the transcoding flow are run under the Check-in process. It sends the file to the Transcoder and also notifies Zoom.
- Trigger Path: Path in the Zoom repository that will trigger the Aspera flow when a file is saved here.
- Zoom Server: the Zoom MAM Server that holds the repository. The Trigger Path exists on its repository and is also configured here.
- Destination Path: Path outside Zoom where the file needs to be copied.
- Aspera Server: Aspera’s High-speed Transfer Server that copies the file requested to the destination path requested.
- Transcoder / Aspera Client: the transcoder that will get the Aspera Client so it can communicate with the Aspera Server. This Transcoder holds the value for the destination path. When instructed by Zoom, it will send a request with the Aspera Server to copy the file to the destination path.
Prerequisites
Ensure that the following conditions are met:
- The VideoFX / VideoLX system is configured and is running as expected.
- An Evolphin process hub (possibly running on a Transcoder machine) is designated to run the Aspera Client.
- A separate server is designated to run the Aspera Server. This machine is independent of Zoom so it can be outside the Zoom network. It does not need to have Zoom installed.
- Identify the trigger and destination paths for files that should be transferred.
- The trigger path is a path where whenever a file is saved, the Aspera flow will be triggered. This path is on the Zoom repository and is accessed by the Zoom network using the transcoding flow. This value is configured on the Zoom Server.
- The destination path is where a file going through the Aspera flow should be saved by the Aspera Server. This value is configured on the Transcoder that also hosts the Aspera Client.
- Plan on having an exclusive Zoom user account for use by the Aspera Client.
After checking these requirements, follow these steps to continue:
- Set up a storage path for Aspera Server to store the transferred files
- Set up Aspera High-speed Transfer Server
- Configure Aspera trigger on your Zoom Server
- Configure the Aspera Client on your Transcoder
- Validate your Aspera flow
Set up a storage path for the Aspera Server
The Aspera Server will transfer files requested by the Aspera Client to a preconfigured storage path. This path must be accessible on the Aspera Server. Check for any network restrictions to make sure your desired path is accessible from your designated Aspera Server. Save information about this path so it can be configured later on the Aspera Client.
Set up Aspera High-speed Transfer Server
On your designated Aspera Server, download and install Aspera High-speed Transfer Server from https://downloads.asperasoft.com/downloads.
After installing and configuring, make sure to start the Aspera Server.
Configure Aspera on your Zoom Server
You need to save the trigger path along with the location on the Zoom Server. These settings are saved in the server.xml file. Follow these steps to save these configuration settings:
- On your Zoom Server, open server.xml for editing from the conf folder in your Zoom Installation path (Windows – [ZoomInstallDir]\conf\ and Linux – [ZoomInstallDir]/conf/)
- Add the following tags inside <serverspec>: <asperaSpec>
<syncFolders>
<field path=”/Path1″ location=”Location1″/>
</syncFolders>
</asperaSpec>where Path1 is the folder which will result in triggering the Aspera flow if an asset is saved here or in its sub-folders for a machine at the location Location1. - Save and close the file.
- Restart your Zoom Server.
Configure the Aspera Client on your Transcoder
On your designated Transcoder, download and install Aspera Client from https://downloads.asperasoft.com/downloads. Only Aspera CLI would also work.
After installing and configuring, make sure that Aspera bin is added to $PATH. Follow these steps to confirm:
- Open command prompt or terminal.
- Type ascp and press Enter.
- The system would find ascp and show usage.
You also need to save the destination path along with the location on this Transcoder. These settings are saved in the zoom.properties file of the Preview Server. Follow these steps to save these configuration settings:
- On your Aspera Client, open zoom.properties for editing (Windows – [OSInstallDir]\Windows\System32\config\systemprofile\.zm\ and Linux – $Home/.zm/)
- Add the following properties: ASPERA_HOST=HOSTIPASPERA_USERNAME=ZoomUserNameASPERA_PASSWORD=ZoomPasswordASPERA_UPLOAD_TARGET=/DestinationPath
where HOSTIP is the address of the Server hosting the Aspera Server and DestinationPath is the path where the file transferred by the Aspera Server should be moved to.
- Save and close the file.
- Restart your Transcoder.
Validate your Aspera setup
Once all the steps in setting up Aspera are complete, you can see the flow in action while checking in a file to the trigger path. The Aspera job can also be tracked in the Web Management Console in the Jobs Dashboard. Check the flow with this example:
- Get a valid high-res file for checking-in on a transcoding-enabled Zoom Client. Drop the file into the Asset Browser.
- The check-in dialog will be shown where you can choose the ingest settings for each file and set the metadata properties.

- Set the desired values including setting the Server Folder here within the Destination Path for Aspera. Click Check-In.
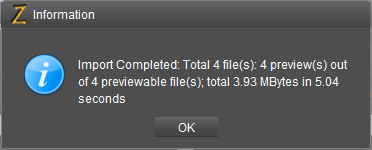
- Screen prompts are shown while sending the files. A message for import complete is shown to the user. Click OK.
- The placeholder file is checked in for this high-res asset.

- The link icon
 below the asset name shows that this is a high-res asset. The low-res proxy is generated and checked-in after a while.
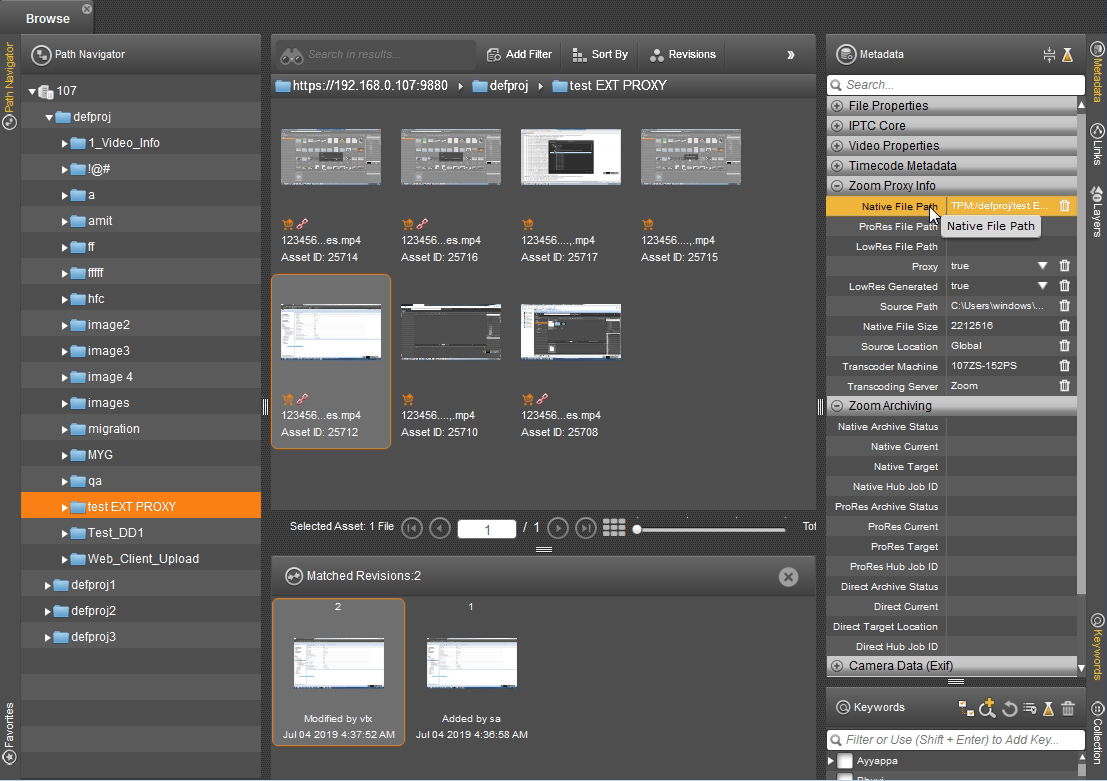
- The metadata shows information about the high-res (native) file before the Aspera sync.

- The Process Dashboard in the Web Management Console (Webmin) also shows this new job as File-Sync.

- The monitor shows jobs in a graph along with other transcoding jobs.

- After the sync with Aspera is complete, the metadata is also updated in Zoom.