The Hub Server handles archive/restore processes for Zoom version 7.3 onwards when configured as part of a Hierarchical Archive system on Zoom.
It needs to be configured on Zoom first and also installed on a server machine later. The Hub Server’s configuration can be managed through Zoom’s Web Management Console. This guide will cover:
Hub configuration in Zoom
Zoom stores Hub configuration settings to connect with a Hub Server. These configuration values should be added to Zoom before installing the Hub Server.
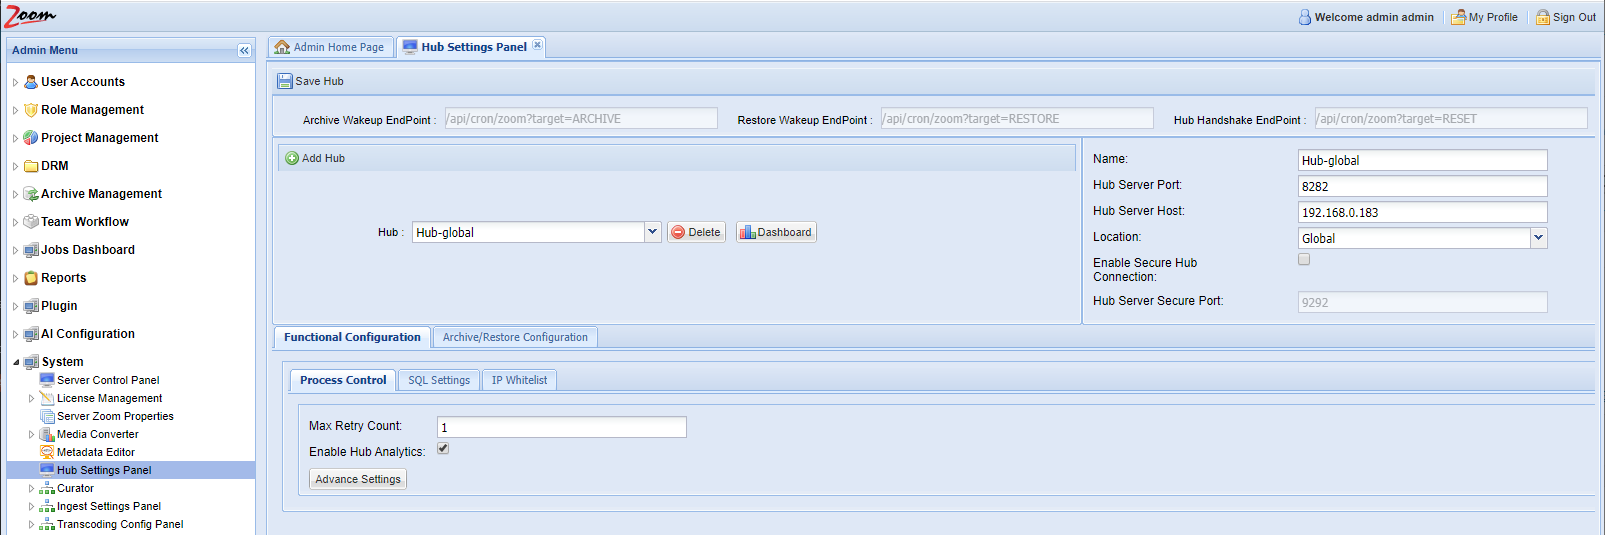
Log in to the Web Management Console and click the Hub Settings Panel under the System node in the Admin Menu sidebar.
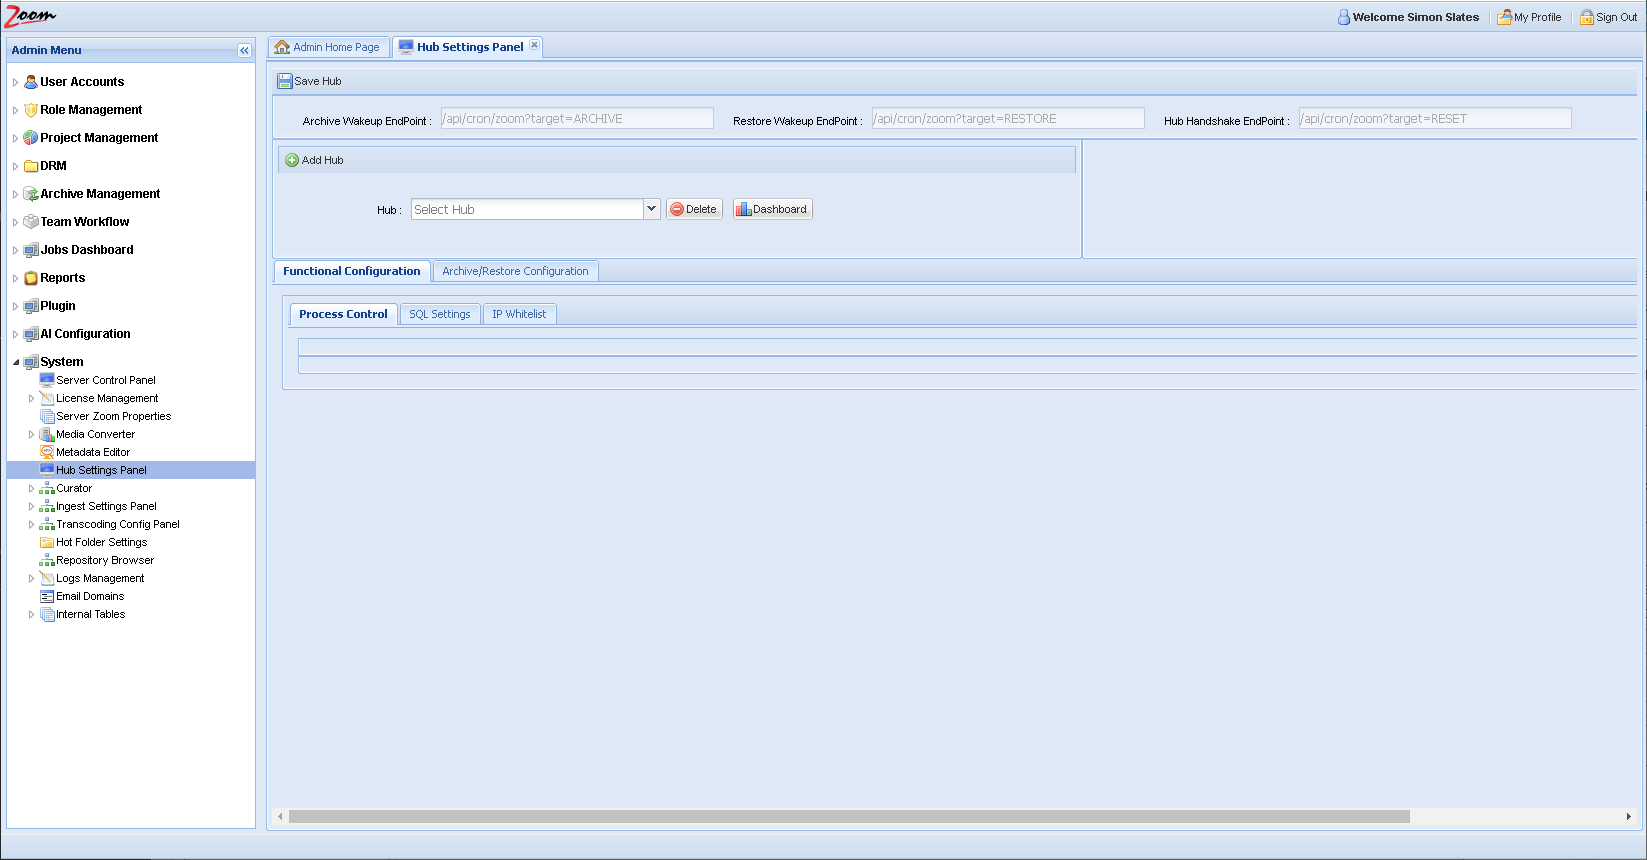
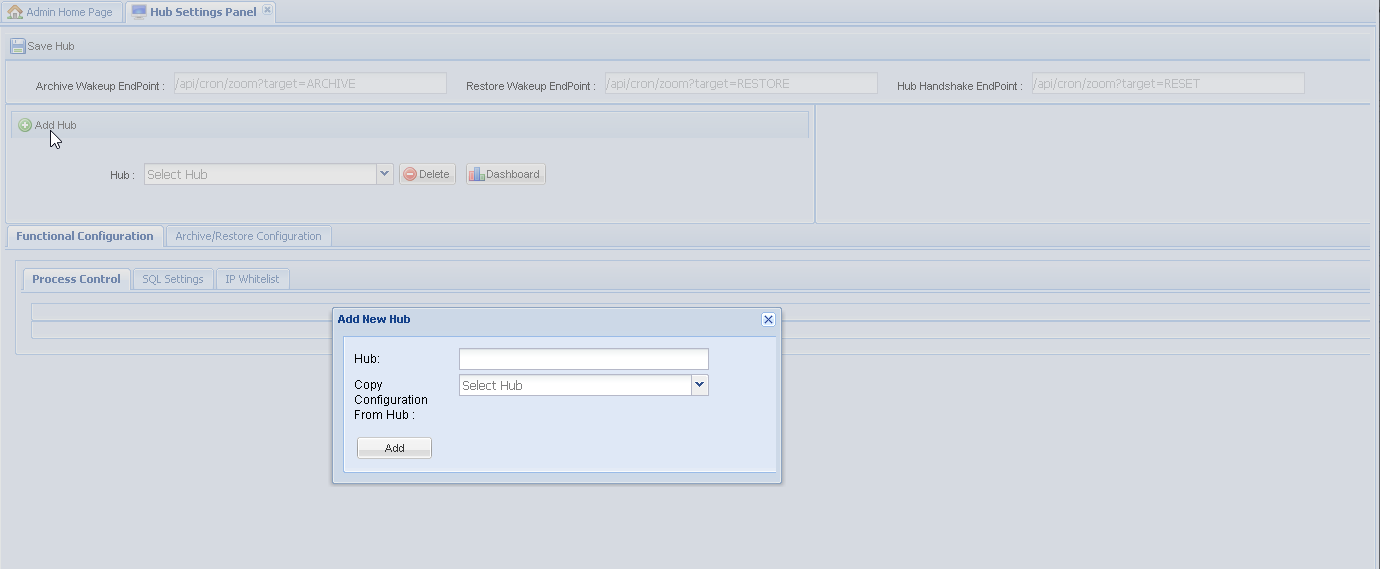
On the Hub Settings Panel, click Add Hub and specify a name for the new Hub. If you want to copy the settings of an existing Hub to your new Hub, select the existing Hub name from the Copy Configuration From Hub drop-down, otherwise leave it blank. Click Add.
Update basic connectivity details for the Hub, like Host (IP) and Port settings. For location-specific settings, also specify the location where the Hub should work. If using SSL, select the Enable Secure Hub Connection checkbox.
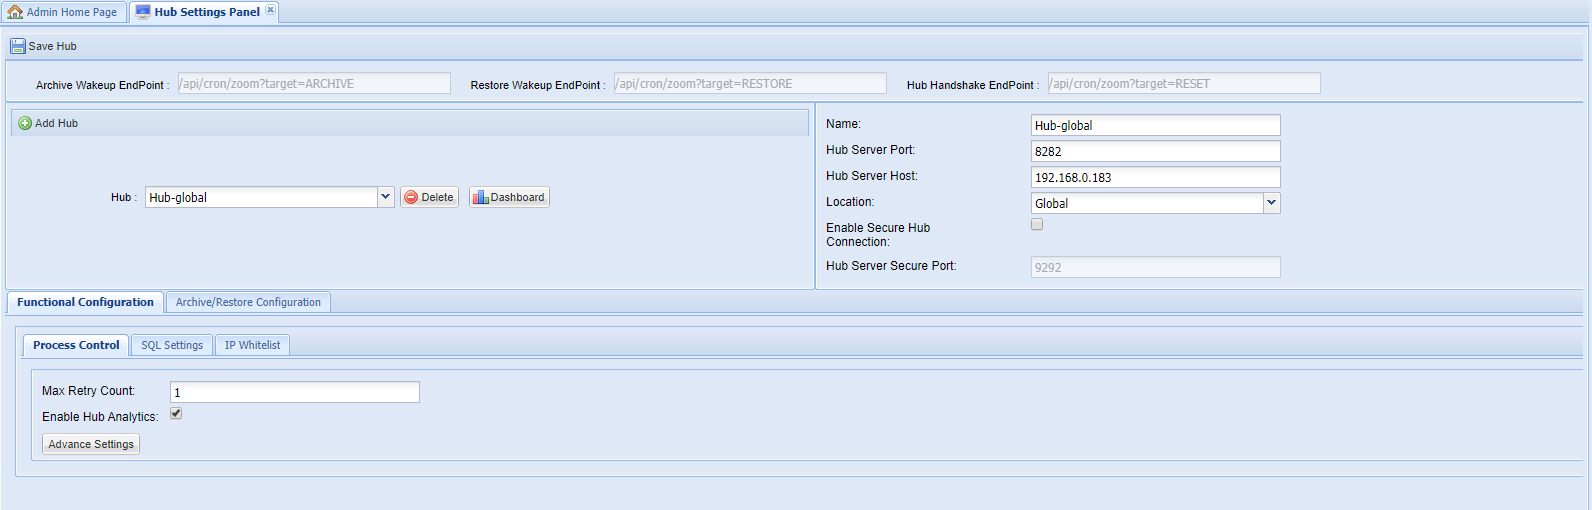
Once the basic connectivity parameters are specified, enter values for the advanced configuration. It is categorized into two parts namely the Functional Configuration and the Archive/Restore Configuration. See the sections below to know about the values that should be entered for these:
Functional Configuration
These values are needed for the basic working of the Hub. It covers Process Control values, SQL DB values, and IP Whitelisting values.

Process Control
These are configuration parameters that control how responsive the Hub will be and must be filled in based on your assessment of the expected load that the Hub is supposed to handle. If you are unsure about this, then use the default values.

Click Advance Settings to see additional Process Control options.
- Max Retry Count: Number of times the failed jobs are retried automatically.
- Enable Hub Analytics: Flag to turn on or off the Analytics module on the Hub.
- Core Pool Size: Minimum number of threads that will be created by default for job execution.
- Max Pool Size: Maximum number of threads that can be created for job execution.
- Queue Blocking Limit: Number of jobs that can be queued in the Hub for processing.
- Keep Alive Time: Duration (in minutes) for which resources are kept when the Hub is not servicing any requests; after this duration, the resources are surrendered.
SQL Settings
Hub uses a SQL Server to store job-related details.
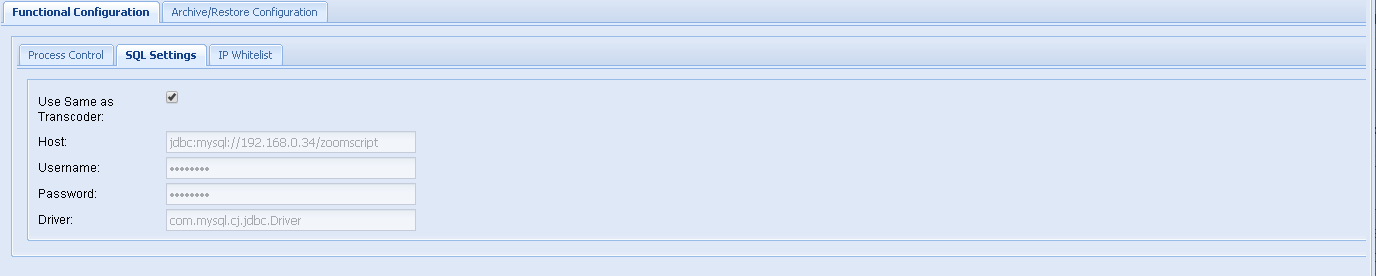
The Zoom Server also uses SQL to store process data for some of its other modules too. If it is already configured for your Transcoder and you would like to use the same SQL database for the Hub as well, then simply select the Use Same as Transcoder option. If you want to create a new or separate SQL database for the Hub, then follow instructions here to download your OS-specific installer of MySQL. Run the installer and follow the instructions. Create a user and provide the host, username, password, driver (com.mysql.cj.jdbc.Driver) details here.
IP Whitelist
For security reasons, only IPs configured here will be allowed to communicate with the Hub Server. Typically, the Zoom Server sends requests to the Hub. In addition, anyone viewing the Hub Dashboard will also be sending queries and so the IPs of all clients who would need access to the Hub Dashboard must also be added here.

Add the list of IPs from which Hub will entertain requests.
Archive/Restore Configuration
These values are needed for the handling of Archive jobs with the Hub. It covers paths and projects covered under various tiers.
Tier 0 is considered to be the Zoom repository. Tier 1 is any path that Zoom can access other than its own repository. And, tier 2 is an external path that Zoom cannot access. For tier 2 paths, Zoom only updates the required metadata for the asset and waits for the Hub to pick up this asset to be moved to tier 2.
- Tier 0 – Zoom Repo
- Tier 1 – Anything accessible by Zoom but not the Zoom Repo
- Tier 2 – External Paths not accessible by Zoom

In this section, the details of all destination tiers are added.
FS Tier 1
Configure any File System paths, that are used by Zoom, for use by the Hub. The paths should be with respect to Hub and mount points should be mounted on Hub as well.
- Default: Comma-separated list of TPM (Third Party Mount point) paths whose assets are expected to be archived using the current Hub.
- Direct Asset Archive DB Mount Path: The default location where the Zoom Server archives the direct-ingest assets.
- Project-wise TPM Mapping: Project-specific archive destination locations for proxy and direct assets as configured in the Zoom Server archive settings.
FS Tier 2
Configure any File System paths here that will not be accessible by Zoom, but by the Hub for archiving.
- Default: Comma-separated list of TPM paths whose assets are expected to be archived using the current Hub.
- Project-wise TPM Mapping: Project-specific archive destination locations for tier-2 archiving.
S3 Tier 2
Configure S3 paths here that would be accessed by the Hub to save to its S3 bucket.
Enter the details of the Amazon S3 bucket like the secret key, access key, and region. It is also possible to define unique S3 buckets for project-wise mapping. For projects not assigned a unique bucket, the default one will be used.

Click Save Hub after configuring the necessary details across various panels.

Jobs with the Hub Server
The Hub has a dashboard to track and monitor archive/restore jobs and it is accessed from Zoom’s Web Management Console.
After your Hub is set up and all archiving parameters defined, you can view the archive/restore jobs’ progress in the Hub Dashboard inside the Web Management Console. Log in to the Web Management Console and click the Hub Settings Panel under the System node in the Admin Menu sidebar.
On the Hub Settings Panel, select the desired Hub from the Hub drop-down and click Dashboard.
The Hub Dashboard opens with a list of all recent jobs with details about each of those jobs.
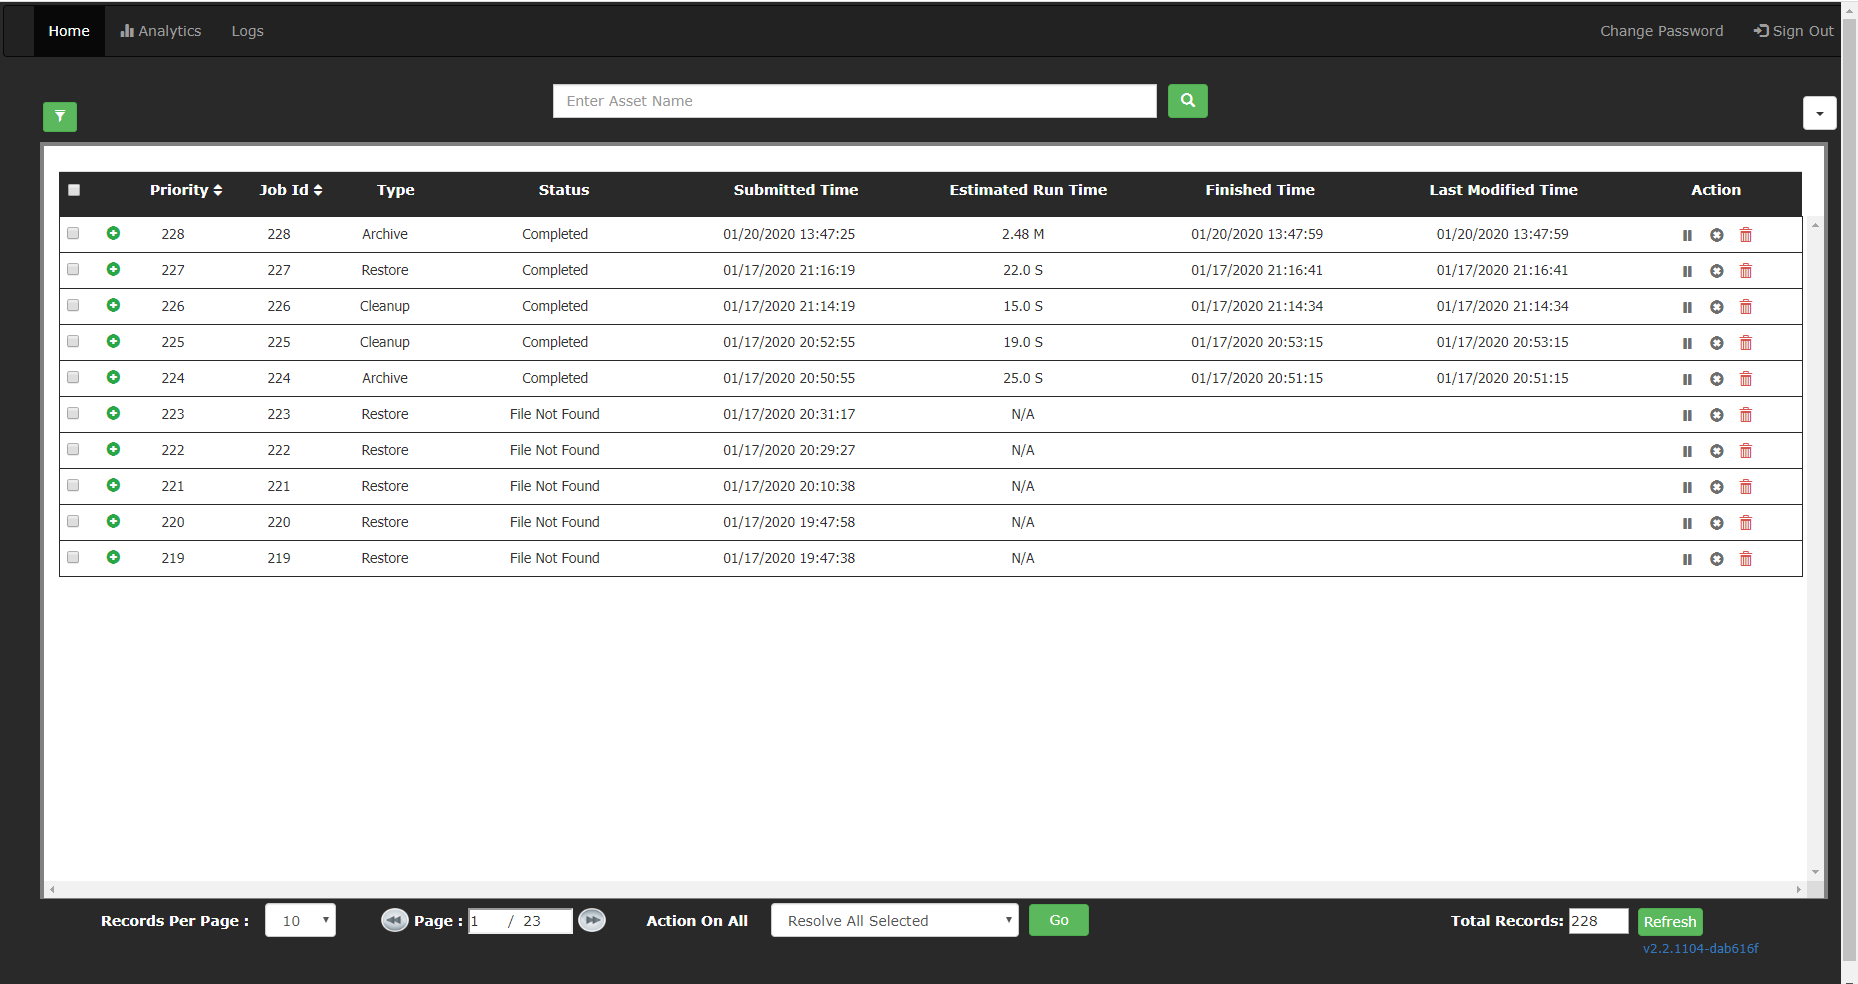
Filtering
You can filter the jobs by clicking on the Filter  icon. Specify the criteria in the filter box shown and click Apply Filters.

Click on the Filter icon again to see/modify/remove filters. Click Apply Filters to see the changes.
Job Details
To view the list of assets that are part of a job, click on the icon in the beginning of row for that job. This detailed view also shows the individual file-level status and relevant times like the status change times.
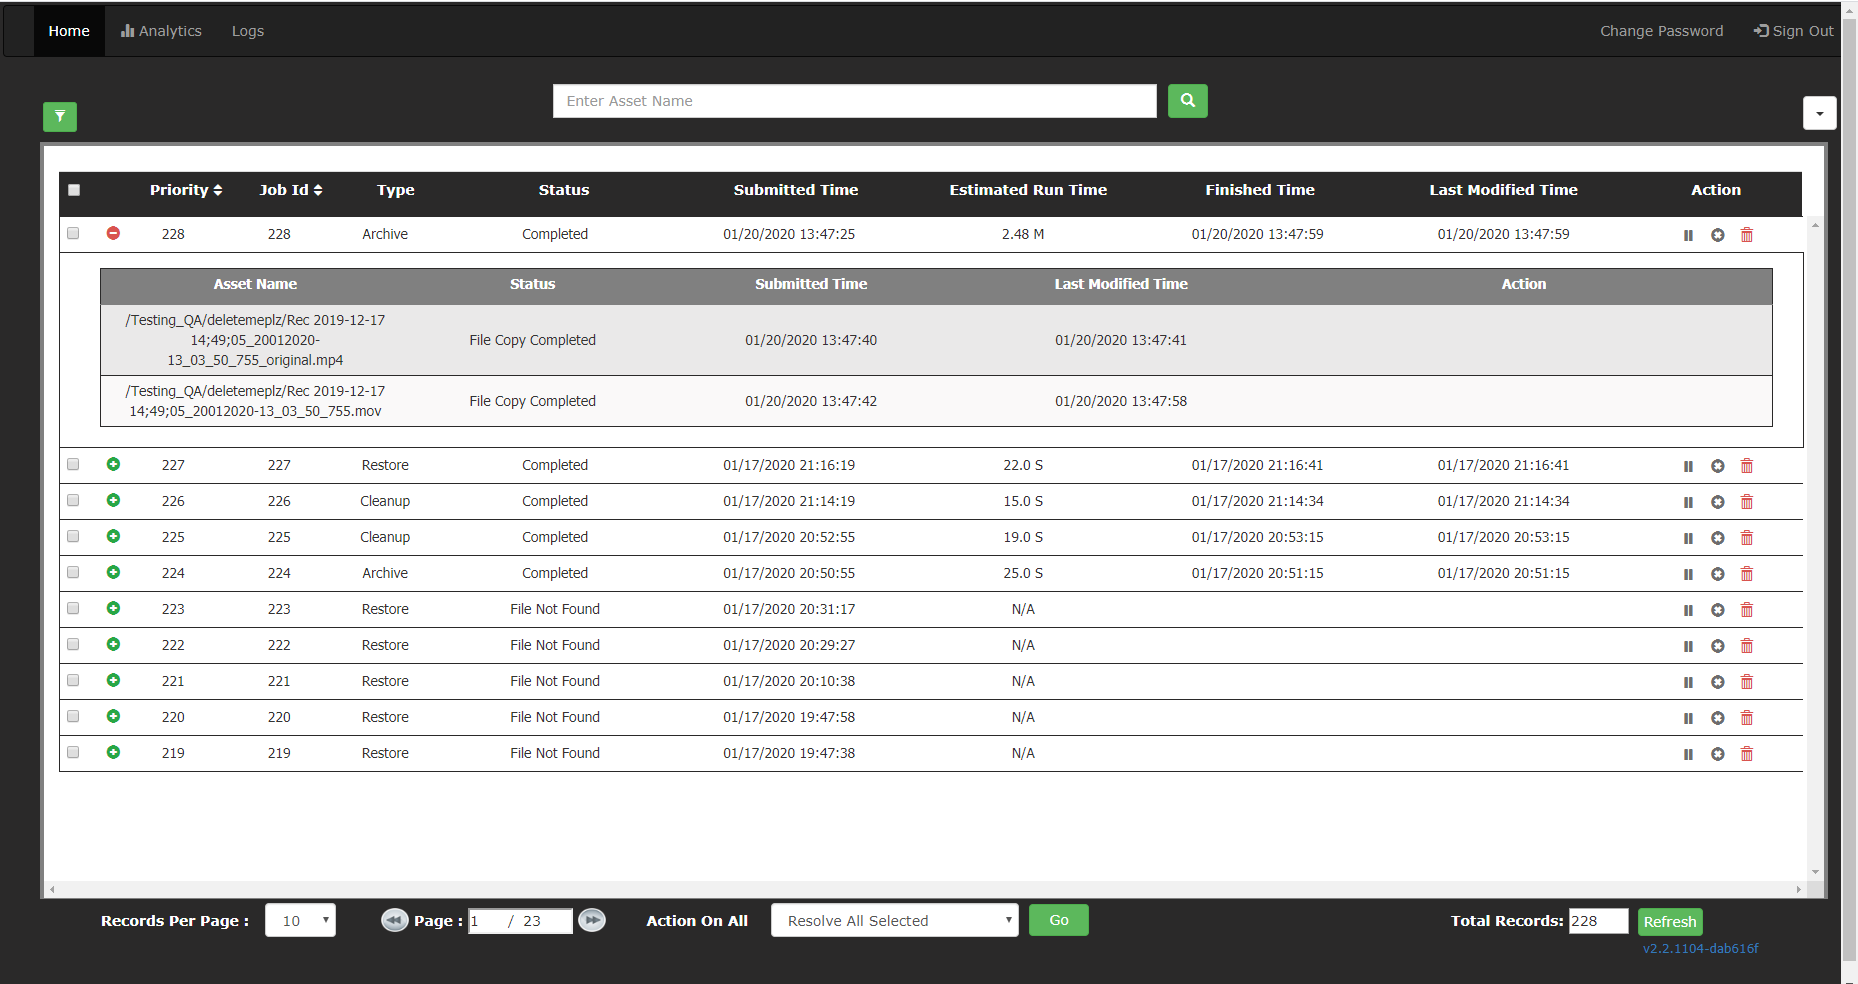
For jobs that are under process, the option to take action on individual assets is also available at the end of the row for each asset.
Process Control
From the Dashboard you can Pause/Resume, Cancel/Resubmit, Resolve, Delete a job or some of its assets.

If you cancel a running job, then Hub stops processing after the current asset finishes and leaves the remaining assets.
Logs
A more detailed log is maintained and is available for viewing as well as downloading from the Logs tab in the dashboard. Select the current or archived logs from the Logs dropdown.

Select a log and click  to download that log to your local machine.
Hub logs
The Hub writes its events to a log file ejh_server.log. This file is saved in the logs folder inside your Hub installation directory. Apart from ejh_server.log, wrapper.log is another log file present in the logs directory. The wrapper.log file logs any errors that were not logged in the Hub logs, including logs generated when the Hub Server is not running like before startup or after a crash.
These log files help you locate issues in the case of errors or when the Hub is behaving abnormally. Whenever logs are requested, always submit both log files to Evolphin Support.
It is possible to control the various log configurations by editing the file log4jConf.xml in the conf folder inside your Hub installation directory. By editing log4jConf.xml you can control:
- Log file’s directory and name – controlled by the tag <FileName>
- Rolling properties of log files
- The maximum number of archived log files
- Various log levels – controlled by tag <Root level>
In most cases, the default settings for logs will work for you. If you still need to change something, look at the sample log4jConf.xml to update these values:
<Configuration>
<Appenders>
<RollingFile name=”RollingFile”>
<FileName>../logs/ejh_server.log</FileName>
<FilePattern>../logs/ejh_server-%i.log</FilePattern>
<PatternLayout>
<Pattern>%d{yyyy-MMM-dd HH:mm:ss:SSS a} [%t] %-5level [%C{1}.%M] – %msg%n</Pattern>
</PatternLayout>
<Policies>
<SizeBasedTriggeringPolicy size=”5 MB”/>
</Policies>
<DefaultRolloverStrategy max=”20″/>
</RollingFile>
</Appenders>
<Loggers>
<Root level=”info”>
<AppenderRef ref=”RollingFile”/>
</Root>
<Logger name=”org.springframework” level=”WARN”>
<AppenderRef ref=”RollingFile”/>
</Logger>
<Logger name=”org.hibernate” level=”WARN”>
<AppenderRef ref=”RollingFile”/>
</Logger>
<Logger name=”org.apache.http.impl.conn.Wire.wire” level=”WARN”>
<AppenderRef ref=”RollingFile”/>
</Logger>
<Logger name=”org.apache.http.wire” level=”WARN”>
<AppenderRef ref=”RollingFile”/>
</Logger>
<Logger name=”org.apache.http.headers” level=”WARN”>
<AppenderRef ref=”RollingFile”/>
</Logger>
<Logger name=”org.apache.http.impl.conn” level=”WARN”>
<AppenderRef ref=”RollingFile”/>
</Logger>
</Loggers>
</Configuration>
These options are available:
- FileName: This is the log file name along with its path where the hub log will be saved. It is usually named as ejh_server.log. The file will be created on the specified path.
- SizeBasedTriggeringPolicy size: This is the file size limit for the log file specified above.
- FilePattern: This is the file name pattern along with the path where the archived logs are kept. When the default log file created above crosses the size limit specified, then the existing log file will be written to the file name with the pattern and path specified here and a new empty log file is created as the default log file. The %i in the file pattern is replaced with a number starting with 1 as new archived log files are created. The latest archived file always has number 0 and older ones are moved to have numbers 1, 2, 3 onwards.
- DefaultRolloverStrategy max: This defines the maximum number of archived log files that will be maintained. Once the archived log file numbers cross this value, the oldest file is deleted and the rest are moved to consecutive higher numbers in the log directory, so the total number of archived log files never exceeds this number.
The size occupied by all archived log files = (DefaultRolloverStrategy max) multiplied by (SizeBasedTriggeringPolicy size) = 20 * 5Mb (max size above) = 100MB - Root level: This defines the log level to be reported in the log files. The values for log4j log levels are explained here.
After updating the desired values, save and close the file.
Restart the Hub service (check Starting and Stopping Zoom Services (Linux) or Starting and Stopping Zoom Services (Windows) to know more about restarting this service).
These log options are now saved.