Introduction
Authenticating Hot Folder User
- Click the Hot Folder Settings section in Zoom Settings (Z menu -> Settings)

- Select the server to import the ingested assets to.
- Under Authenticate Import, input your Username and Password.
It is recommended that you configure a separate dedicated user account for the Hot Folder ingest operations. If you use your own user account, which you would typically use for say, browsing from the Asset Browser, then every time the Hot Folder ingest runs, your Asset Browser session will be logged out. Due to the Zoom named user license model, a single username account can only have one active session at any given point in time.
- Click Validate.
- Click OK.
Adding Hot Folder
- Click the Hot Folder Settings section in Zoom Settings.
- Click Add.
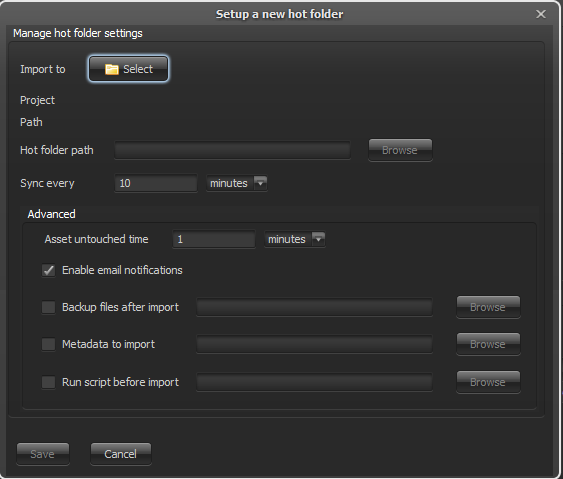
- Under Import to, click the Select button.
- Choose your folder in Zoom to import the assets into.
- Click OK
- Under Hot folder path, click Browse button.
- Navigate to the folder on your local computer you want Zoom to monitor.
- Under Sync every, set how often Zoom should check for updates in that folder. For example –
3 minutes
- Click Save.
Enabling/Disabling Hot Folder
- Click the Hot Folder Settings section in Zoom Settings.

- Click the checkbox corresponding to your Hot Folder in the Hot Folder List.
- Made edits to your Hot Folder.
- Click Update.
Editing Hot Folder
- Click the Hot Folder Settings section in Zoom Settings.
- Select a hot folder in the Hot Folder list
- Click Edit.
- Made edits to your Hot Folder.
- Click Update.
Deleting Hot Folder
- Click the Hot Folder Settings section in Zoom Settings.
- Select a hot folder in the Hot Folder list
- Click Delete.
Additional Hot Folder Configurations
There are a number parameters that can be set for Hot Folders:
Email Notifications
Enables notifications by email about the details of each periodic ingest happening through this hot folder.
- Click the Hot Folder Settings section in Zoom Settings.
- Select a hot folder in the Hot Folder list
- Click Edit.
- Under Enable email notifications, click the checkbox.
- Click Update.
- Under Notify them after import, list the email addresses or an alias of users you would like to notify, separating each with a comma.
Backup Files After Import
- Click the Hot Folder Settings section in Zoom Settings.
- Select a hot folder in the Hot Folder list
- Click Edit.
- Under Backup files after import, click the checkbox.
- Click the Browse button.
- Specify the directory to move files to after import.
- Click Select.
- Click Update.
Moves files in Hot Folder after they are successfully imported into the specified folder.
Add Metadata on Import
Specifies which metadata will be applied to assets automatically when imported into Zoom.
To set which metadata to add to files as they are imported, a text file with the different values must first be set.
- Create a new text file using your preferred text editor.
Notepad, TextEdit, Notepad++, BBEdit, etc.
- For each metadata value you would like to apply to files, create line with [GroupCode]_[MetadataLabel]=[Value], replacing [GroupCode] with the Metadata Group Code your value is stored in, the [MetadataLabel] with the Label of the metadata field, and [Value] with the value you would like to set for that metadata field.
IPTC_City=Zanzibar
- Save your file on your computer.
- Click the Hot Folder Settings section in Zoom Settings.
- Select a hot folder in the Hot Folder list
- Click Edit.
- Under Metadata to import, click the checkbox.
- Click the Browse button.
- Specify the metadata text file to read metadata values.
- Click Select.
- Click Update.
Asset Untouched Time
Controls which files present in the hot folder are actually eligible to be imported. Any file that has been modified within the time specified in this field will be treated as being currently modified, and therefore deemed as partial files. Such files will not be ingested. Since the hot folder mechanism runs periodically, this check will continue to happen and at some point, the files will be fully written and will become eligible for import.
- Click the Hot Folder Settings section in Zoom Settings.
- Select a hot folder in the Hot Folder list
- Click Edit.
- Enter the time interval that might normally take for files to get written into your configured hot folder from any external processes. This is the time Zoom will wait, before picking up that file for importing into the repository.
Run Pre-Script Before Import
Runs specified script before import to allow for automation during the import process.
- Click the Hot Folder Settings section in Zoom Settings.
- Select a hot folder in the Hot Folder list
- Click Edit.
- Under Run script before import, click the checkbox.
- Click the Browse button.
- Specify the script to run before import.
The script is dependent on it being executable on your system. The script can directly import assets by invoking the Zoom import command, in that case, delete the assets in the script before it finishes to avoid the Hot Folder periodic ingest from trying to import again.
- Click Select.
- Click Update.
- To understand a sample Hot Folder ingest script, check out this article here.
Configuring Hot Folders on Linux Server machine
Currently, on Linux, only Zoom server build is available because Linux does not support the necessary UI libraries required to run a full-fledged Zoom client. However, it is possible that one may want to set up and access the command line Zoom client, for example, to set up Hot Folders.
For a Linux server with a terminal, the set-up is straightforward. Simply start the client proxy service, and set up the hot folder as described in the section here. For a headless Linux server, do the following:
- Set up hot folder settings on another machine including the steps to authenticate the hot folder user.
- Copy the $HOME/.zm/ contents of that machine over to the headless Linux server’s $HOME of the user the Zoom client proxy is set up to run-as.
If zmclientproxy service runs as a Linux user
zoom-hotfolder, copy to/home/zoom-hotfolder/.zm/settings/hot_folder/ - Edit the .zm/settings/hot_folder/hotFolderDB.xml to point to the correct disk location from where to conduct the ingest into the Zoom server.
A sample hotFolderDB.xml file:

Download a copy from here.