In 5.2 or greater, Zoom custom formats can be used to control how previews can be rendered for assets stored in the repository. Zoom bundles preview generation tools that by default generate previews for a wide variety of file types. Over and above that, Zoom also provides the necessary hooks for the administrators to configure Zoom’s internal or any external preview-generation tool.
This hook is useful for two things:
- the administrator can setup a specific preview generation scheme (aka Zoom custom format) and make it as the default for a set of file-types.
- from the Asset Browser, the end user can select from the list of custom formats configured, and request that the selected assets be rendered and downloaded using the tool / transformations setup in the selected scheme.

Zoom Asset Browser supports previewing of assets by pressing space or double-click on the asset. This will trigger a request for preview using either the default bundled tool or through any of the custom format configured. If a custom format is to be set as default for any file-extensions, then the output format must be in the formats as shown in the table below; otherwise Asset Browser may not be able to show the preview properly.
Image (e.g.PSD, PNG, AI) JPEG (recommended size: 1920×1920)
Video (e.g. MP4, AVI, MOV) FLV
Audio FLV
MultiPage (e.g. DOC,PPT, PDF) JPEG
Please see “Setting Up Default Custom Format” section for for more details.
Given below are details about the various configuration aspects of the custom format module. Please read this section carefully as they are technical in nature, and subtle errors could creep in if done without due diligence.
Creating New Custom Format
To create a new custom format go to the web-based admin console (usually at http://<zm-server>:8443) and login using an admin account.
- Go to Custom format for Download -> Create new format on the left-side navigation panel. See image below for help.

- Format Name: Specify Format name and Description as per your requirement. Try to provide unique and descriptive format name as it will help the end user at the time of selecting a custom format to use to generate and download a rendered preview.
- Executable path: Provide executable path which is needed for this conversion. Given path must exist on Zoom preview server and must be executable.
- Executable path must be operating system specific, for linux/unix it should be like: “/home/zoom/somexecutablepath” and on Windows: C:\somexecutablepath.exe.
No need to add any quotes(“”) to the executable path.Path must be accessible to Zoom Preview server and executable permission must be set.
- Executable path must be operating system specific, for linux/unix it should be like: “/home/zoom/somexecutablepath” and on Windows: C:\somexecutablepath.exe.
- Default Executables Tags: Zoom server provides few bundled executables, which can be used by providing specific tags in Executable path. For e.g. To use imagemagick’s convert.exe, specify ZOOM_IMAGE.EXE, before running the custom format generator, Zoom will automatically pickup the bundled convert.exe executable. These tags will work on Windows server, Linux and Mac OS X.
- List of executable tags:
- ZOOM_IMAGE_EXE -> It will point to Zoom bundled imagemagick’s’ convert executable. Open Convert Help.
- ZOOM_VIDEO.EXE -> It will point to Zoom bundled ffmpeg executable. Open FFMPEG Help.
- ZOOM_GS_EXECUTABLE -> It will point to Zoom bundled ghost script executable. Open ghost Script Help.
- ZOOM_SOFFICE_EXECUTABLE -> Enable Previews for Microsoft Office Files. Click here for more details.
- List of executable tags:
- Input Formats: In the input format field, enter all the file extensions you want this custom format generator to be associated with for input purposes. e.g If you want to convert a JPEG to PNG, enter JPEG in this field. You can specify more than one input file format in a comma-separated list. e.g. JPEG,TIFF,JPG,GIF,PNG.
- Output Formats: In the output format field, enter all the formats you want this custom format to be associated with for output purposes. e.g If you want to convert a JPEG to PNG, enter PNG in this field. You can specify more than one output file format in a comma-separated list. e.g. JPEG,JPG,PNG. This allows the user to convert or render a file extension matching one of the input formats to any of the output formats via a drop-down list in the various Zoom UIs like Asset Browser, Visual Approval tool.
- Generate Multiple Output File: “Can Generate Multiple Output Files” check box is to be used in case where the output is to be divided into multiple files. e.g a 5 page pdf is saved as 5 different jpeg images containing preview of one separate page each. If custom format generates multiple out files, that means it is multipage asset, each output file name must be started with page number and followed by extension. E.g For a 5 page PDF file, 5 output jpeg files names must be: 1.JPEG, 2.JPEG… 5.JPEG. If the output files names are not in this format, Zoom preview server can’t recognize the pages.
Entering Custom Arguments
Arguments needed by the executable to convert the assets into desired formats has to be provided here.
- Providing input-output formats set which are not compatible will also not show any error while creating the custom formats and the user will again get only generic error in screen. e.g. if you configure to convert a video file into a Word document the converter will try to do the same, but the actual conversion will obviously fail and therefore print an error in log.
- If conversion throws any kind of error user will only be displayed a generic message. If the created custom format contains any error which is hampering the conversion the logs (by enabling thumbprocesslogging in preview server) in .zm folder will contain the details.
- In audio/video formats make sure that the codecs are compatible with each other as well as the targeted format.
- Any path used / arguments used should follow the path separator convention of the OS on which Zoom server is installed. i.e. Windows/Mac/Linux.
- Multiple arguments can be combined in one row, but don’t try it until you are sure about what you are doing and completely comfortable with the executable used.
- Custom argument fields:
- Editable by User: Check this if you want this field to be editable by the user at the time of download. If checked the user will be shown the default value at the time the time of download along with an option to edit the same.
- Label and tooltip: Provide a label and tooltip as per your requirement. If the field is editable the user will see this label and tooltip at the time of download. Otherwise these will be used for internal use anyhow.
- Parameters: The details parameters field will also be explained in next point and in examples. In parameters you will provide actual parameter which are to be passed to the executable to convert the asset. So default parameters tags are provided in the Choose tags dropdown. Any flag attached with the tags are to be typed in parameters text field accompanied by the tags in .
- Parameters fields:
- Provide all the arguments in a different rows and type the flag with the parameter argument in the text field. e.g. if ffmpeg takes audiocodec as argument with a flag -acodec you will write “-acodec ” in parameters field. this can take any name inside it. It is upto you provide a meaningful name for your own use later on while editing the custom format in case.
- You can also use predefined tags from dropdown instead of . e.g. to provide InputFilename in imagemagick with flag -i you write -i in parameters, press spacebar and then select Input File from dropdown.
- You can also provide the value hard code in parameters. e.g For imagemagich the quality argument takes the flag -quality. You can write -quality 92 in parameters if you dont want to make quality user editable. In which case you dont have to provide default values in any other place.
- After typing the parameters you click update.
- A new text field will appear for every custom argument in which are not predefined. In the text field provide the default value.
- In every parameter do press the Update button and then provide the default. This is mandatory. Otherwise the conversion may not work at all.
- For all arguments use a new row. Click Add argument to get a new row.
- You can remove any row by clicking the remove button if you want.

- Click Save when done.
Editing Custom Format
Open Zoom web console (Webmin) in browser at URL http://<zm-server>:8443.

Click on the Manage Formats in the left navigation panel. See figure below:
Now on right hand side custom format list will be displayed. Either double click on the custom format to start editing it OR select the custom format which you want to edit, and then click on Edit button in toolbar to start editing.

See “Creating new custom format section for more details”
Duplicating Custom Format
Open Zoom web console (Webmin) in browser at URL http://<zm-server>:8443.

Click on the Manage Formats in the left navigation panel. See figure below:
Now on right hand side custom format list will be displayed. Select the custom format which you want to duplicate, and then click on Dupliacte button in toolbar to start editing.

See “Creating new custom format section for more details”
Deleting Custom Format
Open Zoom web console (Webmin) in browser at URL http://<zm-server>:8443.
Click on the Manage Formats in the left navigation panel.
See figure below:
Now on right hand side custom format list will be displayed. Select the custom format which needs to be deleted. Click on Delete button and confirm the delete operation.
Viewing Existing Custom Format
Open Zoom web console (Webmin) in browser at URL http://<zm-server>:8443.
Click on the Manage Formats in the left navigation panel. See figure below:

Zoom Provided Custom Formats
There are 4 default custom formats provided in Zoom. These can by found in Manage formats.
- DV to MP4 converter: A default converter for DV format.
- Zoom FLV converter: A default converter to convert somegeneral use formats to flv (MXF,FLV,MP4,MOV). We use this format to generate audio/video preview.
- Zoom MP4 converter: A default converter to convert some general use formats to mp4 (MXF,FLV,MP4,MOV).
- Zoom image converter: A default converter to convert some general use formats to mp4 (JPG, PDF, PNG, JPEG, TIF, TIFF). We use this format to generate image preview.
Setting Up Default Custom Format
Open Zoom web console (Webmin) in browser at URL http://<zm-server>:8443.

Click on the Default Formats in the left navigation panel. See figure below:
Click on Add default Format.
Write the file extension/file type for which you want to add a default format.
Select the appropriate custom format from the drop-down list and click save.
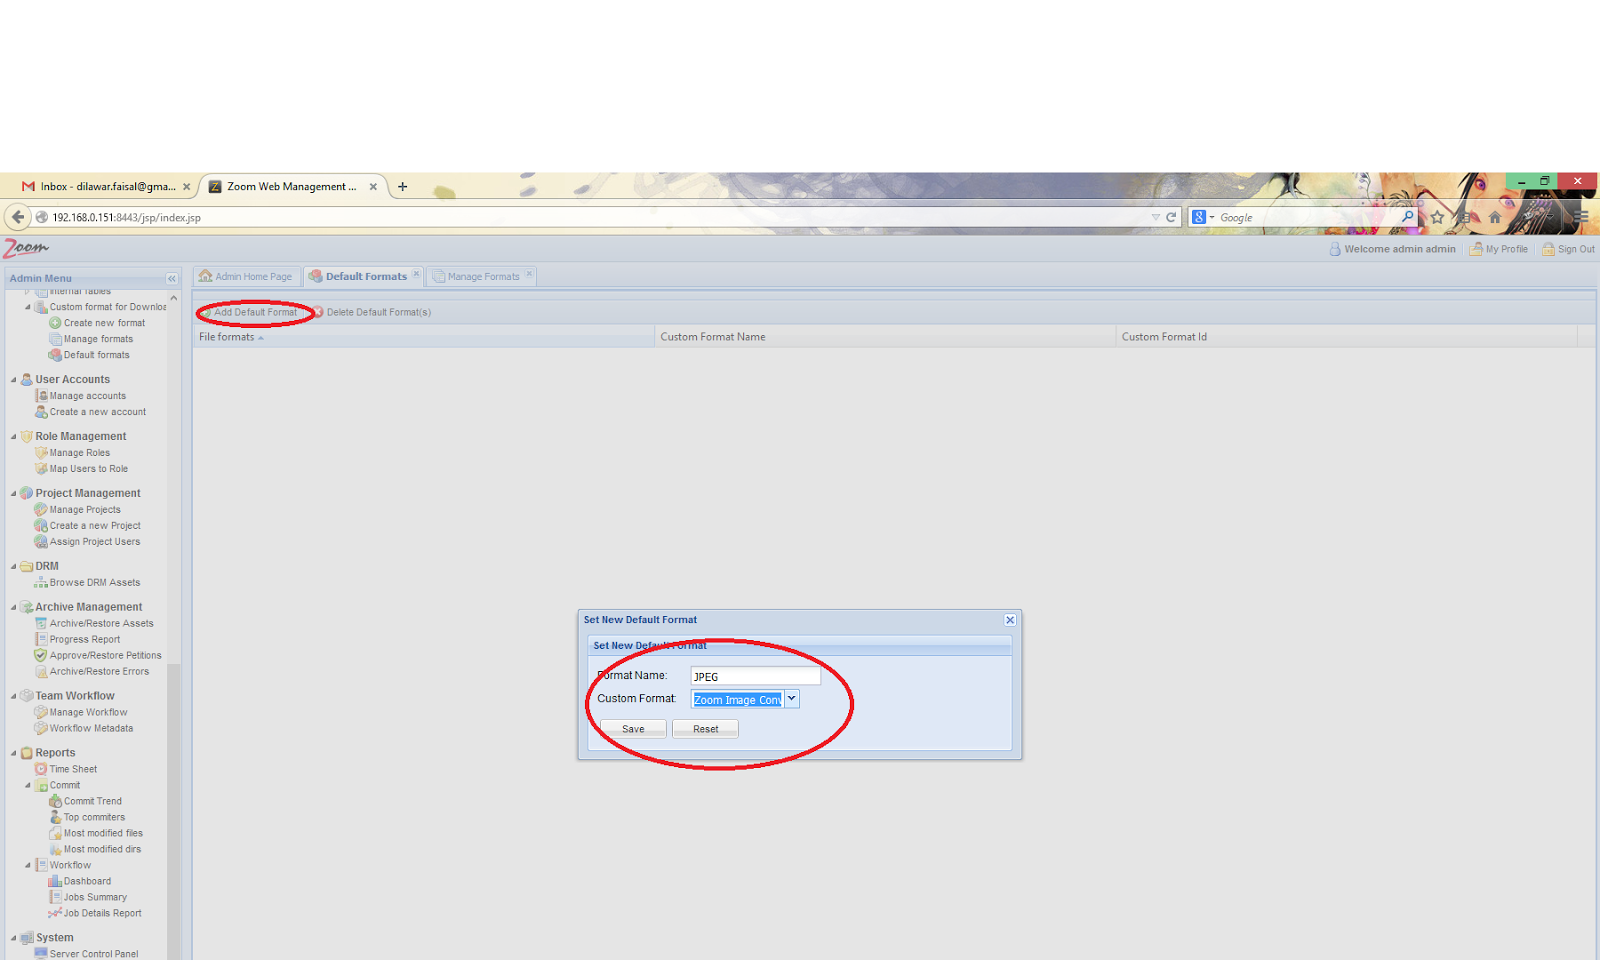

Once you done the above steps, whenever a user requests a preview of say a JPEG file, the registered custom format generator will be invoked.
Deleting Default Custom Format
Open Zoom web console (Webmin) in browser at URL http://<zm-server>:8443.
Click on the Default Formats in the left navigation panel. See figure below:
Click on Delete Default Format. And click Yes for Approval:

Default Format is deleted.