Available Archive Modules
An archive module allows the Zoom archive manager to delegate the actual archive/restore operation to a specific archive handler. The following are currently supported:
| Archive Module | Type | Implemented | Description |
| Basic | Internal | Built-in | Supports archiving to a single file system path on the network |
| Path-specific Archive | Internal |
Built-in | Similar to basic, plus the ability to map Zoom project vaults to different file system directories. This allows each brand/business unit to have its own archive storage |
| File System Archive | External |
Zoom 7.3 onwards – using Hub (as Hierarchical Archive) | Supports archiving to external file systems and media using Evolphin’s Hub Server |
| S3/BlobStore | External |
Until Zoom 7.2 – using scripts Zoom 7.3 onwards – using Hub (as Hierarchical Archive) | Supports Object Blob Storage or Cloud-based Storage such as Google Cloud Storage, AWS S3, Cloudian S3, or Microsoft Azure Blob |
| FrontPorch | External | Using scripts | Supports Oracle FrontPorch DIVA |
| SGL | External | Using scripts | Supports SGL FlashNet |
Enable Archive Management License
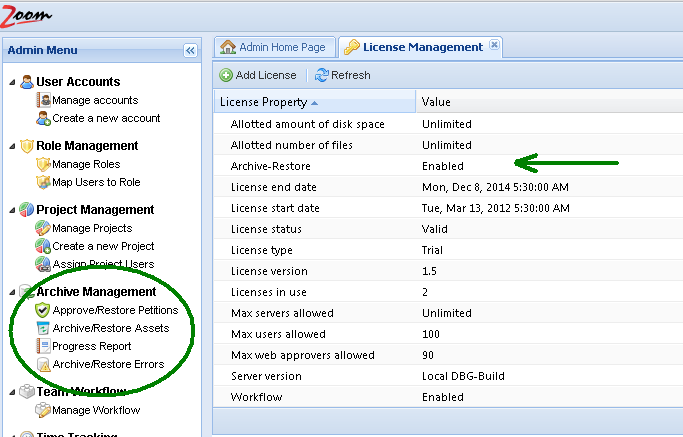
Archiving is an optional feature that is available only to deployments that hold an appropriate license. You can check your license information in Zoom’s web-based administration console.
To check the license information, log on to your administration console in a browser at a URL like this: http://zoomserver:8443/
From the navigation menu on the left, click open the “License Management” option under the “System” menu. If you hold a license that allows archive operations you will see a separate “Archive Management” menu in your navigation panel as shown below.
Configuring Basic Archive Module
For users who have archive as part of the Zoom license they have purchased, Zoom can archive assets to a single designated archive location using the Basic Module. This folder location must pre-exist at the Zoom DAM server in order for the configuration to work. You can configure location of the Archive by doing the following:
- In your preferred web browser, go to the Web Management Console. ex. http://localhost:8443 or http://<zoomserver>:8443
- Log in using your admin credentials.
- In the left sidebar, click on Server Control Panel under the Server section.
- Click on Archive Management.
- Under Archive Location, set the path to the archive folder as it exists on the Zoom DAM server. Ex. e:\zoom\archive\ or /mnt/Archive on the Zoom MAM server.
- Restore Threshold: This is the file size in bytes which is a threshold for restore petition. Please check the section on “Restore Petition” for more details. The default threshold is -1.
- Click Save.
- You will be prompted to restart the server. Click Yes.
- Refresh your web browser.
Configuring External Archive Module
This post explains the steps involved in setting up archiving to external systems like S3 / SGL / DIVA or dedicated File-System partitions. The external systems act as a secondary archive storage for the Zoom internal, and Zoom referenced (or indexed) assets.
Understanding the External Archive Flow
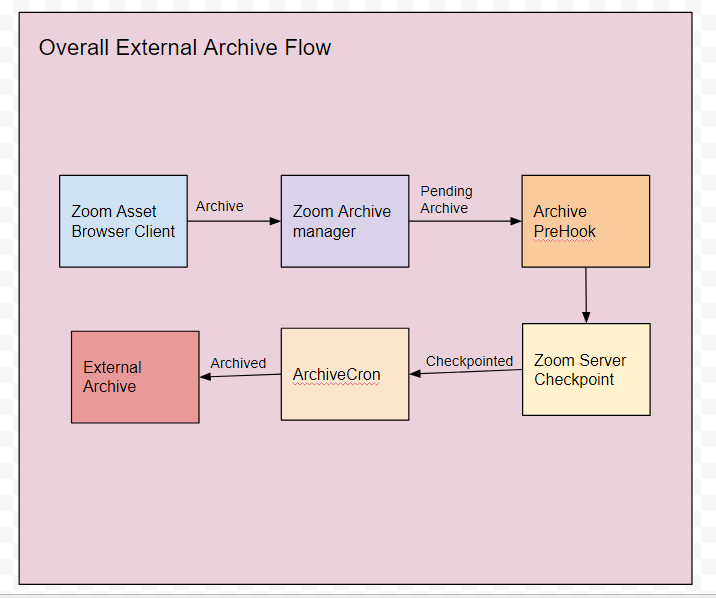
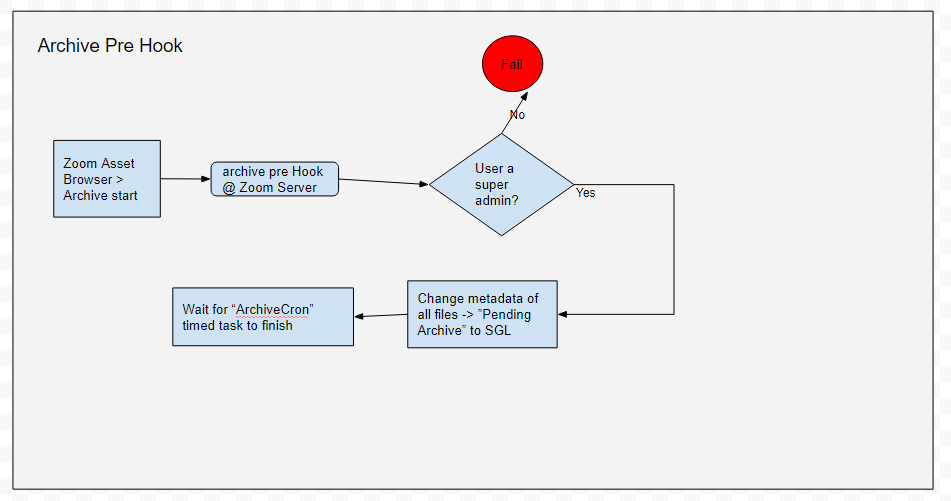
Archive Pre Hook Flow
- The user initiates an archive from Asset Browser, the control passes to the archive pre-hook installed on Zoom server. Metadata is updated on the asset as shown in the diagram below. The hook is responsible for marking assets in a “Pending ..” state for them to be archived by the Archive Cron timer task
Checkpointing
If the asset is a Zoom direct asset (stored in the Zoom database), it needs to be checkpointed before it can be archived. Checkpointing will ensure all the versions are stored in an “Asset ID” file that will be copied to the external archive. Assets that have native or mid-res proxy on an external storage such as a SAN, can be copied without checkpointing but even for these assets the low-res proxy is often checked-in into Zoom database as a direct asset. if so the low-res proxy will also need to be check-pointed in order to archive.
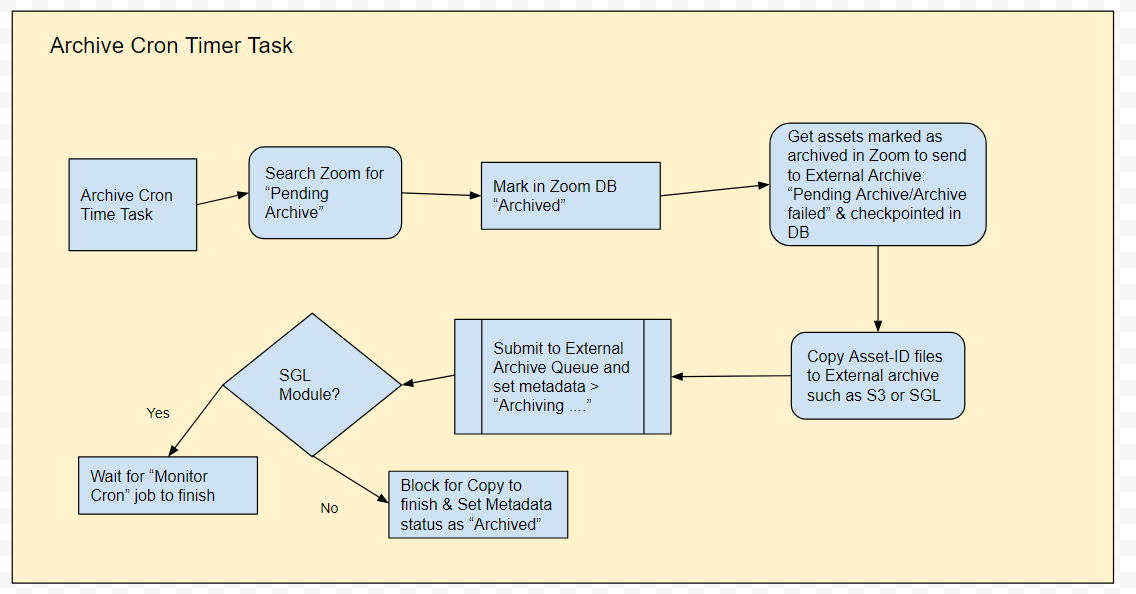
Archive Cron Flow
The archive cron timer task will run periodically and submit assets that are ready for archiving to the external archive system such as S3 or SGL. The assets need to meet the following requirements:
- Metadata needs to indicate a “Pending..” status
- Direct asset/low-res proxy in Zoom database representing the asset needs to be check-pointed
Monitor Flow (for SGL and other Job Queue bases external archive systems)
Understanding the External Restore Flow

Restore Pre Hook Flow
- User initiates a restore from Asset Browser, the control passes to the restore pre-hook installed on Zoom server. Metadata is updated on the asset as shown in the diagram below. The hook is responsible for marking assets in a “Pending Restore..” state for them to be restored by the Archive Cron timer task
Archive Cron Flow
The archive cron timer task will run periodically and copy assets that are ready for restore from the external archive system such as S3 or SGL. The assets need to meet the following requirements:
- Metadata needs to indicate a “Pending restore..” status
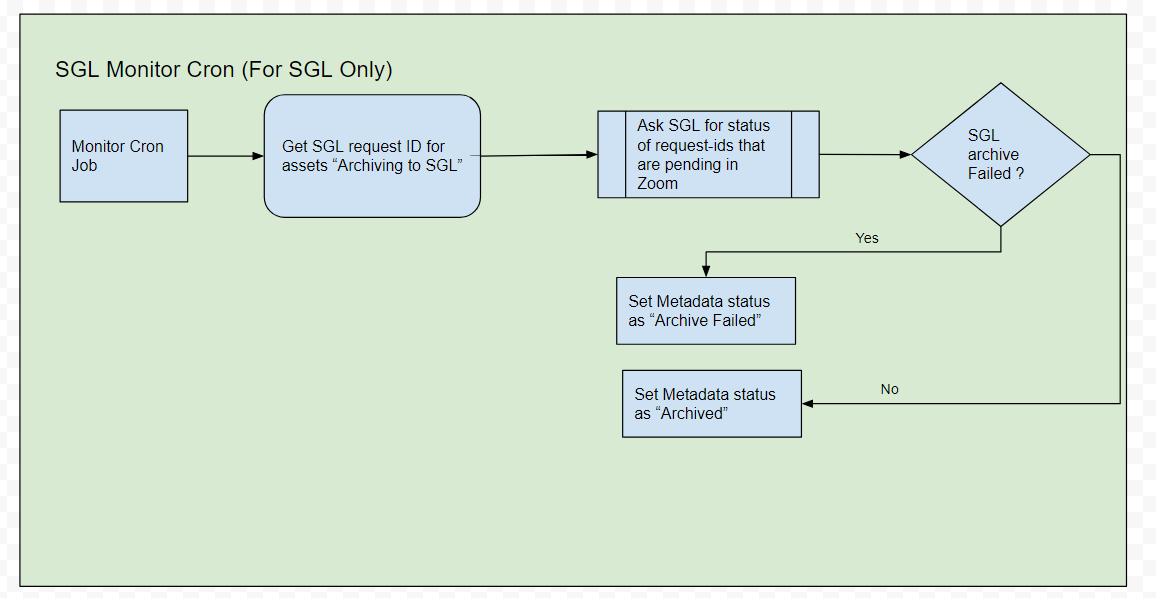
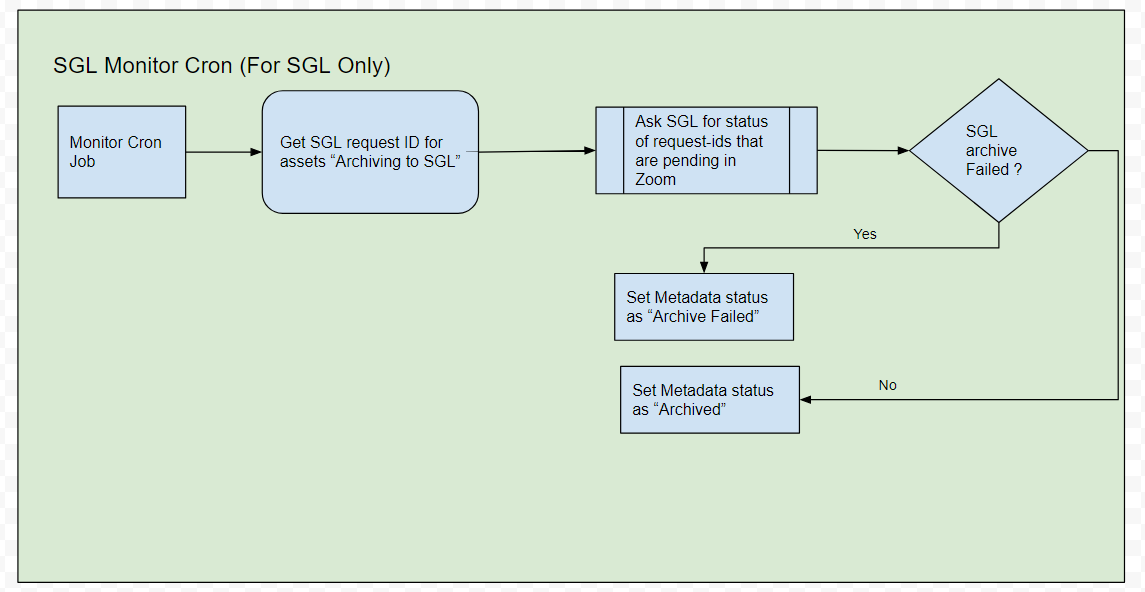
SGL Monitor Cron Flow
For SGL external archive system the following flow is used:
Steps to install and configure the Archive components
- Install Perl library components.
- Install the Archive-specific modules.
- Configure the archive and restore pre-hooks
- Update the various configuration files for your deployment.
- Configure the recurring archive timer – Cron for Linux and for Windows a timer.
Installing the Perl libraries and modules
Review and follow the instructions for installing the Perl SDK. You only need Perl and the modules so just follow the instructions for “Perl Installation”.
Installing the Archive Modules
Download the archive.zip file from the support site or your mail.
After unzipping you should have the following folder structure.
<your_root_folder>/
ArchiveCron/
conf/
config.ini
log4perl.conf
archiveCron.bat Note: only for Windows deployment
archiveCron.pl
ArchivePreHook/
conf/
config.ini
log4perl.conf
archive-hook.bat Note: only for Windows deployment
archive-hook.pl
lib/ Note: not exploded contains all the modules used by the system
logs/
Archive-Cron.log
Archive-Prehook.log
archiveCronBat.log Note: only for Windows deployment
archiveHiresBat.log Note: only for Windows deployment with VFX
RestorePre-Hook.log
RestorePreHookBat.log Note: only for Windows deployment
RestorePreHook/
restorePreHook.bat Note: only for Windows deployment
restorePreHook.pl
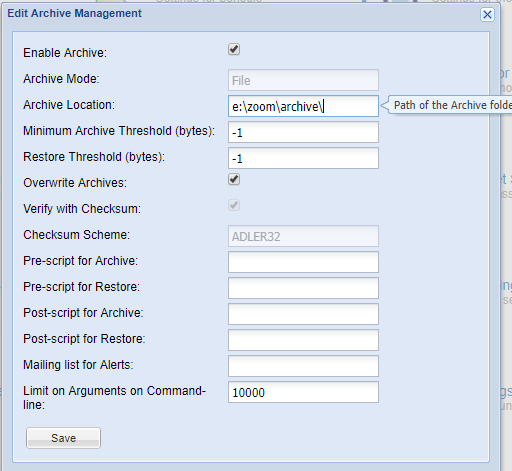
Configuring the Archive / Restore Pre-hooks
- Login to web-based admin console
- Open the “Server Control Panel” menu
- Launch the Archive Settings menu option
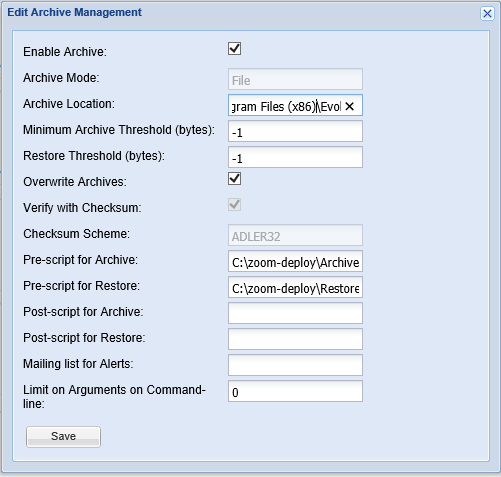
- Check “Enable Archive”
- Create a folder on your server file system and copy/paste that path into “Archive Location”.
- Put the path for the “Pre-script for Archive” in the box. In our example we are using C:/zoom-deploy/ArchivePreHook/archive-hook.bat
- Put the path for he “Pre-script for Restore” in the box. in our example we are using C:/zoom-deploy/RestorePreHook/RestorePreHook.bat
- Leave both “Post-script” fields blank
- Set your email list if you are using one, you can add it at a later date.
- Set “Limit on Arguments on Command line” to 0.
- Click on the fields for archive and restore pre-processing, and point them to the Archive and Restore pre-hook batch files (if Windows) or perl scripts (if Linux). See screenshot below.
- Save and restart server for the changes to take effect.
Configuration Files
System-wide Common Parameters
For every config.ini, ArchiveCron, ArchivePreHook and RestorePreHook we have common sections; these are detailed below:
[ZOOMSERVER]
| serverURL= | http://<your host IP address>:8880 |
IP and port for your server |
| webminURL= | http://<your host IP address>:8443 |
IP and port for your server |
| serverUsername= | <your admin account> |
Zoom admin user account to use |
| serverPassword= | <your admin password> | Password for the above account |
[METADATA]
| proxy= | <your metadata group>_Proxy | Indicates whether or not, an asset is a proxy for a high-res external asset. [VideoFX] |
| hiResPath= | <your metadata group>_NativeFilePath | Indicates the path where the high-res external asset is placed. [VideoFX] |
| hiResArchiveStatus | <your metadata group>_HiResArchStatus | Indicates the current status of the external archive operation on the high-res asset. [VideoFX] |
| directArchiveStatus= | <your metadata group>_DirectArchivetatus | Indicates the current status of the external archive operation on the Zoom assets. [In VideoFX setup, specifically for non-proxy files] |
| lowresArchiveStatus= | <your metadata group_DirectArchiveStatus | Indicates the current status of the external archive operation on the low-resolution proxy asset. [VideoFX] |
| midresArchiveStatus= | <your metadata group_MidResArhchiveStatus | Indicates the current status of the external archive operation on the mid-res asset. [VideoFX] |
Archive Pre-Hook config.ini
[TO ARCHIVE] – this section tells the system which categories of files are to be archived. Set 0 = disable and 1 = enable.
| hires= | 0 or 1 | Enable to archive high-res assets |
| midres= | 0 or 1 | Enable to archive mid-res assets |
| lowres= | 0 or 1 | Enable to archive proxy of external high-res assets |
| direct= | 0 or 1 | Enable to archive assets directly ingested into the Zoom repository |
ArchiveCron config.ini
[DEFAULT UNC path]
|
root_UNC_PATH | Specify the location that the assets must be copied to, if no dedicated path is defined for the project to which an asset belongs |
[Project UNC map]
| <Zoom Project Root Path> | Location where assets belonging to this project must be archived to |
[ARCHIVE]
| archiveModule | Can be set to “AwsS3”, “FileSystemArchive”, “SGL” |
Zoom Server Metadata.xml
If you choose to follow our metadata recommendation, add the following to your metadata.xml and restart the server.

The Cron or Timer Task
A key component of the external archive module is a script that needs to be periodically run continuously, without user intervention. To achieve this, we configure the target script using a Cron tab in Linux, or using the Windows Task Scheduler in Windows. See details below.
For Linux
When set, this will cycle and call the archiveCron.pl causing archive and/or restore events to run.
For Linux you set up cron for the user account and the following line can be copied and pasted into your crontab.
Note: the above will run every minute
For Windows
To setup a task scheduler, run the following steps as administrator:
- Open the control panel
- Choose “System and Security”
- Under “Administrative Tools”, select “Schedule tasks”
- In the “Task Scheduler”, select “Create Task”
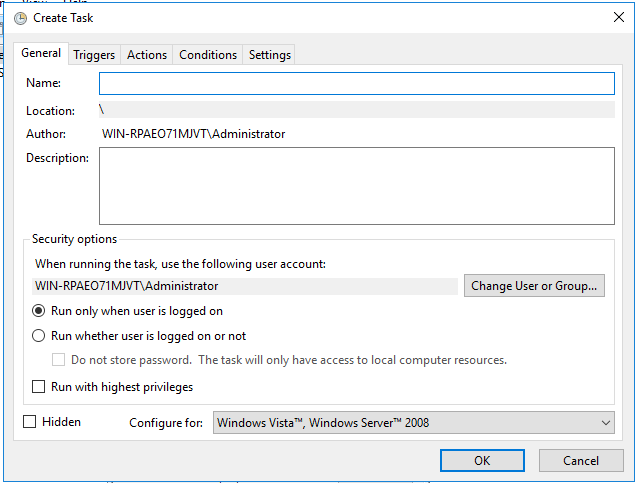
- in the “General” tab seen above, do the following:
- Provide a Name, example “zoom archive” and description
- Enter a Location \ do not change
- Using the “Change User or Group…” Do not change
- Select elect the “Run whether user is logged on or not”, we want it to run all the time
- Configure for <your version of the OS>
- Now select the “Triggers” tab: and use the “New…” button to create a new task
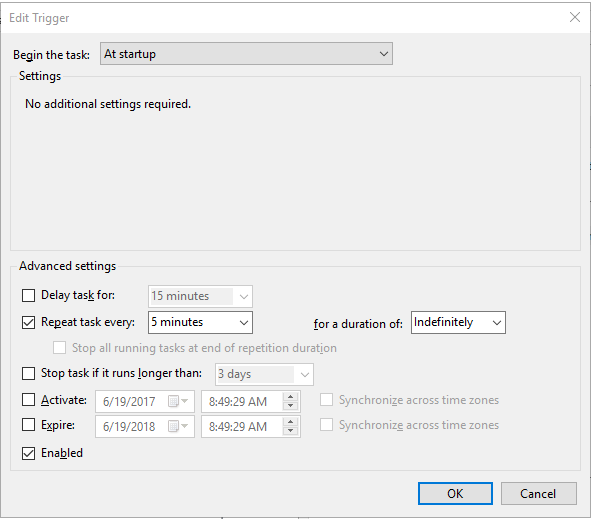
- Select “Begin the task” and select “At startup”
- Select the “Repeat task every” checkbox
- Choose your duration, change “5 minutes” to “1 minute”
- Change “for a duration of” to “Indefinitely”
- Select “Ok”
- Now using the Actions tab, we need to select the program to run:
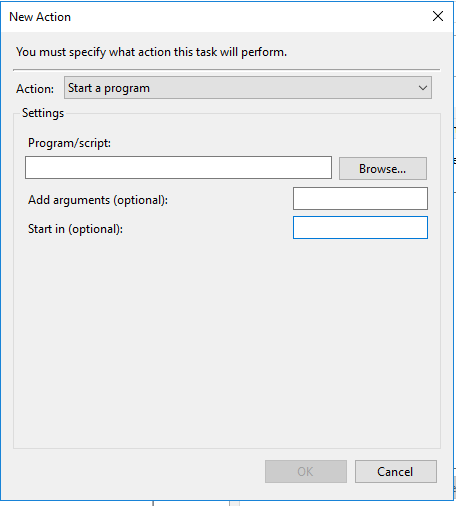
- Select “Start a program”
- Browse to <Your root directory> and select the appropriate batch file.
- Leave the next two, optional fields blank
- Select “OK”
- Restart the system and your task should be active
A couple items to note: When ingesting new assets you will not be able to archive them until you checkpoint. Additionally, archived assets will not be removed from primary storage until you checkpoint.