Using the zm CLI (command line interface) it is possible to perform bulk actions such as:
- create user accounts in the Zoom server
- assign users to project vault
- assign users to role
- get all users mapped to a role
- get all users mapped to a project vault
Basic syntax : zm -s zoom-server-url -c loadusers csv-file-name -p project-name -r role-name
If Single Sign On (SSO) using OpenID Connect is turned on and a system account, such as sa_brand_admin, is being used to issue the command, then a security realm argument –realm SystemRealm must be additionally supplied to the command:
zm --realm SystemRealm --username sa_brand_admin -s https://zmsrv:9880 admin -c loadusers users.csv -p Marketing -r mediaadmin
Create User Accounts
This is supported only for the Zoom Local User realm. For LDAP or OpenID (also labelled PingRealm) realms, user creation is handled by an external LDAP/AD or the Identity Provider such as Azure AD or Google Auth.
zm -s https://zmsrv21:9880 admin -c loadusers file.txt -p Marketing -r mediaadmin
Here, -c denotes the task to be executed; for now, only "loadusers" is supported.
This command will load all the users details (like username, password, last name, first name, email, rate) that are defined in the CSV file on to the Zoom Server. One or more users can be loaded from the file.
Using the command syntax shown above, we can load these two users on the Zoom Server. To verify that the users are loaded correctly, you could open your web-based administration console at the “Manage Accounts” menu option and check the entries there. You will see entries as shown in the following screenshot:

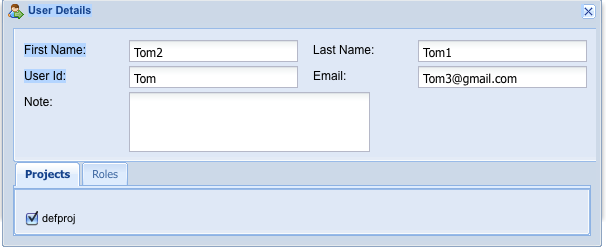
You can click open the user details menu from the web admin > Manage Accounts and verify all the details of the user account. See screenshot below. Notice the project name:
CSV (Comma separated value) Syntax
The users’ details in the CSV file must be given in the following field or column sequence. Note that all fields are required.
<Username>,<password>,<lastname>,<firstname>,<e-mail ID>,<rate>
For example: shown here are the contents of the CSV file “users_details.txt” which was used to run the ADMIN command shown in the above use-case:

| user-id (no spaces or special chars, alphanumeric) | Password | Last Name | First Name | Billing Rate (> 1) | |
| joe | ******** | Smith | Joe | joe@hub.org | 1 |
| ram | ******** | Hong | Ramsey | ram@hub.org | 1 |
Last column can just be set to 1 if you don’t care about a billing rate.
Assign users to role or project
The same “zm admin – c loadusers” command can be used to perform role or project vault bulk assignment. For instance, after user accounts have been created, simply use the same CSV with the –p project-vault or -r role argument. For example, to assign users in userlist.csv to Marketing project vault with role set to media admin:
zm -s https://zmsrv21:9880 admin -c loadusers userlist.csv -p Marketing -r mediaadmin
The password column can contain a dummy string for LDAP or PingRealm (security realm). Do not enter the actual password in the CSV.
Starting with Zoom version 7.6.1, the CSV file needs only the username column for performing only project or role assignment. No other columns, including the password, are required. Other columns may be added only if any edits in them are required.
Get users mapped to a role or project vault
To fetch a list of users assigned to a particular project, zm getusers command can be used. For example:
Command to get users assigned to the Marketing project:
zm -s https://zmsrv32:9880 getusers -p Marketing
Command to get users assigned to the Project Admin role:
zm -s https://zmsrv32:9880 getusers -r projectadmin
Command to get users assigned to both the Library project vault and the Project Admin role:
zm -s https://zmsrv32:9880 getusers -p Library -r projectadmin