Hierarchical Archive allows multi-level archiving to be implemented in Zoom. An asset can independently move between different tiers of the hierarchy as configured for the system. You need to set up a Hub Server for this to work. The Hub manages the jobs that move assets between tiers and provides reports for the admin users.
Zoom 7.6.x users, please redirect to the article here.
The 7.6.x releases, which are part of our Resilience series, were specifically built for the pandemic-stricken world where most people have been forced to work remotely. This series builds on collaboration over the WWW, and leverages the benefits of cloud storages like Amazon S3. This series has some significant differences from the other versions in how the archive flow works.
From Zoom 7.3 onwards, the framework for setting up Hierarchical Archive is installed with Zoom. It is ready to use after the license is enabled, it is configured in Zoom, and a Hub Server is set up to manage Hierarchical Archive jobs. After setting up the Hierarchical Archive, once an archive/restore job is triggered in Zoom, it runs independently of Zoom processes as it is managed by the Hub Server.
Once you evaluate and conclude that you need Hierarchical Archive with your Zoom setup, you need to begin by ensuring that these prerequisites are met:
- Ensure you have received an Archive and Hierarchical Archive license from Evolphin Sales.
- Designate a server machine inside your network as the Hub. This could also be on the existing Zoom Server or Preview Server machine. This machine also needs Java 8 or higher.
- Plan on having an exclusive Zoom user account for the Hub. One Zoom user account per Hub will be needed.
- Choose a machine to install SQL Server or use an existing SQL Server for job reporting.
After the prerequisites are met, follow these steps to set up Hierarchical Archive:
- Enable Hierarchical Archive in Zoom
- Add Hub configuration in Zoom
- Set up Hub Server
- Validate your Hierarchical Archive setup
Enable Hierarchical Archive in Zoom
While enabling Hierarchical Archive we need to also enable Basic Archive on Zoom, if it is not already done. Follow these steps to enable Hierarchical Archive after setting up basic archive:
- Open the Web Management Console for your Zoom Server. ex. http://localhost:8443 or http://<zoomserver>:8443
- Log in using your admin credentials.
- In the Admin Menu sidebar, click Server Control Panel under the System node.
- Click Hierarchical Archive Settings on the Server Control Panel page.

- Click Enable Ingest Time Archive Flow to enable automatically copying of the external assets to tier-2 storage, at the time of ingest. This automatic copying is triggered at the time of asset ingest and is completed in the background silently.
- Click Show Additional Options for Archive / Restore to view Hierarchical Archive options while choosing archive/restore for proxy assets in the Asset Browser.
- The other settings are already set to their default values. Click Enable Tier-1 Archive of Direct Assets and Enable Tier-2 Archive of Direct Assets to enable Hierarchical Archive for direct assets. Tier-1 Archive should be enabled for Tier-2 Archive to work.
- Choose a Default Archive Location to only allow archive from the chosen location when Auto-Retirement is triggered.
- Archive Metadata Group shows the metadata group used for storing metadata values related to archiving. The default metadata group name ‘ZARC’ is already filled here. If you wish to use another metadata group for this purpose, then specify another valid metadata group name here. If the metadata group name specified here does not exist, then the archive will fail later. The default metadata group specified here has all the required metadata fields for saving archive related information.
- Supported Storage Type shows the archive options that will be shown on the Hierarchical Archive options window in Asset Browser. Specify the archive storage type you have configured like FS (for File System), S3. However, you also need the specified storage types configured in Zoom for it to work. Check here to know about the storage types supported with Zoom.
- Specify the Default Tier-2 Storage Type for the tier-2 archive of direct assets and automatic ingest time archive of assets. By default, it is set to use FS (for File System).
- In the Archive Exclusion Rule box, you can specify an exclusion rule for assets using metadata values. If the rule is true for any asset then that asset will not be archived. This is run for all assets sent for archiving, automatic, manual, or through auto-retirement. Specifying the exclusion rule is optional. The exclusion rule is specified as one or more metadata field and value pairs in JSON format. For example, if we want an asset to be excluded from archiving if it has IPTC_City set as (Sydney or Berlin) or IPTC_Country set as Japan, then the exclusion rule should be: {“IPTC_City”:[“Sydney”,”Berlin”], “IPTC_Country”:[“Japan”]}
- [For SGL deployments] Enter the path to the custom SGL script, and the batch size for archive operations in the respective fields. (Contact Evolphin support team if you would like to purchase SGL support).
- In Zoom 7.6.2, you can configure the Zoom purge operations to also clean up the external hi-res / mid-res / image-sequence assets from the archive storage location like the S3; this will also clear the assets from the user’s local TPM paths or the shared P-SAN paths. You can check this article for more details.
- In Zoom 7.6.2, you can prevent the low-res component of an asset from getting archived if the transcoder is still waiting to generate the proxy file for that asset. (If the transcoder has not yet generated the proxy file, and checked it in, the low-res component up until that point is simply the placeholder file that would have been ingested during the original check-in; it does not make sense to archive this placeholder, and also, if it were archived, the subsequent check-in of the true proxy file would fail!)
- Click Save.
- In Zoom versions before 7.5, you will be prompted to restart the server. Click Yes.
- Refresh your web browser.
Hierarchical Archive settings are now saved.
Add Hub configuration in Zoom
Zoom stores Hub configuration settings to connect with a Hub Server. These configuration values should be added to Zoom before installing the Hub Server.
Log in to the Web Management Console and click the Hub Settings Panel under the System node in the Admin Menu sidebar.
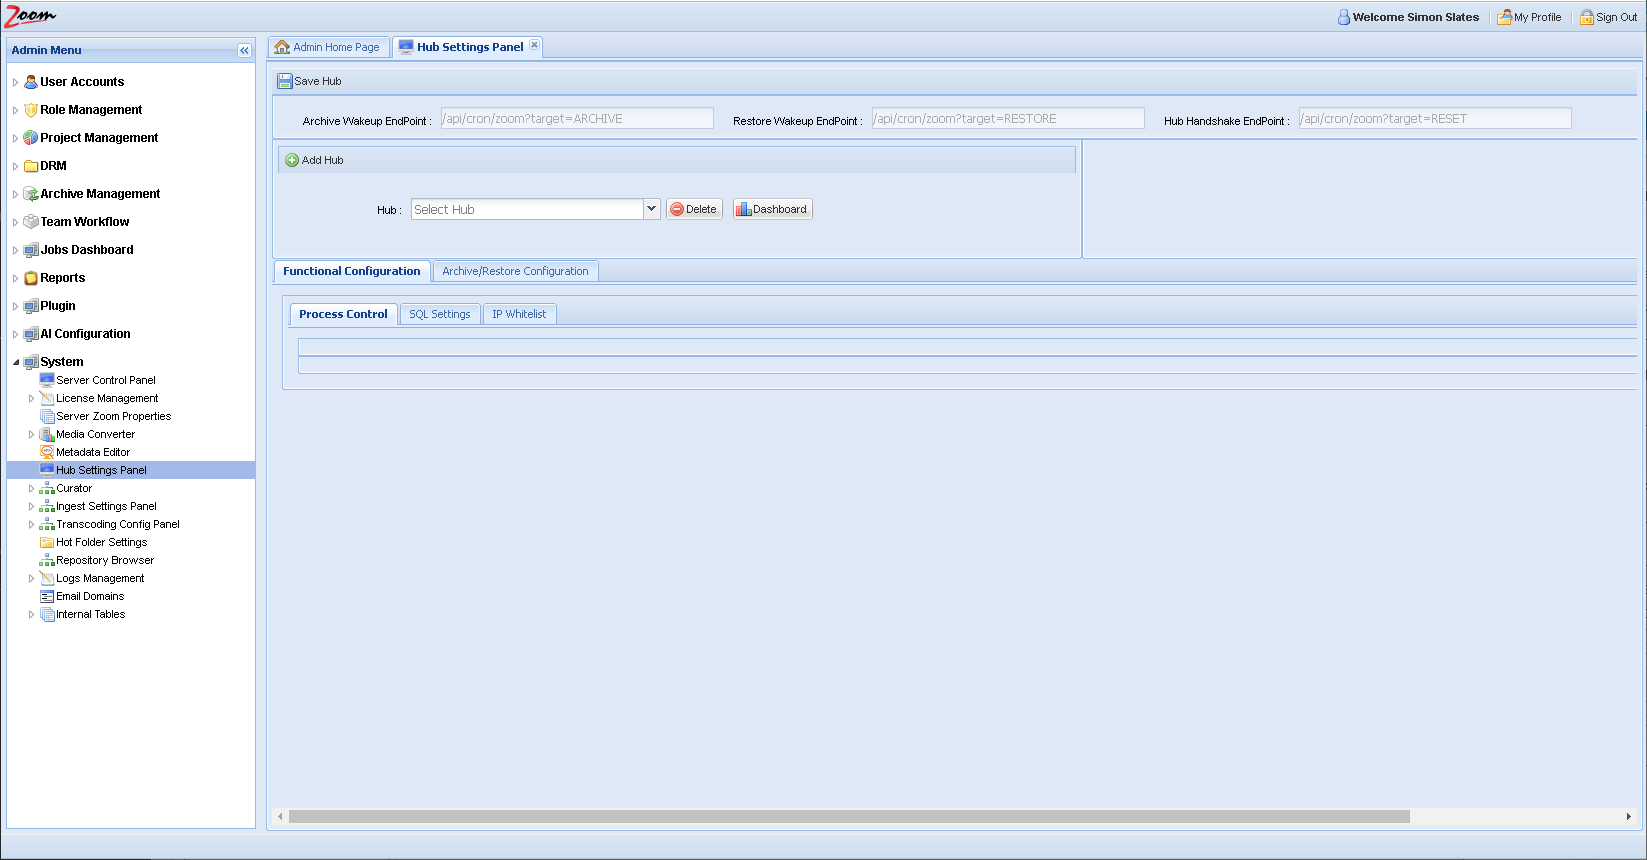
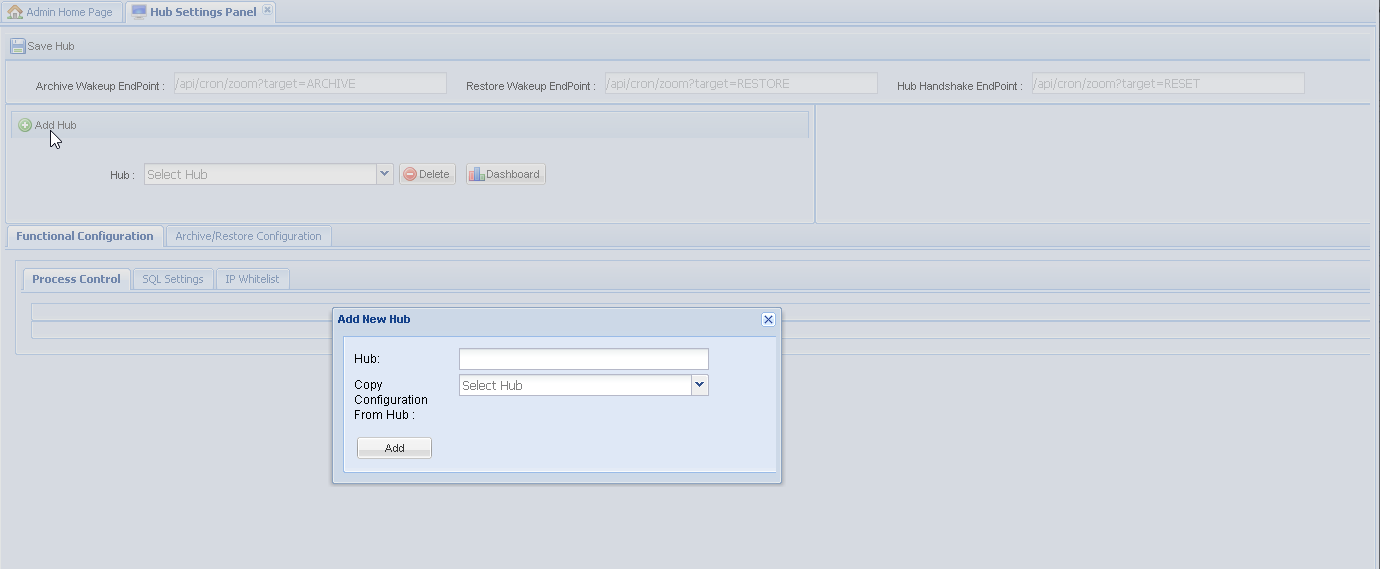
On the Hub Settings Panel, click Add Hub and specify a name for the new Hub. If you want to copy the settings of an existing Hub to your new Hub, select the existing Hub name from the Copy Configuration From Hub drop-down, otherwise leave it blank. Click Add.
Update basic connectivity details for the Hub, like Host (IP) and Port settings. For location-specific settings, also specify the location where the Hub should work. If using SSL, select the Enable Secure Hub Connection checkbox.
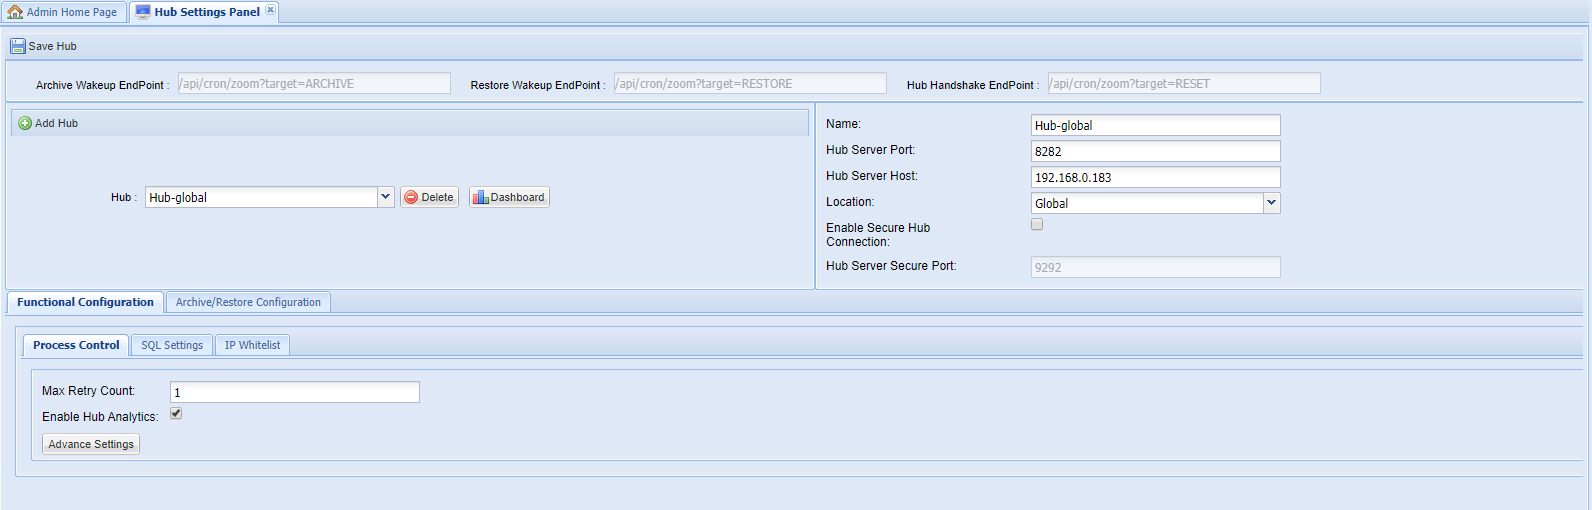
Once the basic connectivity parameters are specified, enter values for the advanced configuration. It is categorized into two parts namely the Functional Configuration and the Archive/Restore Configuration. See the sections below to know about the values that should be entered for these:
Functional Configuration
These values are needed for the basic working of the Hub. It covers Process Control values, SQL DB values, and IP Whitelisting values.

Process Control
These are configuration parameters that control how responsive the Hub will be and must be filled in based on your assessment of the expected load that the Hub is supposed to handle. If you are unsure about this, then use the default values.

Click Advance Settings to see additional Process Control options.
- Max Retry Count: Number of times the failed jobs are retried automatically.
- Enable Hub Analytics: Flag to turn on or off the Analytics module on the Hub.
- Core Pool Size: Minimum number of threads that will be created by default for job execution.
- Max Pool Size: Maximum number of threads that can be created for job execution.
- Queue Blocking Limit: Number of jobs that can be queued in the Hub for processing.
- Keep Alive Time: Duration (in minutes) for which resources are kept when the Hub is not servicing any requests; after this duration, the resources are surrendered.
SQL Settings
Hub uses a SQL Server to store job-related details.
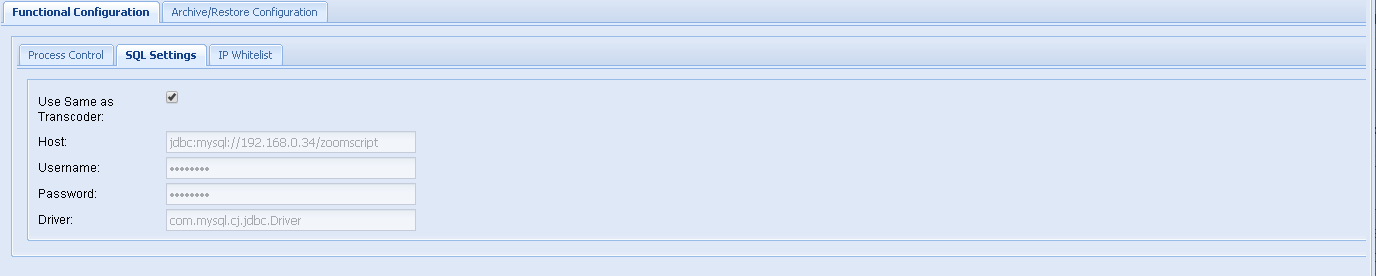
The Zoom Server also uses SQL to store process data for some of its other modules too. If it is already configured for your Transcoder and you would like to use the same SQL database for the Hub as well, then simply select the Use Same as Transcoder option. If you want to create a new or separate SQL database for the Hub, then follow instructions here to download your OS-specific installer of MySQL. Run the installer and follow the instructions. Create a user and provide the host, username, password, driver (com.mysql.cj.jdbc.Driver) details here.
IP Whitelist
For security reasons, only IPs configured here will be allowed to communicate with the Hub Server. Typically, the Zoom Server sends requests to the Hub. In addition, anyone viewing the Hub Dashboard will also be sending queries and so the IPs of all clients who would need access to the Hub Dashboard must also be added here.

Add the list of IPs from which Hub will entertain requests.
Archive/Restore Configuration
These values are needed for the handling of Archive jobs with the Hub. It covers paths and projects covered under various tiers.
Tier 0 is considered to be the Zoom repository. Tier 1 is any path that Zoom can access other than its own repository. And, tier 2 is an external path that Zoom cannot access. For tier 2 paths, Zoom only updates the required metadata for the asset and waits for the Hub to pick up this asset to be moved to tier 2.
- Tier 0 – Zoom Repo
- Tier 1 – Anything accessible by Zoom but not the Zoom Repo
- Tier 2 – External Paths not accessible by Zoom

In this section, the details of all destination tiers are added.
FS Tier 1
Configure any File System paths, that are used by Zoom, for use by the Hub. The paths should be with respect to Hub and mount points should be mounted on Hub as well.
- Default: Comma-separated list of TPM (Third Party Mount point) paths whose assets are expected to be archived using the current Hub.
- Direct Asset Archive DB Mount Path: The default location where the Zoom Server archives the direct-ingest assets.
- Project-wise TPM Mapping: Project-specific archive destination locations for proxy and direct assets as configured in the Zoom Server archive settings.
FS Tier 2
Configure any File System paths here that will not be accessible by Zoom, but by the Hub for archiving.
- Default: Comma-separated list of TPM paths whose assets are expected to be archived using the current Hub.
- Project-wise TPM Mapping: Project-specific archive destination locations for tier-2 archiving.
S3 Tier 2
Configure S3 paths here that would be accessed by the Hub to save to its S3 bucket.
Enter the details of the Amazon S3 bucket like the secret key, access key, and region. It is also possible to define unique S3 buckets for project-wise mapping. For projects not assigned a unique bucket, the default one will be used.

Click Save Hub after configuring the necessary details across various panels.

Set up Hub Server
You need the Hub Server to manage jobs for various Zoom modules like Hierarchical Archive or AI.
You can install it on any server in your Zoom network. Check that you have the Hub installer from Evolphin Support before proceeding.
Installing the Hub
Extract the shared Hub installer zip/tar to any path on your designated Hub Server machine and follow the steps below to install the Hub:
On Windows
- Open Command Line as an administrator.
- Navigate to the \bin folder inside the extracted Hub build files.
- Run Hub install (this will register Evolphin Job Hub as a service)
- Run Hub start (this will start the Hub Server)
To stop use Hub stop; for restart use Hub restart. To remove this service use Hub remove.
On Linux
- Navigate to the /bin folder inside the extracted Hub build files.
- Run ./Hub start (this will start Hub server)
To stop use ./Hub stop, for restart use ./Hub restart and to remove this service use ./Hub remove.
Registering with Zoom
After installing the Hub using the steps above, you also need to update one or more XML files with the correct configuration before registering with Zoom. When you start the Hub for the first time then it is registered with Zoom using the configuration settings in these XML files. Follow these steps on your Hub machine:
- Navigate to the /conf folder inside the folder where you have installed the Hub and locate hub.xml.
- Open hub.xml for editing.
<JobHubServerSpec>
<host>localhost</host>
<port>8282</port>
<configPort>7272</configPort>
<stagingArea>C:\EJH\staging</stagingArea>
<enableDebug>false</enableDebug>
<hubName>GlobalHub</hubName>
<s3MultipartUploadThreshold>5242881</s3MultipartUploadThreshold>
<s3MultipartUploadThreadCount>5</s3MultipartUploadThreadCount>
<ZoomSpec>
<adminServer>http://localhost:8443</adminServer>
<zoomUser></zoomUser>
<zoomPassword></zoomPassword>
<tpmPrefix>TPM:</tpmPrefix>>
</ZoomSpec>
</JobHubServerSpec> - Update these tags as needed:
- hubName: specify the name for this Hub as given in the Web Management Console.
- host: check that it has the IP/hostname for the Hub Server machine.
- adminServer: specify Zoom Server’s URL with port used for Web Management Console.
- zoomUser and zoomPassword: specify a dedicated Zoom user account and password here for use by this Hub machine.
- Save and close hub.xml.
- In the same /conf folder, locate ai-spec.xml.
- Open ai-spec.xml for editing.
- Update the tag previewServerUrl with the URL to access Preview Server, that is hostname with the port. For example, <previewServerUrl>http://192.168.0.183:8873</previewServerUrl>.
- Save and close ai-spec.xml.
- Start the Hub service (check Starting and Stopping Zoom Services (Linux) or Starting and Stopping Zoom Services (Windows) to know more about starting this service).
The Hub is now registered with Zoom. If needed, you can modify these settings here in the XML files and update other Hub configuration parameters through the Zoom Web Management Console. However, you need to restart Hub service after any change to Hub parameters is made (in the XML files or in Zoom Web Management Console).
Validate your Hierarchical Archive setup
After setting up your Hub, you can see how the hierarchical archive works by following this example.
Zoom Hierarchical Archive Flow
In Zoom 7.6.2, there are some changes in this module. Check this article for details.
- In the Asset Browser or Web Asset Browser, select one or more assets to be archived (Tier 0 to Tier 1) and select Archive from the Action menu. You could also right-click on the selected assets to select Archive from the context menu in the Asset Browser. The new Hierarchical Archive window is shown.
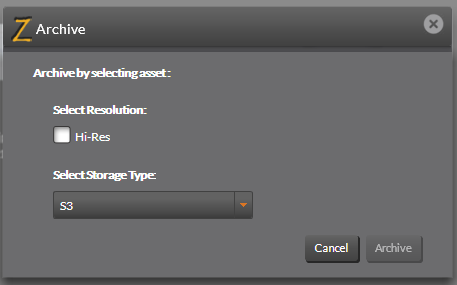
- Select which resolution/proxy asset you want to archive. (one or more from Hi-Res, Mid-Res, or Direct are shown depending on which of these are supported for the selected assets).
- Select Target Storage Type. Currently, FS (File System) and S3 (Amazon S3) are supported.
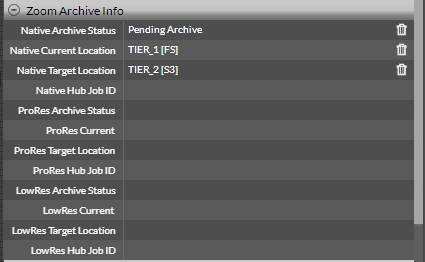
- Click Archive. Check the Zoom Archive Info metadata group. The archive status for the corresponding resolution gets updated to Pending Archive and the Native Target Location gets updated to reflect the destination. For the example shown below, the Native Target Location is the Tier 2 S3 bucket.
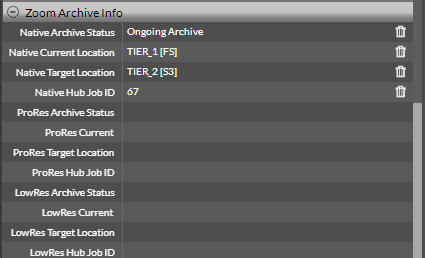
- Later, when this request is picked up by the Hub for processing, the status changes to Ongoing Archive and a job ID is also assigned to the operation. This job ID can be used for searching in the hub dashboard to get the most recent status of the asset/job.
- If the request is invalid for some reason, the status changes to Failed Archive.
- Correspondingly, the hub dashboard shows the updated job status. Initially, it shows a job’s status as Pending. At this point, the hub is waiting to inspect the assets in the job to estimate the time of completion.

- After that the status changes to Not Started, and then proceeds to File Copy Started / External Copy Started, Completed, Failed etc depending on the outcome at each stage.


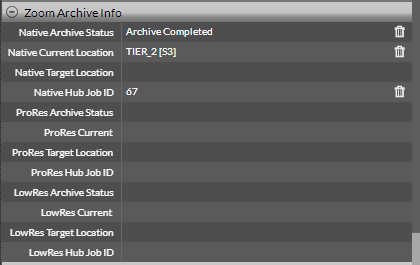
- After completion of a request, the status gets updated to Completed Archive and the Native Target Location is set to empty once again.
The asset’s chosen proxy is now archived. The Archived assets are identified by the Archive icon on their thumbnails. Check that their Archiving metadata shows that these are on Tier 1.
A similar flow is followed for restoring assets.