The Search and Execute feature generates reports containing some basic information. In 7.6.2 and above, the media managers can customize the information that gets captured in the reports. This article will walk you through the steps to configure and customize the report generation.
For a recap about running the Search and Execute actions from the Asset Browser, look at this article.
Steps to Customize Search Reports
- Log in to your Web Management Console. Open Server Control Panel from the System node in the Admin Menu sidebar.
- Click Search and Execute to open its settings.
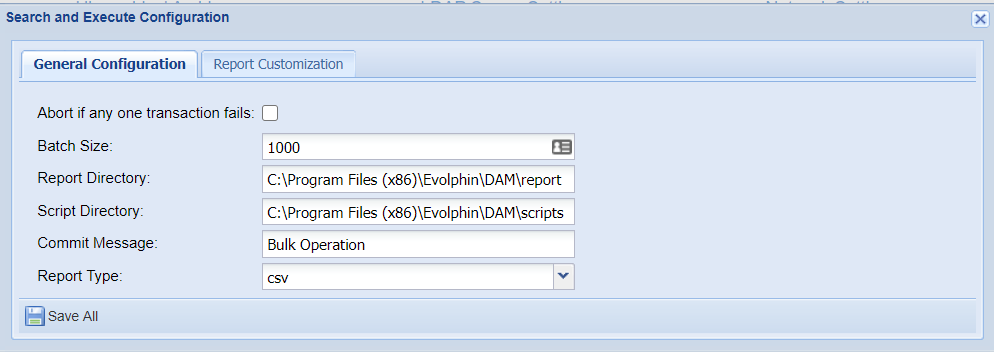
- Make sure to enter appropriate values for the report paths and the report file format.
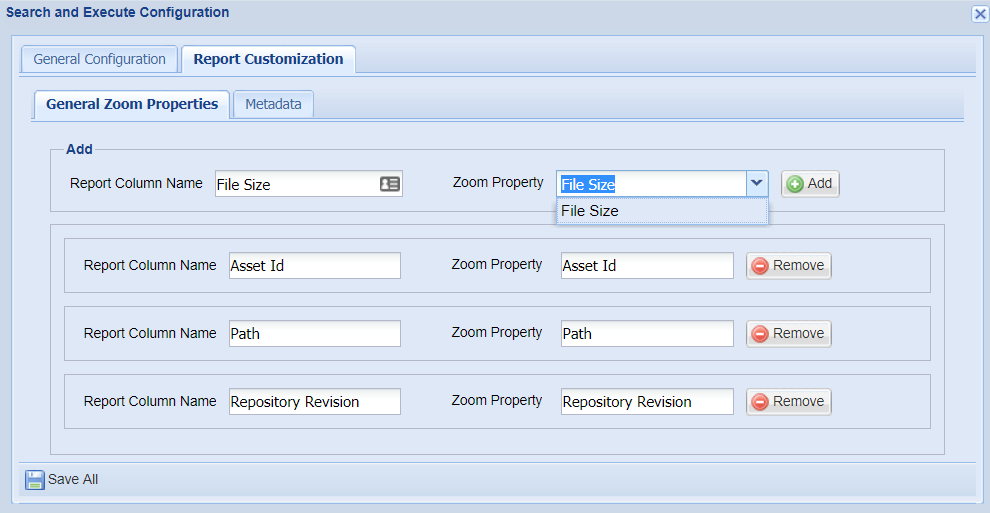
- Click on Report Customization tab.
- By default, you will see
Asset Id,PathandRepository Revisionincluded in the settings under General Zoom Properties. You can retain these fields as they are, or remove them. In addition to these, you could also include theFile Sizeproperty from the Zoom Property drop-down. These are generic properties associated with the Zoom assets.
- Click on the Metadata tab. This contains a drop-down list of all the metadata properties defined on the Zoom server from which you could select one or more properties to be included in the reports.

- Click on Add / Remove as required, to arrive at the final set of properties that will be included in the Search report.
- Note that the column names you want to print in your report may be customized too. They need not be the same as the property name as defined inside the Zoom eco-system. To change the column name, while selecting the property to be added, enter the name you want in the field labeled Report Column Name.
- Don’t forget to click on Save All.
- On clicking to save, if you find an alert as shown below, it is because you have forgotten to click on Add after selecting a property from the drop-down, in one or more of the tabs.

After saving the configuration changes, you can generate reports from the Visual Asset Browser as usual. The generated report will contain as columns all the properties that you have asked to include in the settings. For each of the asset that has matched the search criteria, the values corresponding to these properties, if defined, will be added to the report.
Periodic Search & Execute
Zoom 7.6.3 and above offers the ability to schedule automatic and periodic execution of specific actions, on assets matching pre-defined search criteria. Here is how you can set this feature up.
Framework Configuration
- Log in to your Web-based management console and open the Search and Execute Settings from the Server Control Panel.
- Click on the tab labeled “Periodic Saved Search”
- Configure the frequency of executing the actions.
- Select the action to be executed on the matched assets.
- If you only need a report generated, and nothing else, then select “No Action”.
- Save and exit.

Marking Searches for Periodic Execution
- Launch the Visual Asset Browser.
- Click on Search tab, and open Settings icon on the Advanced Search panel.
- Select the desired Saved Search from the list. (You can save any of your recent searches if you do not already have any Saved Searches).
- Click on the triangle icon to mark it to run periodically.
- On clicking, the icon will turn into a clock icon as shown in the right hand side.


You can mark as many of the Saved Searches to run periodically, as you wish. All the Saved Searches will be picked up and executed repeatedly according to the frequency configured on the server side settings. All assets matching the Saved Search parameters, will then be submitted to the “Action” configured on the server side settings. If “No Action” is specified, a report containing the matched assets’ details will be saved periodically on the server location.
If you want to remove a Saved Search from periodic run, simply click on the clock icon, to unmark it.
Only superadmin users can mark / unmark Saved Search for periodic runs.