Once all the setup for VideoFX is complete as described here, we are ready to see VideoFX flow in action. The VideoFX flow starts from the source file on the Client machine and ends on the low-res proxy checked-in to the Zoom MAM Server. Check here to see the diagrammatic flow.
VideoFX flow
Check the flow with a valid high-res file. Follow these steps as a guideline:
- Get a valid high-res file for checking-in on a VideoFX enabled Zoom Client. Drop the file into the Asset Browser.
- The check-in dialog will be shown where you can set the metadata properties. Set the desired properties and click Check-In.

- Successive messages are shown while executing pre-hook and post-hook.

 If the hook scripts encounter any errors then the configuration for VideoFX should be revisited. Check configuration settings in the script installers and also check the script log for more details. For a Windows system, the script logs will be in [ScriptInstallationRoot]\zoom-deploy\logs. For a Linux system, the logs will be in [ScriptInstallationRoot]/zoom-deploy/logs.
- A message for import complete is shown to the user. Click OK.

- The placeholder file is checked-in for this high-res asset.

- The icon
 below the asset name shows that this is a high-res asset.
 - The low-res proxy is generated and checked-in after a while.

- The metadata shows information about the high-res (native) file.

- Information about low-res proxy is also shown.

- When the pro-res is generated then information about pro-res is also updated.

- Check that the proxy flag is true.

Archiving on-demand with VideoFX
- If archiving on-demand was enabled in your VideoFX setup, then select Create Job for this asset from the context menu.

- This will bring up the Create Job form that was added for archiving/restoring.
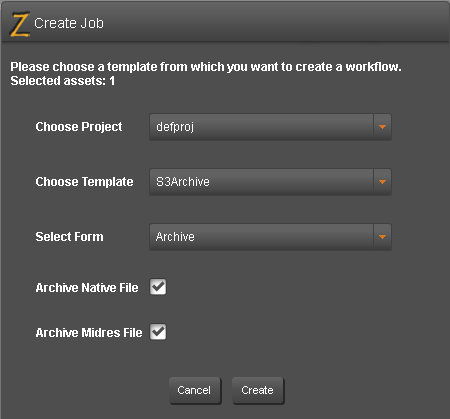
- Select your template and choose which files and proxies should be archived. Click Create.
- The job will be submitted for processing and it will run in the background. When the job will complete, the metadata related to archiving is updated to show the status of the asset. The archiving status will show as ‘Copied to External System’ (as per the messages set in the config.ini of your script installers, described here). This status means that the asset has only been copied to the external archive, but not removed from the original location.
 If archiving fails for the asset, then check archive configuration settings in the script installers. Also, check the script logs for more information. For a Windows system, the script logs will be in [ScriptInstallationRoot]\zoom-deploy\logs. For a Linux system, the logs will be in [ScriptInstallationRoot]/zoom-deploy/logs.
- To remove the asset from the original location, you need to archive it again. Select Create Job for this asset from the context menu. In the Create Job form, select the archiving template and files. Click Create. When the archiving job is complete, the metadata related to archiving is updated to show the status of the asset.

- Now, restore this asset. Select Create Job for this asset from the context menu. In the Create Job form, select the restoring template and files. Click Create.

- When the restoring job is complete, the metadata is updated to show that the asset is restored and now in Zoom/network storage.
